Introduction
There’s something magical about a dessert that combine s rich chocolate, creamy cheesecake, and juicy cherries all in one bite. This Black Forest Cheesecake Bliss is exactly that—a heavenly treat that captures the essence of indulgence. Inspired by the classic Black Forest cake, this cheesecake variation takes the best flavors of the traditional German dessert and elevates them into a velvety, baked cheesecake that will impress both family and guests alike. Whether you’re preparing it for a holiday, a birthday, or simply to satisfy your sweet tooth, this dessert is bound to steal the show.
 Print
PrintBlack Forest Cheesecake Bliss
- Total Time: 5 hours 30 minutes (including chilling)
- Yield: 12 servings 1x
- Diet: Vegetarian
Description
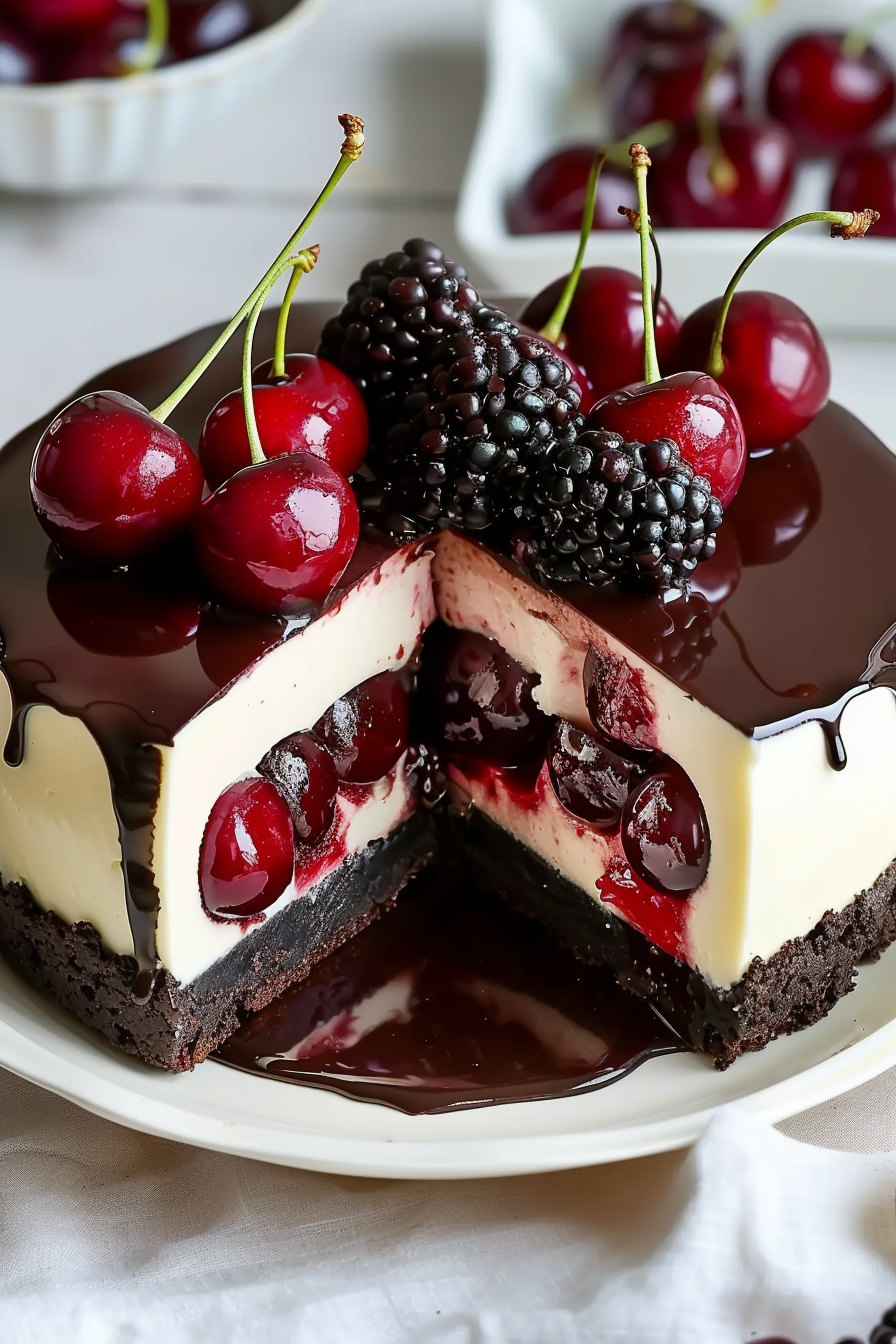
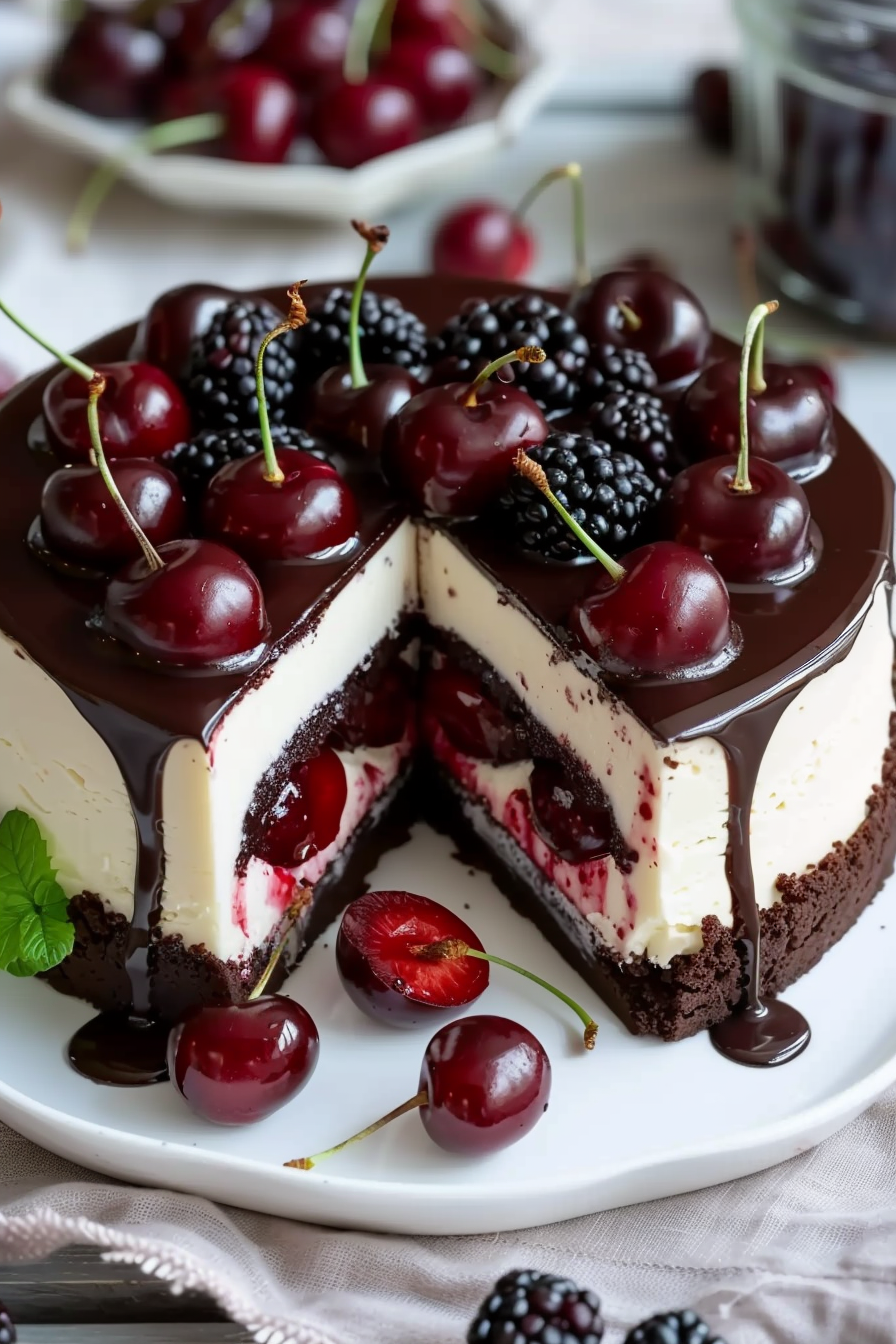
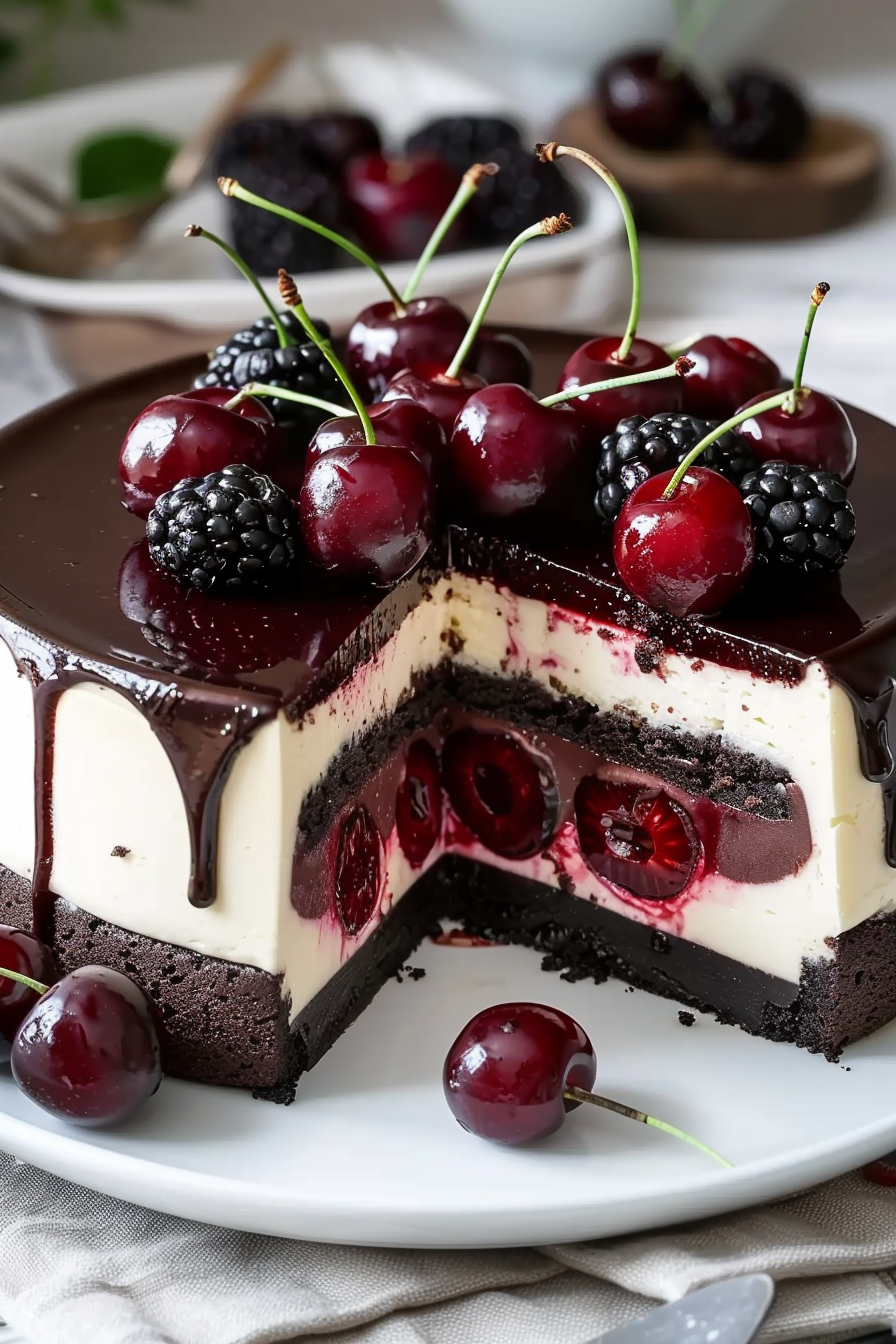
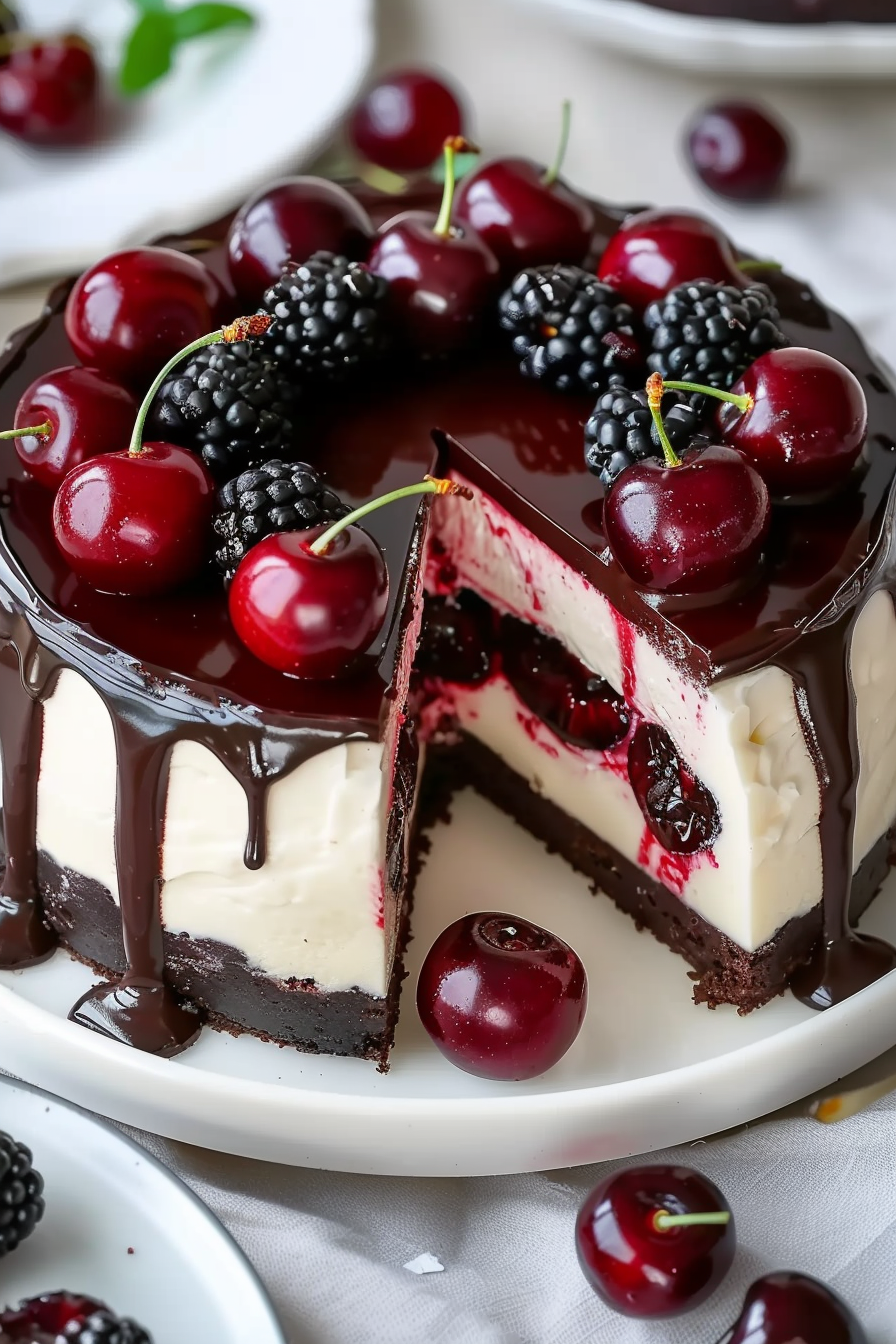
A decadent cheesecake with a chocolate cookie crust, creamy chocolate filling, and luscious cherry topping. Perfect for celebrations.
Ingredients
-
2 cups chocolate cookie crumbs
-
1/2 cup unsalted butter, melted
-
16 oz cream cheese, softened
-
1 cup sugar
-
1 cup sour cream
-
3 large eggs
-
1 cup melted dark chocolate
-
1 tsp vanilla extract
-
2 cups pitted cherries (fresh or canned)
-
1/2 cup sugar (for cherry filling)
-
1 tbsp cornstarch
-
1/2 cup water
-
1 tbsp lemon juice
-
Whipped cream, for topping
-
Chocolate shavings, for garnish
-
Extra cherries, for decoration
Instructions
-
Preheat oven to 325°F (160°C). Mix cookie crumbs and melted butter, then press into a springform pan. Bake for 10 minutes, then cool.
-
Beat cream cheese until smooth, add sugar, then blend in sour cream. Mix in eggs one at a time, then stir in chocolate and vanilla.
-
Pour batter over crust and bake 50–60 minutes until center is set but slightly jiggly. Cool in oven 1 hour, then chill at least 4 hours.
-
In a saucepan, cook cherries, sugar, cornstarch, water, and lemon juice over medium heat until thickened. Cool completely.
-
Spread cherry topping over chilled cheesecake. Garnish with whipped cream, chocolate shavings, and extra cherries before serving.
Notes
Best made a day ahead for easier slicing. Store covered in the refrigerator for up to 5 days or freeze without topping for up to 2 months.
- Prep Time: 30 minutes
- Cook Time: 1 hour
- Category: Dessert
- Method: Baking
- Cuisine: American
My Recipe Story
The first time I made this Black Forest Cheesecake Bliss was for a family gathering during the holidays. I had been craving the flavors of Black Forest cake but wanted something a little creamier and more decadent. That’s when I decided to merge my love for cheesecake with this iconic cherry-chocolate duo. The result was incredible—every slice disappeared quickly, and the dessert became the star of the evening. Since then, this cheesecake has been my go-to recipe whenever I want to impress or treat my loved ones. Over time, I perfected the layers, ensuring the crust was just the right amount of crunchy, the filling was luxuriously smooth, and the cherry topping balanced sweetness with a hint of tartness. This recipe has since become a cherished favorite in my kitchen.
Why You’ll Love This Recipe
- Decadent Layers: The combination of a chocolate cookie crust, creamy chocolate cheesecake, and cherry topping is unbeatable.
- Show-Stopping Appearance: Garnished with whipped cream, cherries, and chocolate shavings, this cheesecake looks as good as it tastes.
- Versatile: Perfect for birthdays, holidays, or dinner parties, it fits any celebratory occasion.
- Make-Ahead Friendly: You can prepare this dessert a day in advance, making it stress-free for hosting.
- Customizable: Easily adaptable with different fruits, chocolates, or toppings depending on your preference.
Ingredient Breakdown
Every ingredient in this Black Forest Cheesecake Bliss serves an important purpose in building its luxurious taste and texture. Let’s take a closer look at why these components matter and how they create the perfect harmony.
The crust is made with chocolate cookie crumbs and melted butter, giving a crisp yet rich base that balances the creamy filling. The cream cheese forms the heart of the cheesecake, providing smoothness and tang that complements the chocolate. Sour cream adds an extra layer of creaminess and helps stabilize the texture, while eggs give the cheesecake structure without making it heavy. The addition of dark chocolate intensifies the flavor and ensures a deep, luscious taste.
Of course, cherries are the star of the topping. Using pitted cherries with sugar, lemon juice, and cornstarch creates a glossy, fruity sauce that balances the richness of the cheesecake. The finishing touches—whipped cream, chocolate shavings, and extra cherries—add visual appeal and flavor variety, making every bite indulgent and satisfying.
Equipment You’ll Need
- 9-inch springform pan
- Mixing bowls (various sizes)
- Electric mixer or stand mixer
- Rubber spatula
- Measuring cups and spoons
- Saucepan
- Whisk
- Baking sheet (for water bath, optional)
- Cooling rack
Step-by-Step Directions
Step 1: Prepare the Crust
Preheat your oven to 325°F (160°C). In a mixing bowl, combine the chocolate cookie crumbs with the melted butter until evenly coated. Press the mixture firmly into the bottom of a greased springform pan to create a smooth, compact base. Bake the crust for about 10 minutes, then remove and allow it to cool completely before adding the filling. This step ensures the crust sets properly and won’t become soggy once the cheesecake mixture is added.
Step 2: Make the Cheesecake Batter
In a large mixing bowl, beat the softened cream cheese using an electric mixer until it reaches a smooth, lump-free consistency. Gradually add sugar and continue mixing until fully incorporated. Blend in the sour cream to add creaminess and subtle tang. Next, beat in the eggs one at a time, mixing just enough after each addition to incorporate without overbeating. Finally, stir in the melted dark chocolate and vanilla extract until the batter is silky and evenly colored.
Step 3: Bake the Cheesecake
Pour the cheesecake batter over the cooled crust, spreading it evenly with a spatula. Place the springform pan on a baking sheet; for extra precaution against cracking, you may bake it using a water bath. Bake for 50–60 minutes, until the edges are set but the center still has a slight jiggle. Turn off the oven, crack the door open, and allow the cheesecake to cool inside for one hour. This gradual cooling helps prevent cracks. Afterward, transfer it to the refrigerator to chill for at least 4 hours or overnight.
Step 4: Make the Cherry Filling
While the cheesecake is chilling, prepare the cherry topping. In a saucepan, combine the cherries, sugar, cornstarch, water, and lemon juice. Cook over medium heat, stirring constantly until the mixture thickens and turns glossy. This will take about 8–10 minutes. Once it coats the back of a spoon, remove from heat and allow it to cool completely. The topping should have a sweet-tart balance with a vibrant red sheen.
Step 5: Assemble and Serve
Once the cheesecake is fully chilled, spread the cooled cherry topping generously over the surface. Decorate with dollops of whipped cream around the edges, sprinkle with chocolate shavings, and garnish with extra cherries for presentation. Slice with a sharp knife, wiping between cuts for clean slices. Serve chilled and enjoy every bite of this decadent masterpiece.
Variations & Substitutions
While the traditional combination of chocolate and cherries is hard to beat, there are plenty of ways to put your own spin on this cheesecake. Try swapping the chocolate cookie crust with a graham cracker base for a milder flavor. If cherries aren’t available, raspberries or strawberries make excellent substitutes for the topping. For a slightly lighter dessert, you can use reduced-fat cream cheese, though the texture may be less creamy. White chocolate can also be used instead of dark chocolate for a sweeter twist, or you can mix milk and dark chocolate for balance.
Expert Tips & Troubleshooting
- Avoid cracks: Don’t overbeat the eggs, and allow the cheesecake to cool gradually in the oven after baking.
- Use room-temperature ingredients: Softened cream cheese and eggs help create a smooth, lump-free batter.
- Prepare a water bath: Baking in a water bath provides gentle, even heat and reduces the risk of cracking.
- Chill thoroughly: Refrigerate for at least 4 hours—overnight is best—for proper setting and flavor development.
- Slice cleanly: Use a hot knife, wiped clean between slices, for professional-looking presentation.
Storage, Freezing & Make-Ahead
This cheesecake can be stored in the refrigerator, covered loosely with plastic wrap, for up to 5 days. For longer storage, freeze the cheesecake without the cherry topping. Wrap it tightly in plastic wrap and then in foil to prevent freezer burn. It can be frozen for up to 2 months. Thaw overnight in the refrigerator before serving, and add the cherry topping once defrosted. For make-ahead convenience, you can bake the cheesecake the day before your event, chill it overnight, and assemble with toppings right before serving.
Serving Ideas & Pairings
This Black Forest Cheesecake Bliss pairs wonderfully with a variety of beverages and sides. Serve it with a hot cup of coffee or espresso to balance the sweetness, or pair it with a glass of red wine such as Merlot or Pinot Noir for an elegant finish. For lighter pairings, fresh fruit or a simple berry salad works beautifully. If you’re serving this at a party, consider pairing it alongside lighter desserts like fruit tarts or lemon bars for contrast. Whipped cream on the side is always a crowd-pleaser, especially for guests who love an extra dollop of indulgence.
FAQ
Can I use canned cherries instead of fresh?
Yes, canned cherries work perfectly for the topping. Just make sure to drain them well before using.
Do I need to use a water bath?
It’s optional but recommended. A water bath helps the cheesecake bake evenly and reduces the chance of cracks.
Can I make this gluten-free?
Yes, simply use gluten-free chocolate cookies for the crust, and ensure your chocolate is gluten-free.
How do I know when the cheesecake is done?
The edges should be set while the center remains slightly wobbly. It will firm up as it cools.
Can I prepare the cherry topping in advance?
Absolutely. You can make the cherry topping up to 2 days ahead and store it in the refrigerator until ready to use.
Final Thoughts
This Black Forest Cheesecake Bliss is more than just a dessert—it’s an experience. From the crunchy chocolate crust to the creamy filling and luscious cherry topping, every bite is a celebration of flavors and textures. It’s the perfect showpiece for any occasion, and with a few expert tips, it’s easy to achieve bakery-quality results at home. Whether you’re sharing it with loved ones or treating yourself, this cheesecake promises to deliver a slice of pure indulgence.