Introduction to the Recipe
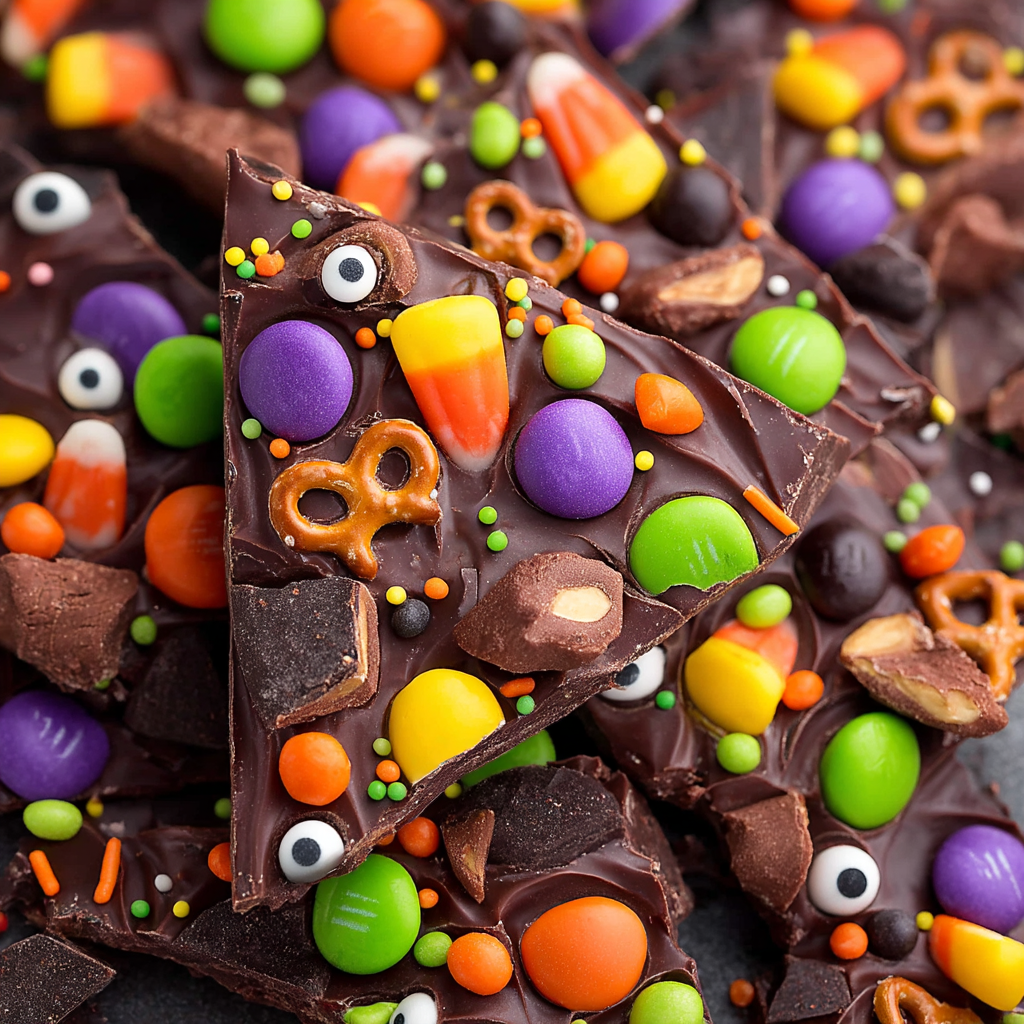
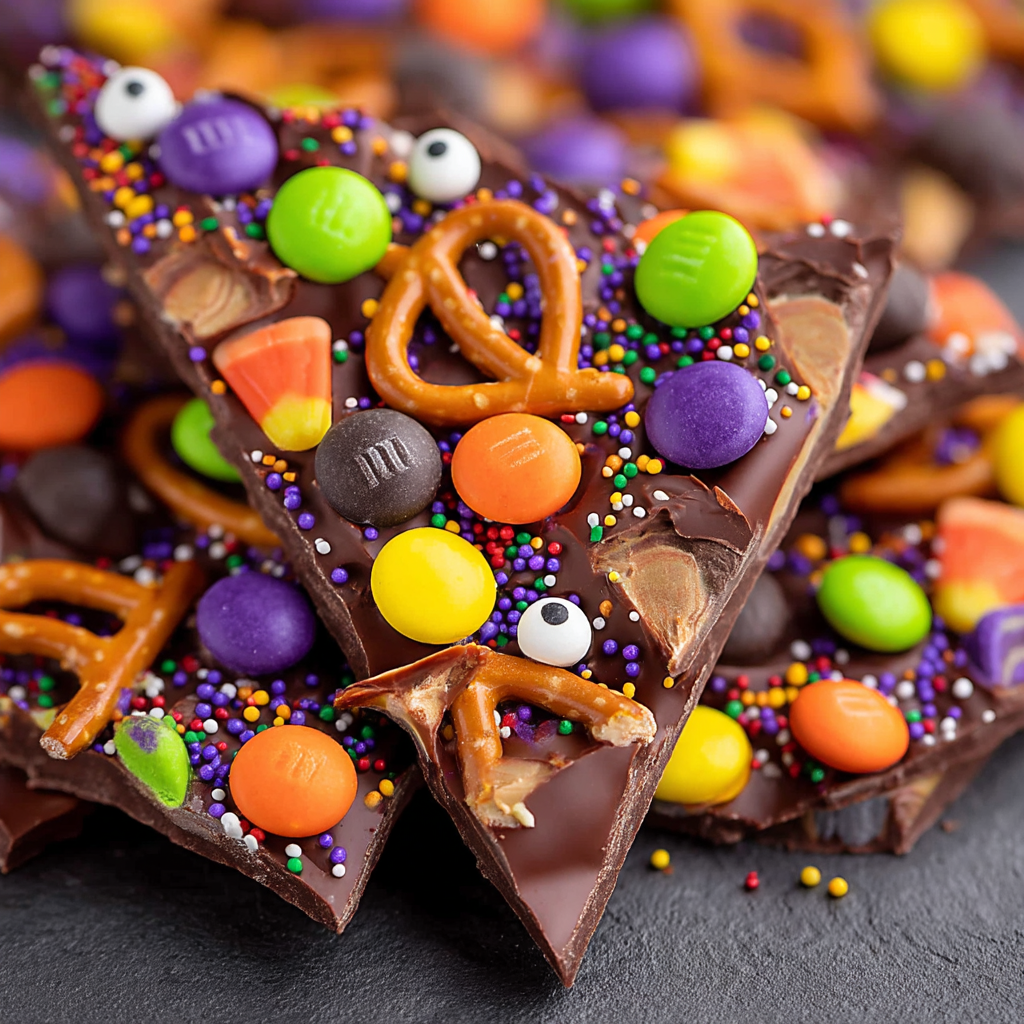
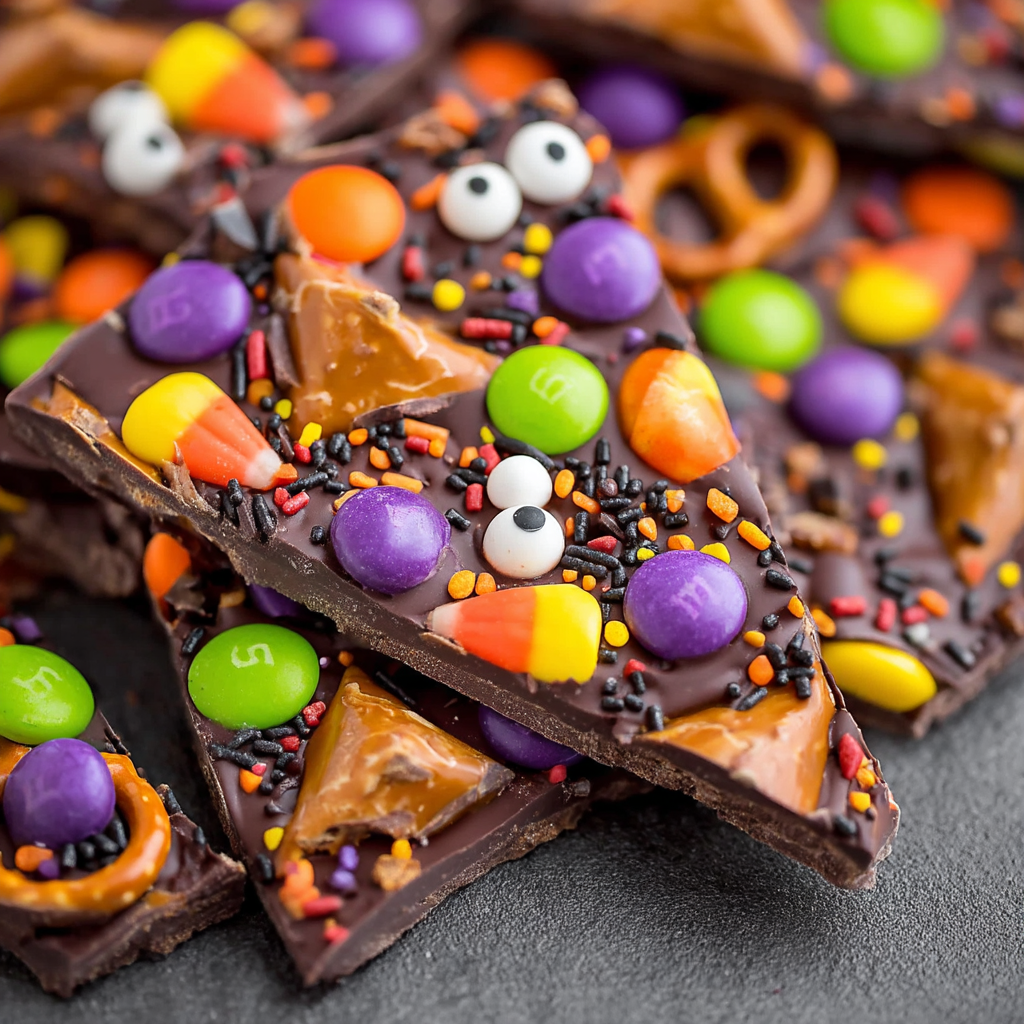
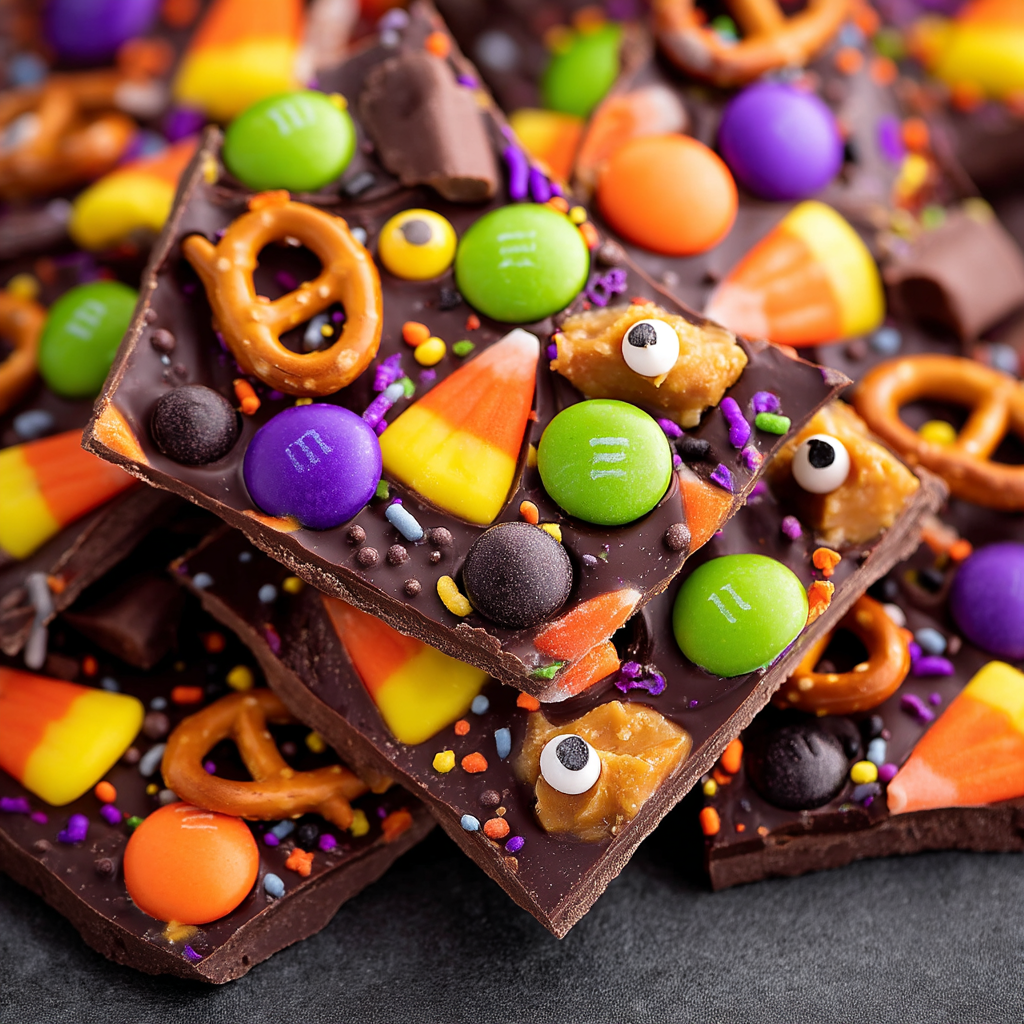
Spooky season just got sweeter with this utterly fun and festive Boo Bark! Halloween chocolate bark. Imagine rich swirls of dark, milk, or white chocolate scattered with candy eyeballs, candy corn, sprinkles, and festive Halloween bits—this is a treat that charms kids and adults alike. Whether you’re preparing a dessert table for a haunted house party or simply craving something playful and indulgent, this chocolate bark recipe is a standout, combining simplicity and creativity.
The beauty of this bark lies in its versatility: you can mix different types of chocolate or candy melts (white, milk, dark) and layer or swirl them for a marbled effect. Then, as you press your Halloween-themed toppings on, you turn a basic bark into a dramatic “boo!” statement. For inspiration on chocolate tempering or breaking the bark cleanly after it sets, you might check out a guide on chocolate tempering techniques or a deep dive into making candy melts work beautifully. By weaving simple chocolate skills with festive flair, this Boo Bark! becomes an easy yet show-stopping Halloween staple.
This recipe leans on just a handful of ingredients—12 ounces of chocolate (or candy melts), a touch of vegetable or coconut oil (optional for smoothing), and an assortment of Halloween-themed toppings (think candy corn, pumpkins, eyeballs, seasonal M&Ms, sprinkles). What you get is a recipe that’s as customizable as your imagination. You can make it classic dark-chocolate heavy, swirl in white chocolate accents, or go full-on candy overload. The Boo Bark! moniker gives it that perfect SEO-friendly hook—not too long, but specific and fun.
Whether you’re making this in bulk for a party or in small batches for trick-or-treat handouts, this recipe allows flexibility and creativity. In the sections below, you’ll find the basic ingredient list and instructions, advanced techniques to elevate your bark, storage tips to maintain freshness, substitutions for dietary needs, answers to common FAQs, and a warm wrap-up. Let’s dive right into crafting your spookiest, most mouthwatering Boo Bark! yet.
Basic Recipe: Ingredients and Instructions
Print
Boo Bark! – Halloween Chocolate Bark Recipe
Description
A spooky and fun Boo Bark! Halloween chocolate bark recipe—easy to make and customizable for all your tricks and treats.
Ingredients
- 12 ounces of chopped chocolate, chocolate chips, or candy melts (you may choose white, milk, dark, or a combination)
- ½ tablespoon vegetable oil or coconut oil (optional, helps with flow and gloss)
- Halloween-themed toppings, such as:
• Candy corn
• Candy pumpkins
• M&Ms (Halloween colors)
• Candy eyeballs
• Seasonal sprinkles
• Mini marshmallows (optional)
• Halloween bark bits or themed candies
Instructions
- Prepare a baking tray
Line a rimmed baking sheet (about 9×13″ or similar) with parchment paper or a silicone mat. Make sure the surface is flat and clean. - Melt the base chocolate
In a microwave-safe bowl or in a double boiler, melt about two‑thirds (8 ounces) of your chocolate or candy melts.
– Microwave method: heat in 20- to 30-second bursts, stirring in between until mostly melted but with a few unmelted bits, then stir to complete.
– Double boiler method: set a heat-proof bowl over (not touching) simmering water, melt gently stirring until smooth. - Add the optional oil
Once mostly melted, stir in the ½ tablespoon of vegetable or coconut oil to improve flow and give the bark a glossier finish. - Incorporate remaining chocolate (optional layering/swirl)
If you’re doing a marbled look, melt the remaining 4 ounces of a contrasting chocolate (e.g. white if base is dark). Then gently drizzle or swirl it into the melted base chocolate after pouring (see Step 6). - Pour onto tray
Immediately pour the melted chocolate onto the prepared baking sheet, spreading it to your desired thickness (¼ inch to ½ inch). Use an offset spatula or the back of a spoon to smooth it out or leave it slightly rustic. - Add toppings and swirl (if desired)
Before the chocolate sets, sprinkle on your Halloween candies, eyeballs, sprinkles, etc. If using a second color chocolate, drizzle it in lines and drag a toothpick or skewer to create swirl patterns. - Set the bark
Let the bark sit at room temperature until completely firm (about 1 to 2 hours, depending on ambient temperature). Alternatively, place it in the refrigerator for 20–30 minutes to speed up the process. - Break or cut into pieces
Once set, lift the bark off the parchment or mat and break or cut it into irregular shards. Store or serve immediately.
Notes
Temperature matters: Avoid overheating chocolate (especially candy melts), as they can seize or become grainy.
Work quickly with toppings: The moment you pour the chocolate, you have limited time before it starts to set—have all your toppings ready.
Thickness tip: If you make your bark too thick, it will take much longer to set and be harder to break neatly.
Uniform pieces: If you prefer consistent shards, use a sharp knife or bench scraper to score straight lines before full hardening, then break along lines once set.
Keywords: Boo Bark! – Halloween Chocolate Bark Recipe
Advanced Techniques
Here are five advanced techniques to elevate your Boo Bark! beyond basic:
1. Tempering for Snap and Gloss
When you temper chocolate, you align the cocoa butter crystals, giving the bark a professional gloss and cracking snap. To temper, use the seed method: melt two‑thirds of your chocolate to about 45 °C (113 °F), remove from heat, then stir in the remaining third (chopped) to bring it down to around 31 °C (88 °F) for dark chocolate (slightly less for milk or white). If the temper is correct, the chocolate will set firm at room temperature with a shiny finish. This step prevents bloom (white streaks) and gives the bark that satisfying break. It takes a bit more care and a reliable thermometer, but the result is worth it.
2. Creating Multi‑Layered Barks with Flavor Layers
You can elevate your bark by layering flavors. For example, pour a base layer of dark chocolate, allow it to set halfway, then pour a thin middle layer of peanut butter or caramel, and top with white chocolate. Another approach is to use flavored melts (mint, orange, pumpkin spice) for alternating layers, giving visual contrast and distinct taste surprises in each shard. Just ensure each layer firms enough to support the next, but not so firm that they fail to adhere.
3. Swirl and Marble Artistry
Beyond just sprinkling, swirl designs add elegance. After pouring your base chocolate, drizzle a contrasting color (e.g. white) in parallel lines or random zigzags. Use a skewer or toothpick to drag through lines in alternating directions, forming hearts, waves, or spider-web patterns. Practice on a scrap first to get flow control. The trick is not over-mixing; preserve contrast between the layers. The visual drama makes your Boo Bark! feel artisanal.
4. Embedding 3D Candy Effects
To create a raised, 3D look (for example, eyeballs partially sinking, candy pumpkins sticking out), pour a thin base chocolate coat and let it firm slightly. Then add a little extra dot of chocolate where each candy will go (a “glue” drop), place the candy, then pour remaining chocolate over or around it. The candy appears embedded but still protruding. This technique gives depth and dimension, especially with eyeballs or gummy shapes, making the bark more visually dramatic.
5. Flavor Infusions and Textural Contrasts
You can infuse flavors or textures into your bark to surprise the palate. Try sprinkling a pinch of flaky sea salt over top (working with sweeter candies). Or mix in toasted nuts (if not allergic), crushed cookies, or puffed cereal for crunch. You might steep a vanilla bean in melted white chocolate, or add a drop of orange or peppermint extract (just a little, not overwhelming). Combining smooth chocolate with crunchy or chewy bits (like candy corn or brittle shards) takes your bark from expected to exceptional.
See more advanced recipes at cookingwhite.com
Storage, Shelf Life, and Maintenance Tips
Here are five essential tips to keeping your Boo Bark! fresh and delicious:
1. Room Temperature Storage in Airtight Containers
Store the bark in a cool (below 70 °F/21 °C), dry room (away from sunlight). Use rigid airtight containers or tins lined with parchment or wax paper, layering parchment between layers of bark to prevent sticking. At room temperature, the bark will maintain its texture and flavor for about 1 to 2 weeks if stored properly.
2. Refrigerator Storage for Warm Climates
In warmer households where ambient temperature approaches the melting point of chocolate, you can store the bark in the refrigerator. Place it in an airtight container (to avoid absorbing odors) and allow it to come to room temperature before serving (to avoid condensation forming on the surface). Refrigerated bark can last 3 to 4 weeks, though the texture might slightly firm—still delicious.
3. Freezing for Long-Term Preservation
If you need to store the bark for extended periods, freezing works well. Wrap pieces in parchment or freezer paper, then place them in sealable freezer bags or airtight containers, removing as much air as possible. Frozen bark can keep well for up to 3 months. Thaw it slowly in the refrigerator overnight, then bring to room temperature before opening to prevent condensation.
4. Avoiding Moisture and Humidity
Chocolate is hygroscopic, meaning it readily absorbs moisture, which can cause “sugar bloom” (white spots) or a dull surface. Always store in low-humidity environments, avoid opening containers outdoors on humid days, and ensure your hands/tools are dry when handling. If condensation occurs, let the bark dry inside a closed container (unopened) at room temperature before serving so moisture dissipates.
5. Refresh the Appearance Before Serving
If some bloom or dullness develops, you can re-warm the top layer slightly with a hairdryer (on low heat) from a distance or place it briefly near warm surfaces (not hot). Then lightly buff with a soft cloth or do a quick re-spray of tempered cocoa butter (if you have). Doing so can revive shine. Also, before serving, break into fresh shards (toss off any that look whitish) to present the best pieces.
Dietary Adaptations and Substitutions
Here are five ways to adapt Boo Bark! for various dietary needs:
1. Vegan / Dairy‑Free Version
Use dairy-free dark or “vegan” chocolate or candy melts made without milk products. Many specialty baking brands offer vegan chocolate chips or melts. For the optional smoothing oil, use refined coconut oil or a neutral-tasting plant oil. Make sure your toppings (candies, eyeballs, sprinkles) are also vegan (no gelatin, no milk-derived coatings). The process remains the same; the result is a cruelty-free Boo Bark!.
2. Gluten‑Free Adjustment
The base recipe is naturally gluten-free, as long as you choose ingredients (especially toppings) labeled gluten-free. That means checking labels on candy corn, sprinkles, cookies, or other decorative bits to ensure no cross-contamination or biscuit dust. Always pick certified gluten-free toppings to avoid hidden wheat ingredients.
3. Low‑Sugar / Sugar‑Reduced Option
You can use sugar-free or reduced-sugar chocolate or sugar-free candy melts. These are available from specialty baking brands (look for stevia-, erythritol-, or monk fruit–sweetened options). Be cautious: these alternative chocolates may behave slightly differently when melting (they can seize more easily), so add them slowly, stir gently, and don’t overheat. Use sugar-free or low-sugar toppings (sugar-free sprinkles, sugar-free candy corn) to keep the entire bark consistent.
4. Nut‑Free / Allergy‑Safe Adaptation
If nut allergies are a concern, avoid using any nut-based ingredients (peanut butter, nut-containing candies, nut brittle bits). Choose toppings and chocolate processed in nut-free facilities. If you normally incorporate nuts for texture, substitute them with safe alternatives like crispy rice cereal, pretzel bits (gluten-free version if needed), or seeds (e.g. pumpkin seeds) for crunch.
5. Flavor Variations / Alternative Bases
Instead of traditional chocolate, consider using yogurt-based or compound wafers (for milder flavor), or even carob melts for cocoa-free preference. You can swirl in fruit purees or spreads (raspberry, passion fruit) in thin patterns within the bark to add tang and color, substituting part of the chocolate. Another variation is mixing in a small percentage (say 10 %) of cocoa nibs, freeze-dried fruit bits, or crispy quinoa for texture. Just ensure compatibility with melting behavior.
FAQs About the Recipe
Here are five frequently asked questions—answered in depth:
1. Why did my chocolate seize or become grainy?
Chocolate or candy melts can seize (turn lumpy or grainy) if they come into contact with even a tiny bit of moisture. Avoid steam or water droplets entering your bowl or utensils. Also, overheating chocolate, especially white or milk, can cause fat separation or graininess. To fix seized chocolate: add a small amount of warm neutral oil (like vegetable or melted cocoa butter) and stir gently to bring it back together. Always melt slowly and stir often.
2. Why is my bark dull and losing shine?
That’s probably due to bloom, either fat bloom or sugar bloom. Fat bloom happens when chocolate isn’t properly tempered, causing the cocoa butter to migrate and form whitish streaks. Sugar bloom arises when moisture hits the surface, dissolving sugar crystals and then recrystallizing. To minimize dullness, temper the chocolate, store bark in a dry environment, and allow pieces to come to room temperature in sealed containers. You can gently buff out minor bloom with a soft cloth or re-warm the surface slightly (low heat) to resurface.
3. How thin or thick should I make the bark?
A thickness around ¼ to ⅜ inch is usually ideal: thin enough to break easily, thick enough to hold toppings securely. If it’s too thin, heavier candies may cause fracture or break off. If too thick (½ inch or more), it may take too long to set or be harder to break neatly. Use an offset spatula to control even spreading and always monitor set time if thickness varies.
4. Can I add liquids or extracts for flavor?
Yes, but carefully. Small amounts (½ teaspoon or less) of extracts (vanilla, peppermint, orange, almond) can add a flavor dimension. However, avoid adding watery liquids (juice, heavy syrups) as they’ll disrupt the chocolate’s structure and risk seizing. If adding extract, stir it in after the chocolate is fully melted and stable—don’t exceed recommended small amounts.
5. Why is my bark cracking badly or breaking too cleanly?
If it cracks too easily or breaks in thin, brittle shards, it may be over-tempered (crystallized too strongly) or cooled too quickly (especially in the fridge). Also, ambient temperature changes (hot-cold shifts) cause stress cracks. To avoid this, let your bark set more gradually at a stable room temperature. If you refrigerated it, bring it back to room temp slowly before handling. Slight imperfection in breakage often looks more artisanal and is totally fine.
Conclusion & Final Thoughts
In the end, Boo Bark! Halloween chocolate bark is more than just a seasonal treat—it’s a fun, customizable, and relatively effortless way to impress your guests, delight children, or indulge your own Halloween cravings. With a base of 12 ounces of chocolate or candy melts, a whisper of smoothing oil, and your favorite spooky toppings (candy corn, eyeballs, sprinkles, pumpkin candies), this bark balances simplicity with creativity.
This recipe is special because it lets you lean into your imagination. Want a haunting white‑and-orange swirl? Go for it. Prefer deep dark chocolate with candy eyes and a sprinkle of sea salt? That works too. The techniques in the “Advanced” section help you elevate the aesthetics and textures—from tempering properly to embedding 3D candies—turning a scattered bark into a visually arresting centerpiece. Storage guidance means your creations stay fresh longer, whether at room temp, chilled, or frozen. Adaptations open it up to vegan, gluten-free, low-sugar, or allergy-safe versions, making Boo Bark! accessible to many dietary preferences. FAQs offer troubleshooting so you don’t get tripped up by seizing chocolate or bloom.
Whether you’re gifting pieces to neighbors, packing them for school parties, or arranging them on a dessert buffet, this bite-sized bark is perfect for Halloween’s festive energy. The shards are dramatic, the candy adornments bring instant charm, and the chocolate itself—when well-chosen and handled with care—delivers the decadent payoff. The recipe’s flexibility means it can scale up or down based on how many trick-or-treaters or party guests await.
So, grab your favorite chocolate (or mix of chocolate types), gather seasonal toppings, warm up that bowl, and get ready to shout “Boo!” with your bark. With the guidance above, your Boo Bark! will not only taste delicious but look delightfully haunting. Happy Haunting—and happy baking!