
Introduction
If you’re looking for a no-bake dessert that’s easy, nostalgic, and guaranteed to please a crowd, Chocolate Peanut Butter Balls with Rice Krispies are exactly what you need. These bite-sized delights combine the creamy richness of peanut butter with the subtle crunch of crispy cereal, all wrapped in a smooth layer of chocolate. They strike the perfect balance between sweet and salty, crunchy and creamy, and are ideal for any occasion.
Whether you’re preparing them for a holiday cookie tray, a school bake sale, or simply as a family snack, these peanut butter balls are an effortless way to impress. Best of all, they’re made with just a few pantry-friendly ingredients, and you don’t even need to turn on the oven!
My recipe story
I first discovered Chocolate Peanut Butter Balls when my grandmother made them during the holiday season. She would always include them on her cookie platters, nestled between fudge squares and sugar cookies. The moment I bit into one, the creamy peanut butter filling with that light crispy crunch had me hooked. Over the years, I started experimenting with my own versions—sometimes using creamy peanut butter, other times chunky, and occasionally swapping in different coatings for a twist.
Now, this recipe is a family tradition in my own home. My kids love helping roll the balls, while I handle the chocolate dipping. It’s one of those recipes that’s as fun to make as it is to eat, and the finished product always disappears quickly. If you grew up loving peanut butter cups, these homemade treats will taste like a nostalgic, slightly crunchier cousin.
💡 Why You’ll Love This Recipe
- No baking required, making it quick and stress-free.
- A perfect balance of creamy, crunchy, sweet, and salty flavors.
- Kid-friendly and fun to make together as a family activity.
- Customizable with different coatings, toppings, or nut butters.
- Great for holidays, gifting, parties, or just enjoying as a snack.
Ingredient breakdown
One of the best parts about this recipe is that it calls for simple, familiar ingredients. You probably already have most of them in your pantry, which makes it a convenient dessert to whip up when the craving strikes.
Peanut butter: The star of this recipe. You can use crunchy peanut butter for added texture, or creamy peanut butter if you prefer a smoother filling. Natural peanut butter works too, but make sure it’s well-stirred and not overly runny.
Butter: Softened unsalted butter helps bind the filling together and adds richness. If you only have salted butter on hand, you can still use it—just omit any added salt.
Powdered sugar: This sweetens the peanut butter mixture and gives it structure. It also prevents the filling from being too sticky, making it easier to roll into neat balls.
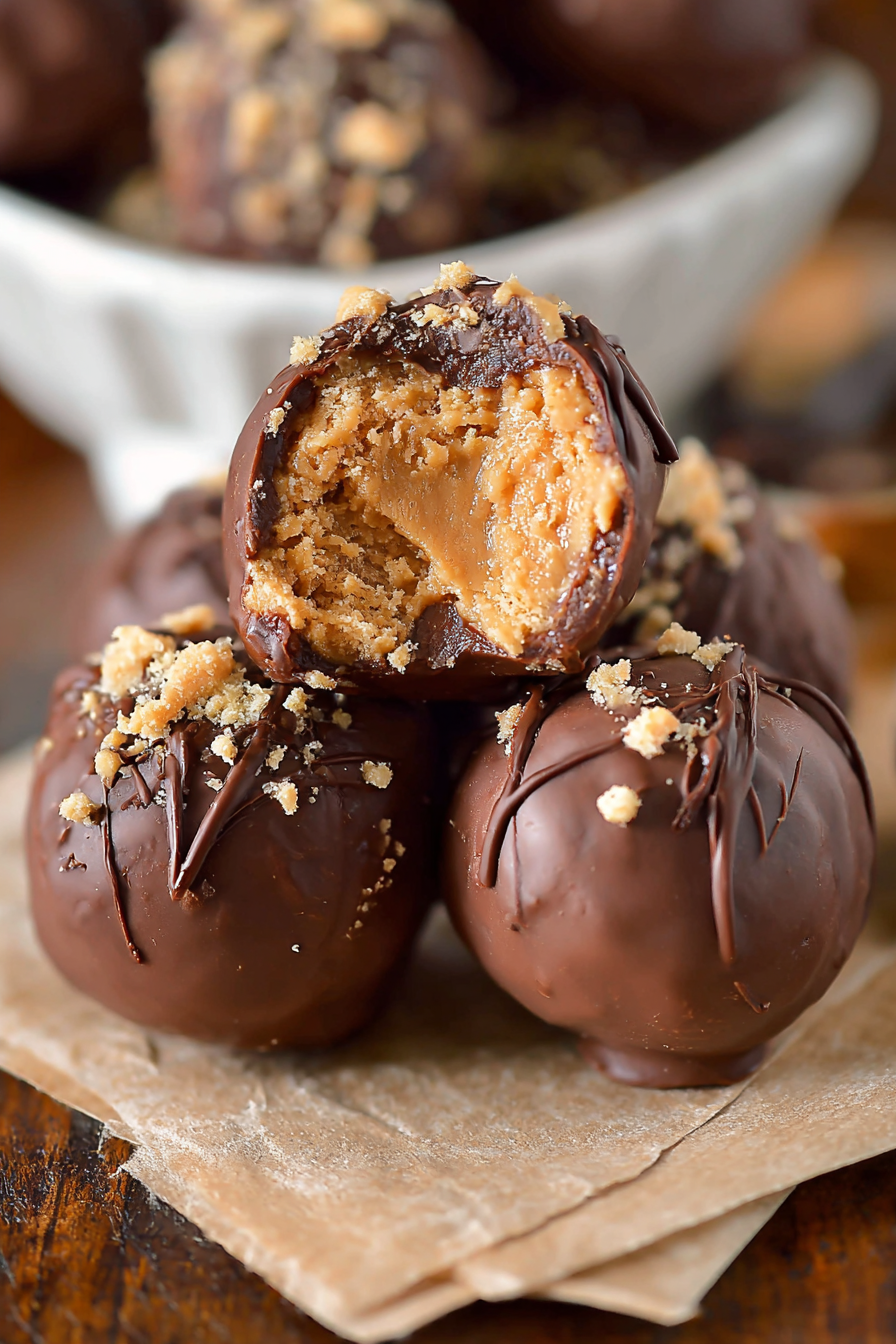
Rice Krispies cereal: The secret ingredient that gives these treats their delightful crunch. It adds a light, crispy texture that makes these peanut butter balls stand out from the classic version.
Chocolate: Melted chocolate forms the smooth coating that ties everything together. Semi-sweet or dark chocolate works beautifully to balance the sweetness of the filling, but milk chocolate is also an option if you like it sweeter.
Equipment you’ll need
- Large mixing bowl
- Electric hand mixer or sturdy spoon
- Measuring cups and spoons
- Baking sheet
- Parchment paper or wax paper
- Microwave-safe bowl or double boiler for melting chocolate
- Forks or dipping tool for coating balls
- Refrigerator space for chilling
Step-by-step directions
Step 1: Prepare the filling. In a large mixing bowl, combine the softened butter and peanut butter until smooth and creamy. Gradually add the powdered sugar, mixing until fully incorporated. The mixture should be thick enough to hold its shape. Stir in the Rice Krispies gently to maintain their crispiness.
Step 2: Shape the peanut butter balls. Scoop out small portions of the mixture (about 1 inch in diameter) and roll them into smooth balls using your hands. Place them on a parchment-lined baking sheet. If the mixture feels sticky, lightly dust your palms with powdered sugar to help roll them more easily.
Step 3: Chill before dipping. Place the tray of peanut butter balls in the refrigerator for at least 30 minutes. This step ensures the balls firm up and makes them easier to coat in chocolate without falling apart.
Step 4: Melt the chocolate. In a microwave-safe bowl, melt the chocolate in 30-second intervals, stirring after each until smooth. Alternatively, use a double boiler for a gentler melting process. Be careful not to overheat, as chocolate can seize.
Step 5: Dip and coat. Using a fork or dipping tool, lower each chilled peanut butter ball into the melted chocolate. Tap off excess chocolate gently and return the coated balls to the parchment-lined sheet. Repeat until all balls are coated.
Step 6: Chill and set. Once all balls are dipped, refrigerate the tray again for about 20–30 minutes, or until the chocolate has hardened. Store the finished treats in an airtight container until ready to serve.

Variations & substitutions
This recipe is versatile and can be customized to suit different tastes. Here are a few ways to switch it up:
- Swap peanut butter for almond butter or sunflower seed butter for a nut-free option.
- Use white chocolate or butterscotch chips instead of dark or milk chocolate for the coating.
- Roll the chocolate-coated balls in crushed nuts, sprinkles, or shredded coconut before the coating sets.
- Add a teaspoon of vanilla extract or a pinch of sea salt to the peanut butter mixture for extra flavor.
- Experiment with flavored cereals instead of plain Rice Krispies for a fun twist.
💡 Expert Tips & Troubleshooting
- If the mixture is too sticky, add a little extra powdered sugar until it firms up.
- Make sure the balls are well chilled before dipping, or they may fall apart in the chocolate.
- Use a fork for dipping to allow excess chocolate to drip off smoothly.
- If your chocolate thickens while dipping, rewarm it gently to restore its fluid texture.
- For a professional look, drizzle extra melted chocolate over the finished balls once set.
Storage, freezing & make-ahead
These peanut butter balls are perfect for making ahead of time. Store them in an airtight container in the refrigerator for up to 2 weeks. If you’d like to prepare them even earlier, they also freeze beautifully. Place the balls in a single layer on a baking sheet to freeze until solid, then transfer to a freezer-safe bag or container. They’ll keep for up to 3 months. When ready to enjoy, let them thaw in the refrigerator overnight or at room temperature for about 30 minutes.
Serving ideas & pairings
Chocolate Peanut Butter Balls are incredibly versatile when it comes to serving. Here are some ways to enjoy them:
- Arrange them on a holiday dessert tray alongside cookies and fudge.
- Package them in decorative tins or bags for thoughtful homemade gifts.
- Serve with a glass of cold milk, coffee, or hot cocoa for a cozy snack.
- Pair with fresh fruit like strawberries or banana slices for a fun dessert platter.
- Add them to a party dessert spread alongside cupcakes and brownies.
FAQ
Can I use natural peanut butter?
Yes, but make sure it’s well-stirred and not too runny, or the mixture may be too soft to hold its shape.
Do I have to use Rice Krispies?
No, but they add a wonderful crunch. You can omit them or replace them with crushed graham crackers or cornflakes for a similar texture.
What type of chocolate works best?
Semi-sweet chocolate is the most popular choice, but milk, dark, or even white chocolate can be used depending on your taste preference.
Can I make these ahead for a party?
Absolutely! These treats can be made several days in advance and stored in the fridge until serving.
Why are my peanut butter balls falling apart in the chocolate?
This usually happens if they weren’t chilled long enough. Make sure to refrigerate them before dipping for the best results.
Final thoughts
Chocolate Peanut Butter Balls with Rice Krispies are one of those timeless recipes that never go out of style. They’re simple to make, require no baking, and deliver a flavor combination that appeals to both kids and adults alike. Whether you’re preparing them for a holiday spread, gifting them to friends, or just treating yourself, these little bites of joy are always a hit. Give them a try, and you may just find yourself making them again and again as part of your family traditions.
Print
Chocolate Peanut Butter Balls with Rice Krispies
- Total Time: 1 hour 10 minutes
- Yield: About 40 balls 1x
- Diet: Vegetarian
Description
No-bake chocolate peanut butter balls with a crispy Rice Krispies crunch. Perfect bite-sized treats for holidays, parties, or snacking.
Ingredients
- 2 cups crunchy or creamy peanut butter
- ½ cup unsalted butter, softened
- 3 to 4 cups powdered sugar
- 3 cups Rice Krispies cereal
- 12 oz semi-sweet chocolate chips (or preferred chocolate)
- 1 tbsp shortening or coconut oil (optional, for smoother melting)
Instructions
- In a large mixing bowl, cream together peanut butter and softened butter until smooth.
- Gradually mix in powdered sugar until a thick dough forms.
- Gently fold in the Rice Krispies cereal until evenly combined.
- Roll the mixture into 1-inch balls and place on a parchment-lined baking sheet.
- Chill the balls in the refrigerator for 30 minutes to firm up.
- Melt chocolate chips with shortening or coconut oil in a microwave or double boiler until smooth.
- Dip each chilled peanut butter ball into the melted chocolate, coating evenly.
- Place coated balls back on the lined sheet and refrigerate until chocolate is set, about 20–30 minutes.
Notes
Store in an airtight container in the refrigerator for up to 2 weeks. For longer storage, freeze for up to 3 months and thaw before serving. These make excellent holiday gifts or party desserts.
- Prep Time: 40 minutes
- Cook Time: 0 minutes
- Category: Dessert
- Method: No-Bake
- Cuisine: American