Christmas Pinwheel Cookies
Introduction
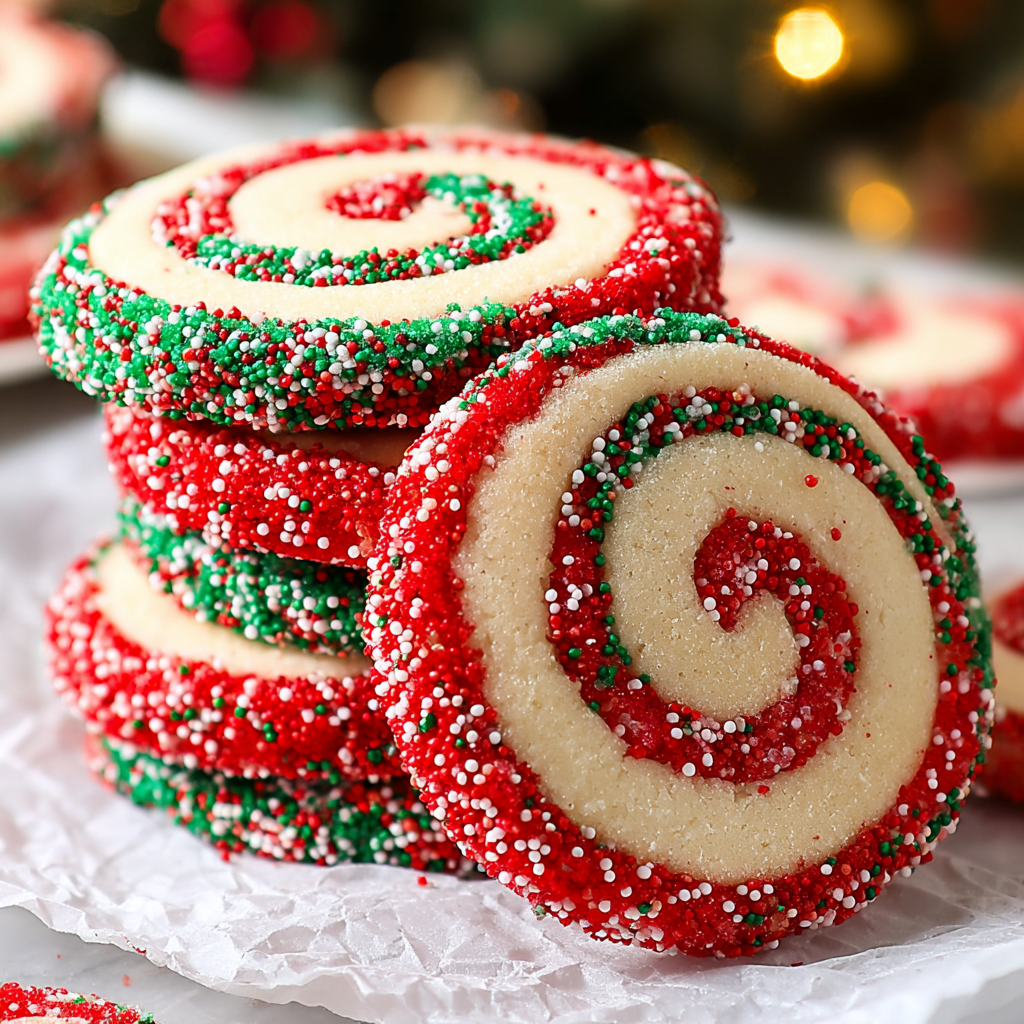
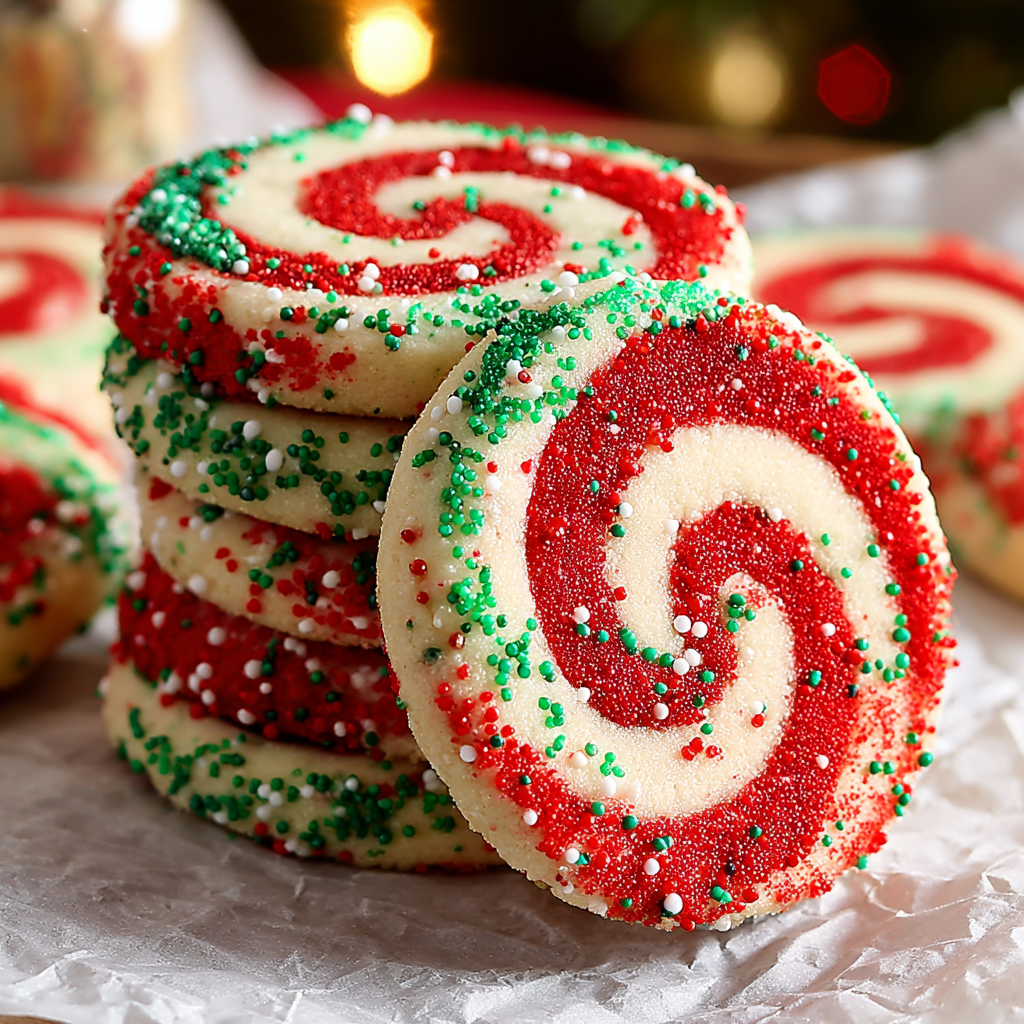
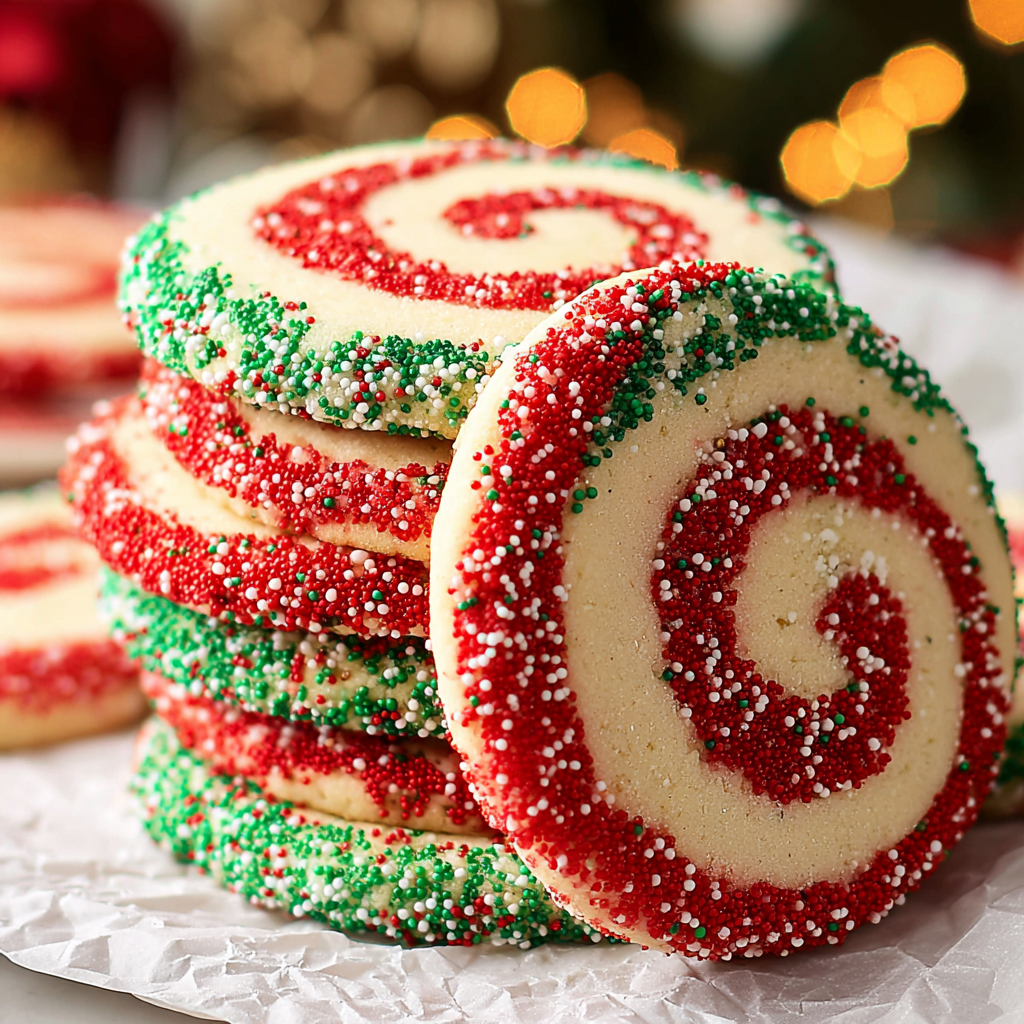
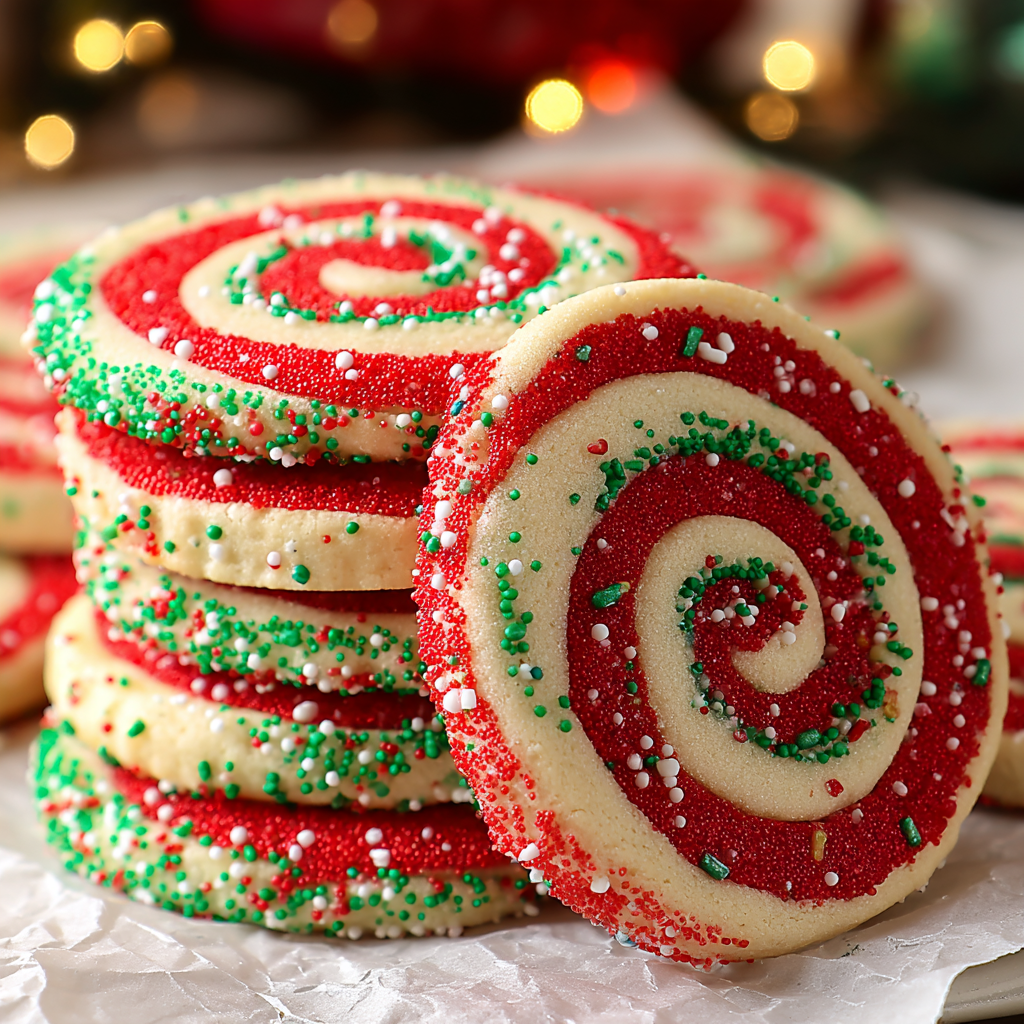
There’s something so enchanting about the sight of Christmas Pinwheel Cookies twirling on a holiday platter. With their cheerful red and green swirls and buttery vanilla aroma, these cookies instantly set the tone for the season. They’re a throwback to classic holiday baking — nostalgic, eye-catching, and absolutely delicious with a cup of hot cocoa or spiced tea.
I first started making these cookies years ago as part of a family cookie exchange, and they’ve since become one of my most-requested recipes. The beauty of these festive treats lies not only in their stunning spiral pattern but also in their texture — crisp at the edges yet soft and buttery in the center. The hint of vanilla keeps them classic, while the playful colors make them irresistible for kids and adults alike.
The technique might look intricate, but don’t be intimidated. With a little chilling and careful rolling, anyone can create these bakery-worthy swirls. The dough is simple — a traditional sugar cookie base that rolls easily and bakes evenly. Once baked, the cookies have a gorgeous sparkle thanks to a coating of red sanding sugar that gives them a subtle crunch and a festive glimmer.
If you’re looking for another show-stopping holiday bake, try these Peppermint Shortbread Cookies from King Arthur Baking, or browse Sally’s Baking Addiction’s Christmas Cookie Collection for more ideas. But for now, let’s create these beautiful Christmas Pinwheel Cookies — a perfect blend of buttery sweetness and holiday magic.
Christmas Pinwheel Cookies : Ingredients and Instructions
Print
Christmas Pinwheel Cookies – Festive Swirls of Holiday Cheer
Description
These Christmas Pinwheel Cookies are buttery, soft sugar cookies with bright red and green swirls and a hint of vanilla. Coated in sparkling sanding sugar, they’re festive, fun, and perfect for gifting or entertaining during the holidays.
Ingredients
- ⅔ cup unsalted butter, softened
- ⅔ cup sugar
- 1 large egg
- 1 teaspoon vanilla extract
- 1¾ cups all-purpose flour
- ½ teaspoon kosher salt
- ¼ teaspoon baking soda
- Red gel food coloring
- Green gel food coloring
- Red sanding sugar (for garnish)
Instructions
- Cream butter and sugar.
In a large mixing bowl, beat the softened butter and sugar together until light and fluffy (about 2 minutes). You can use a stand mixer or hand mixer for this step. - Add egg and vanilla.
Beat in the egg and vanilla extract until fully incorporated. - Combine dry ingredients.
In a separate bowl, whisk together the flour, salt, and baking soda. - Mix dough.
Gradually add the dry mixture to the wet ingredients, mixing until just combined. The dough should be soft but not sticky. - Divide and color.
Split the dough evenly into two portions. Tint one portion red and the other green using gel food coloring. Mix until colors are evenly distributed. - Roll out the layers.
On lightly floured parchment paper, roll each colored dough into an 8×10-inch rectangle of even thickness. Place the green layer on top of the red one, using the parchment to help align the edges. - Roll into a log.
Starting from the long side, tightly roll up the dough to form a spiral log. Wrap in plastic wrap and refrigerate for at least 2 hours (or up to overnight) to firm up. - Preheat and prepare.
Preheat the oven to 350°F (175°C). Line baking sheets with parchment paper. - Slice and sugar-coat.
Unwrap the chilled log, roll it in red sanding sugar to coat the outside, then slice into ¼-inch thick rounds. - Bake and cool.
Arrange cookies 2 inches apart on the baking sheet and bake for 10–12 minutes, until just set but not browned. Cool on a wire rack before serving.
Notes
Active time: 30 minutes | Chill time: 2 hours | Bake time: 10–12 minutes
The dough must chill thoroughly before slicing — this ensures the cleanest, most defined swirls.
Advanced Techniques For Christmas Pinwheel Cookies
Perfecting the Swirl Pattern
The most eye-catching part of Christmas Pinwheel Cookies is their mesmerizing swirl. The key is rolling the dough layers evenly and tightly. If the dough cracks while rolling, let it rest at room temperature for 5 minutes to soften. Using parchment paper underneath helps you guide the dough into a clean, smooth log. I like to refrigerate the rolled dough for 10 minutes mid-roll if it starts to get too soft.
Adding a Flavor Twist with Citrus or Peppermint
Want to elevate the flavor beyond classic vanilla? Add ½ teaspoon of peppermint extract for a cool, candy-cane-inspired twist, or a teaspoon of orange zest for a fresh, citrusy aroma that perfectly complements the buttery base. Both options turn a traditional cookie into a showstopper for your holiday dessert table.
Layering with Cocoa for a Chocolate Swirl
For a chocolate variation, mix 2 tablespoons of cocoa powder into one half of the dough instead of coloring it. The result? A beautiful red-and-chocolate spiral that tastes like a cross between a sugar cookie and a brownie — festive and indulgent at once.
Achieving Crisp Edges and Soft Centers
To get cookies that are soft in the middle and just crisp at the edges, keep a close eye on bake time. Remove them from the oven as soon as the centers look set — they’ll continue firming up as they cool. Overbaking can dull the colors and dry out the texture, so timing is everything here.
Decorating with Extra Sparkle
You can roll the dough log in a mix of red and green sanding sugar, or even edible glitter, for extra sparkle. I love doing this when I’m gifting these cookies — the sparkling edges catch the light beautifully and make them look like they came straight from a bakery window.
See more advanced recipes at cookingwhite.
Storage, Shelf Life, and Maintenance Tips
Keeping Your Pinwheel Cookies Fresh
Store cooled cookies in an airtight tin or container at room temperature. They stay fresh for up to 5 days and maintain their soft centers if kept sealed. Place a piece of parchment between layers to prevent sticking.
Freezing Dough Logs for Future Baking
This dough freezes wonderfully before baking! After wrapping your log in plastic and foil, freeze it for up to 2 months. When ready to bake, thaw slightly in the fridge for an hour, then slice and bake directly from chilled. It’s perfect for spontaneous holiday baking sessions.
Freezing Baked Cookies
If you prefer to bake first, freeze the fully cooled cookies in a single layer on a tray before transferring them to a freezer-safe bag. Thaw at room temperature — they’ll taste as good as fresh.
Reviving Day-Old Cookies
If your cookies lose a bit of softness after a few days, pop them in the microwave for 5–10 seconds. It revives their buttery texture instantly. You can also place a slice of bread in the container overnight to restore moisture.
Packaging for Gifting
I love gifting Christmas Pinwheel Cookies in clear cellophane bags tied with red ribbon, or stacked in decorative tins. They travel well and look beautiful as part of a cookie platter. Always let them cool completely before packaging to prevent condensation.
Dietary Adaptations and Substitutions
Gluten-Free Pinwheel Cookies That Still Hold Shape
Use a 1:1 gluten-free baking flour that includes xanthan gum. I’ve had great results with King Arthur’s Measure for Measure flour — the cookies bake up tender, and the swirls stay defined without spreading too much.
Making Them Dairy-Free
Replace the butter with a plant-based stick margarine or coconut oil (measured solid, not melted). The texture remains soft and tender, with a hint of coconut that pairs beautifully with vanilla and holiday spices.
Reducing Sugar Without Losing Flavor
You can reduce the sugar to ½ cup without affecting texture. For a natural sweetness, try replacing part of it with coconut sugar or maple sugar. The dough may brown slightly more, giving the cookies a lovely caramel hue.
Egg-Free Version for Allergy-Friendly Baking
Swap the egg with 1 tablespoon of flaxseed meal mixed with 3 tablespoons of water. Let it sit for 10 minutes to gel before adding. The cookies remain cohesive and flavorful, though slightly less puffy.
Natural Coloring Options
If you prefer to avoid synthetic dyes, use natural food coloring made from beet powder (for red) and spirulina or matcha (for green). The shades will be softer but still lovely — and you’ll keep things completely natural.
FAQs About the Recipe
Why Is My Dough Crumbling or Cracking?
If the dough seems dry or crumbly, it may have been overmixed or slightly over-measured in flour. Add 1–2 teaspoons of milk or cream and knead gently until it comes together smoothly.
Can I Use Liquid Food Coloring Instead of Gel?
Gel food coloring is best because it provides intense color without adding excess liquid. Liquid dyes can make the dough sticky and harder to roll neatly. If that’s all you have, reduce other liquids slightly.
Why Do My Cookies Lose Their Shape While Baking?
Make sure your dough is thoroughly chilled before slicing. If the log is too soft, the cookies will spread in the oven. I like to chill the sliced cookies on the baking sheet for 10 minutes before baking.
Can I Make the Dough Ahead of Time?
Absolutely! You can make the dough up to 3 days in advance. Keep it wrapped tightly in plastic and stored in the refrigerator. Slice and bake whenever you’re ready — perfect for busy holiday prep.
Can I Add Sprinkles or Chocolate Drizzle?
Yes! After baking, drizzle the cooled cookies with melted white chocolate and top with festive sprinkles. It’s a gorgeous, kid-friendly way to make them even more special.
Conclusion & Final Thoughts
Christmas Pinwheel Cookies are the kind of bake that instantly brings joy to your kitchen. They’re bright, buttery, and beautifully swirled — little edible works of art that taste every bit as good as they look. From the moment you slice through the chilled dough log and reveal those perfect spirals, you know you’ve created something magical.
What I love most is that these cookies combine playfulness with tradition. The red and green pattern captures the essence of Christmas, while the rich vanilla flavor keeps them timeless. Whether you’re baking with kids, assembling cookie tins for neighbors, or setting up a dessert table, these cookies are guaranteed to steal the show.
You can customize them endlessly — add peppermint for a refreshing twist, a drizzle of chocolate for extra indulgence, or swap colors for different holidays throughout the year. They’re fun to make, easy to store, and impossible not to smile at.
So this holiday season, put on your favorite Christmas playlist, dust your counter with flour, and roll up a batch of Christmas Pinwheel Cookies. With every swirl and sparkle, you’ll be baking a little piece of holiday happiness to share with everyone you love.