1. Introduction to the Recipe
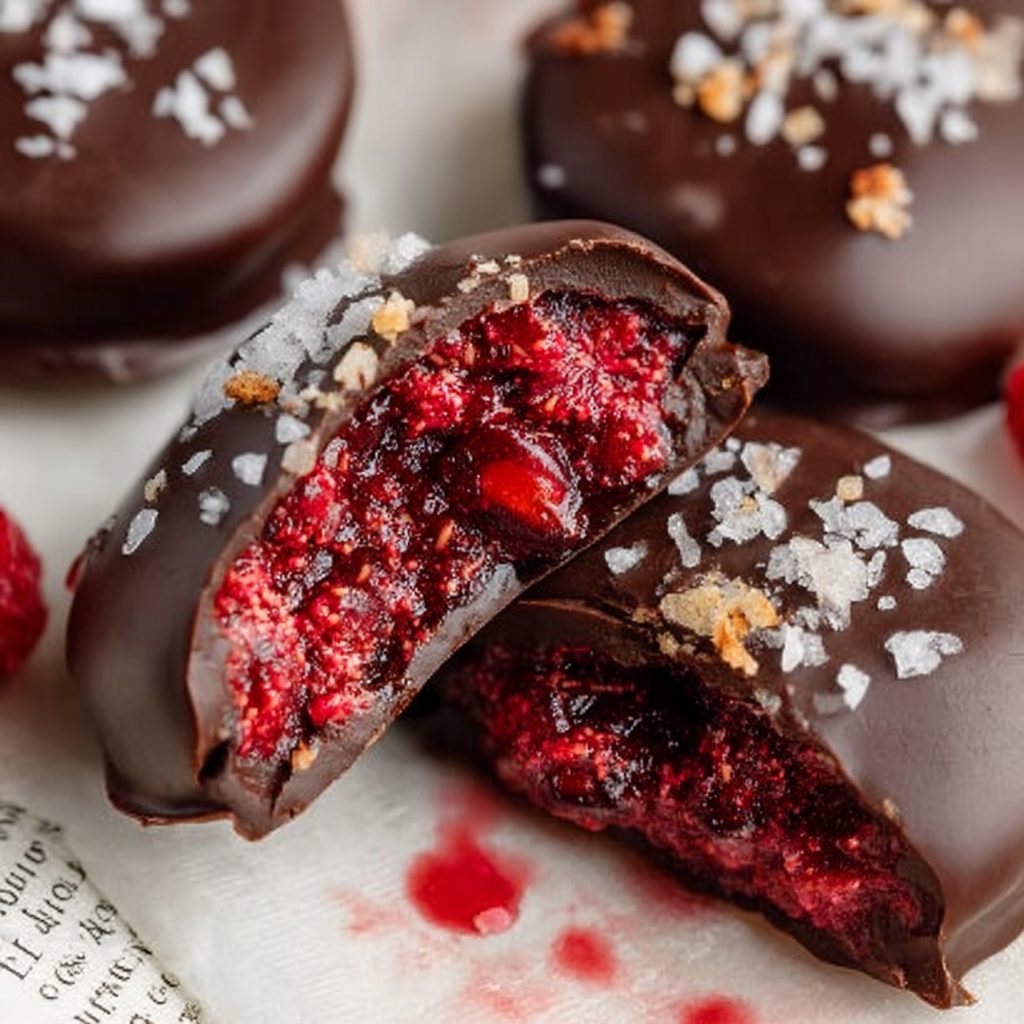
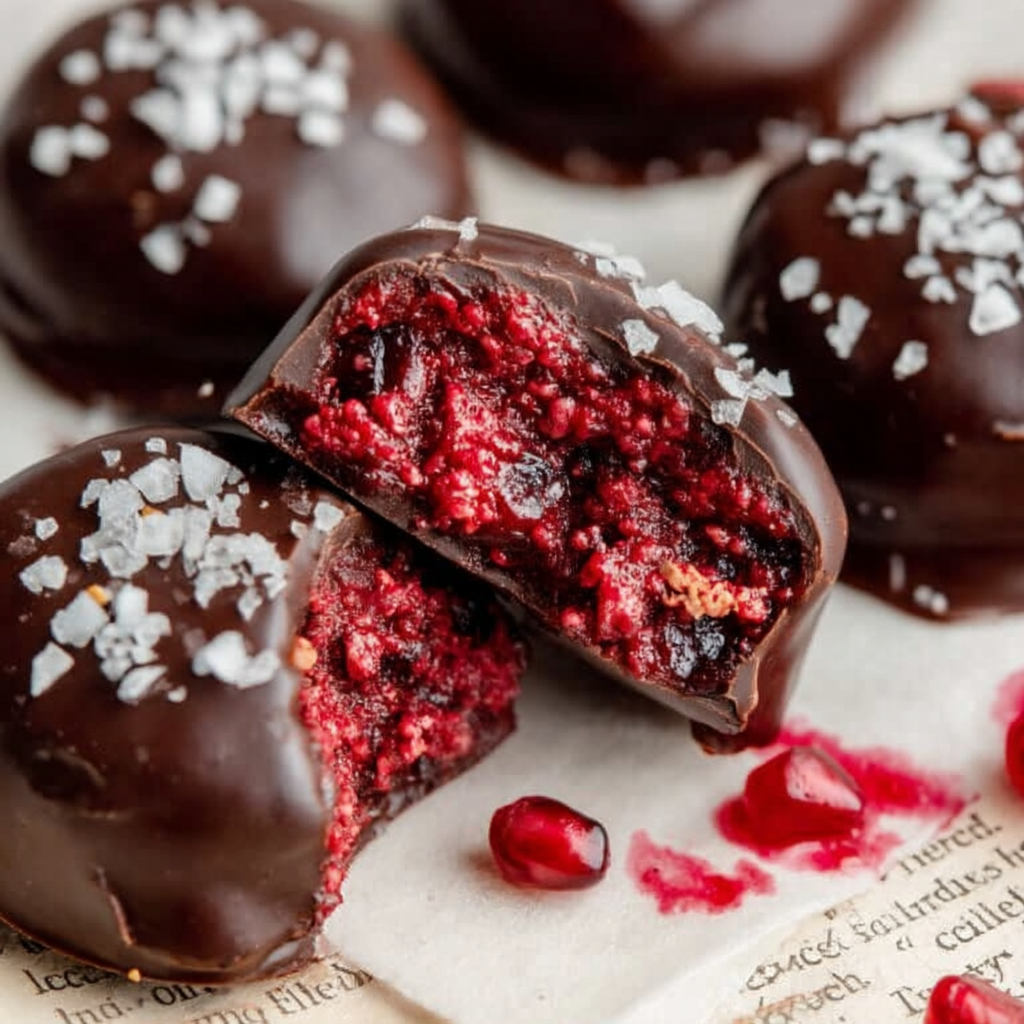
If you’re looking for a treat that strikes the perfect balance between indulgence and health-conscious ingredients, Dark Chocolate Jam Bites may be your next obsession. These bite-sized delights combine the richness of dark chocolate with a naturally sweet raspberry chia jam that’s bursting with flavor and texture. Whether you’re after a no-bake dessert, a refined sugar-free treat, or a simple snack with gourmet appeal, this recipe has you covered.
The recipe uses just a handful of wholesome ingredients: fresh or frozen raspberries, chia seeds for a natural thickener, rich dark chocolate, and a touch of coconut oil for that silky finish. It’s the ideal combination of textures — smooth, melty chocolate on the outside and a soft, jammy center inside. The optional touch of flaky sea salt elevates the flavor with a pop of contrast that makes each bite more complex and satisfying.
You don’t need fancy tools or techniques for this one — just a microwave or a double boiler and a silicone mold or mini muffin tin. It’s a great entry point into homemade chocolates and perfect for gifting, parties, or even freezing for a midweek pick-me-up.
For inspiration on other chocolatey creations, check out this healthy chocolate bark recipe or learn more about how to temper chocolate properly.
Whether you’re treating yourself or looking for a fun kitchen project to share with kids or guests, Dark Chocolate Jam Bites deliver decadence in miniature form. They’re naturally gluten-free, vegan-adaptable, and endlessly customizable — exactly what every good homemade sweet should be.
2. Basic Recipe: Ingredients and Instructions
Print
Dark Chocolate Jam Bites
Description
Dark Chocolate Jam Bites are sweet, fruity, and rich in flavor. These healthy, no-bake bites are quick to make and delicious.
Ingredients
- 1¼ cup (208g) fresh raspberries (or thawed frozen)
- 1 tablespoon chia seeds
- 1 cup (180g) dark chocolate chips or chunks
- 1 teaspoon coconut oil (optional)
- 1 pinch flaky sea salt (optional)
Instructions
- Make the Raspberry Chia Jam
In a small saucepan, heat the raspberries over medium heat until they begin to break down and bubble (about 5–7 minutes). Stir frequently, using a fork or spoon to mash them into a jam-like consistency. - Stir in Chia Seeds
Remove from heat and stir in the chia seeds. Let the mixture sit for 10–15 minutes until it thickens into a spoonable jam. Set aside to cool completely. - Melt the Chocolate
In a microwave-safe bowl or double boiler, melt the dark chocolate with the coconut oil, stirring until smooth. Be careful not to overheat. - Assemble the Bites
Spoon about 1 teaspoon of melted chocolate into each cavity of a silicone mold or mini muffin tin. Use the back of a spoon to spread chocolate up the sides. Chill for 5–10 minutes until firm. - Add the Jam
Spoon ½ to 1 teaspoon of raspberry chia jam into the center of each cavity over the hardened chocolate. - Seal with More Chocolate
Pour more melted chocolate over the jam, smoothing the tops. Optionally sprinkle with flaky sea salt. Chill again until fully set (about 30 minutes). - Unmold and Store
Pop the bites out of the mold and enjoy. Store in an airtight container in the fridge or freezer.
Notes
Use high-quality dark chocolate (70% or higher) for the best flavor.
Ensure the jam is fully cooled before assembling to avoid melting the chocolate shell.
Silicone molds make unmolding easiest, but mini muffin tins with liners also work.
Taste the jam — if it’s too tart, a tiny bit of maple syrup or honey can be added (not needed for most).
Keywords: Dark Chocolate Jam Bites
3. Advanced Techniques
How to Temper Chocolate for Shine and Snap
Tempering chocolate gives your bites a beautiful sheen and crisp snap. While not required, it’s a great skill to master. Melt 2/3 of your chocolate, then remove from heat and stir in the remaining 1/3 until melted and smooth. Use a thermometer: ideal working temp is around 88–90°F for dark chocolate.
Adding Layers of Flavor with Extracts or Zest
Enhance the jam with a few drops of vanilla or almond extract. For brightness, add lemon or orange zest to the chocolate. Just a small pinch transforms the bites from simple to sophisticated. Be careful not to overpower the natural raspberry flavor.
Using Molds for Professional Presentation
Silicone molds come in a variety of shapes — hearts, domes, even flowers. Using these adds charm to your presentation. Lightly spray with coconut oil for easier release, though this is usually unnecessary with flexible molds.
Sweetening the Jam Naturally
The jam is naturally sweet from the raspberries, but for those who want a bit more, stir in 1–2 teaspoons of maple syrup or honey while the jam is still warm. Stevia or monk fruit sweeteners can also be used for low-carb options.
Experimenting with Other Fruits or Add-Ins
You can substitute raspberries with blueberries, strawberries, or blackberries. Just follow the same steps for cooking down and adding chia. Crushed nuts, shredded coconut, or freeze-dried berries make great mix-ins for texture in the chocolate layer.
See more advanced recipes at cookingwhite.com

4. Storage, Shelf Life, and Maintenance Tips
Fridge Storage
Store your Dark Chocolate Jam Bites in an airtight container in the fridge for up to 7 days. Keep them in a single layer or use parchment between layers to prevent sticking. They taste best cold but can be eaten at room temperature too.
Freezing for Long-Term Storage
These bites freeze beautifully. Place them on a tray to freeze individually, then store in freezer-safe containers or bags. They last up to 3 months. Let them thaw for 5–10 minutes before eating for best texture.
Avoiding Moisture and Condensation
When moving bites from freezer to fridge or room temp, place them in a sealed container to avoid condensation forming on the chocolate surface. Moisture can cause chocolate to bloom (white streaks) — harmless but not pretty.
Reheating Chocolate Safely
If your leftover chocolate has hardened before sealing the bites, reheat gently using 15-second bursts in the microwave or a warm water bath. Stir between each interval to keep the chocolate smooth.
Preserving Freshness of Jam
Raspberry chia jam should be thick and not watery. Store any leftover jam separately in a sealed jar in the fridge for 4–5 days. Use on toast, yogurt, or more chocolate bites!
5. Dietary Adaptations and Substitutions
Vegan Adaptation
This recipe is easily made vegan — just ensure your chocolate is dairy-free (many dark chocolates are). Skip honey if adding sweetener, and use maple syrup or agave instead.
Low-Sugar or Keto Option
Use stevia-sweetened or sugar-free dark chocolate chips. Raspberries are already low in sugar, and chia seeds offer fiber and thickness. A keto-friendly sweetener can be used in the jam if needed.
Nut-Free Friendly
This recipe is naturally nut-free! Just double-check that the chocolate you use isn’t processed in facilities that also handle nuts if you’re cooking for someone with allergies.
High-Fiber Boost
Chia seeds already pack a fiber punch, but you can mix in ground flax or use additional berries for an even greater nutritional profile. A spoonful of oat fiber can also bulk up the jam.
Allergy-Friendly Version
All ingredients can be tailored for allergy concerns. Use allergy-safe chocolate (like Enjoy Life brand), skip coconut oil if allergic, and use a seed-based oil or just melt chocolate alone.

6. FAQs About the Recipe
Can I use store-bought jam instead?
Yes, but it should be thick and not runny. Store-bought jam won’t set as well in chocolate shells and may make the bites sticky. For best results, use low-sugar, natural jam or make your own — it only takes 10 minutes!
Why is my chocolate not smooth?
Overheating or moisture in the bowl can cause chocolate to seize. Use dry tools and melt chocolate slowly. Add coconut oil to help thin it if needed.
Can I make these with white or milk chocolate?
Absolutely. The method stays the same. Milk chocolate is sweeter, while white chocolate pairs wonderfully with tart raspberries. Just be careful — white chocolate burns easily, so melt gently.
How do I make this without a mold?
You can absolutely make Dark Chocolate Jam Bites without a silicone mold. Use mini paper cupcake liners in a mini muffin tin. Line the bottoms with chocolate, let it set, spoon in the jam, then top with more chocolate. Chill as directed. The paper liners peel off easily once set, and they’re great for grab-and-go storage.
Can I make these ahead for parties or gifts?
Yes! These bites are perfect make-ahead treats. Make them 2–3 days in advance and store in the fridge or freezer. If giving as gifts, use mini cupcake liners and box them up with wax paper between layers. Keep chilled until gifting to preserve their shape and sheen.
7. Conclusion & Final Thoughts
Dark Chocolate Jam Bites are proof that the best desserts don’t have to be complicated. With only five ingredients, you create a treat that’s indulgent, elegant, and entirely customizable to suit your cravings or dietary needs. Whether you’re making these for a weekend indulgence, a healthy-ish dessert, or a last-minute party treat, they always impress.
What’s most appealing about these bites is the beautiful harmony between the tart-sweet raspberry jam and the rich, smooth dark chocolate. The chia seeds provide subtle texture and natural thickness, eliminating the need for refined sugars or gelatin. A pinch of sea salt on top balances everything out and makes each bite pop.
They also store wonderfully, so you can make a batch ahead of time and keep them in your fridge or freezer for when the sweet tooth strikes. Even better, the recipe can be adapted to suit vegan, keto, or allergy-friendly needs without sacrificing flavor or satisfaction.
In a world full of complicated desserts, Dark Chocolate Jam Bites are refreshingly simple and endlessly delightful. Whether you’re sharing them or savoring solo, they deliver bite-sized bliss with every indulgent piece.