Craving a snack that feels indulgent but fuels your body with wholesome ingredients? These Dark Chocolate and Sea Salt Nut Bars strike that delicious balance between sweet, salty, crunchy, and chewy. Made with a trio of nuts, puffed rice, and a luscious dark chocolate coating, these no-bake bars are perfect for healthy snacking, gifting, or even a grab-and-go breakfast.
With just a handful of ingredients—cashews, peanuts, almonds, puffed rice, dark chocolate chips, and brown rice syrup—you can whip up a batch of these bars in under 20 minutes (plus chilling time). The sea salt and dark chocolate create a rich, satisfying contrast, while the puffed rice adds lightness and crunch. Think of these as your upgraded version of store-bought energy bars—cleaner ingredients, better texture, and way more flavor.
The key to success lies in the glue: brown rice syrup. This sticky, naturally sweet binder holds everything together without making the bars overly sugary. It also gives the bars that satisfying chewy texture you’d expect in a well-made snack bar. Want to understand the difference between binding agents like honey, maple syrup, and brown rice syrup? This article on natural sweetener substitutions is a helpful guide. And if you’ve never worked with puffed rice before, check out this detailed explainer on what it is and how to use it.
These Dark Chocolate and Sea Salt Nut Bars are gluten-free, dairy-optional, and highly customizable. Whether you’re meal prepping, packing school lunches, or simply satisfying your 3 p.m. snack attack, this recipe belongs in your regular rotation.
Basic Recipe: Ingredients and Instructions
Print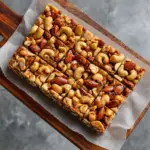
Dark Chocolate and Sea Salt Nut Bars
Description
Crunchy, salty, sweet! These Dark Chocolate and Sea Salt Nut Bars are the perfect no-bake snack with clean, wholesome ingredients.
Ingredients
-
2½ cups unsalted nuts (suggested: ¾ cup cashews, ¾ cup peanuts, 1 cup almonds)
-
½ cup puffed rice
-
¼ cup brown rice syrup
-
1½ teaspoons vanilla extract
-
½ teaspoon sea salt
-
1 cup dark chocolate chips
-
2 teaspoons coconut oil
-
Optional: flaky salt for topping
Instructions
-
Prep Your Pan:
Line an 8×8-inch baking pan with parchment paper, leaving overhang for easy removal. -
Mix the Base:
In a large mixing bowl, combine the nuts, puffed rice, and sea salt. Mix well. -
Heat the Syrup:
In a small saucepan over low heat, warm the brown rice syrup and vanilla extract until just loosened—do not boil. -
Combine and Press:
Pour the warm syrup over the nut mixture and stir to coat evenly. Press the mixture firmly into the prepared pan using a spatula or parchment paper. Make it as even and compact as possible. -
Melt the Chocolate:
In a microwave-safe bowl, melt the chocolate chips and coconut oil in 20-second intervals, stirring until smooth. -
Top the Bars:
Pour the melted chocolate over the nut base, smoothing into an even layer. Sprinkle with flaky salt if desired. -
Chill:
Refrigerate for at least 1 hour, or until chocolate is fully set. -
Slice and Store:
Use the parchment overhang to lift the bars from the pan. Slice into 12 bars or squares and store as directed below.
Notes
Feel free to use any nut combo—pistachios, pecans, or hazelnuts work beautifully.
If bars are too sticky, press a piece of parchment on top while cutting.
Don’t skip the coconut oil—it helps the chocolate set to a snappy finish.
Brown rice syrup is key for binding; honey and maple syrup won’t hold as well.
Advanced Techniques
1. Toasting the Nuts for Extra Depth
To bring out even more flavor, lightly toast your nuts before combining them with the syrup. Spread them on a baking sheet and toast in a 350°F (175°C) oven for 8–10 minutes. This step enhances the nuttiness and adds a warm, roasted depth that pairs wonderfully with the dark chocolate. Just let them cool before mixing with the syrup to prevent premature melting.
2. Layered Texture with Add-Ins
You can boost the texture and nutrition by folding in small extras like chia seeds, sunflower seeds, or even unsweetened coconut flakes. These additions provide a different crunch and keep the bars more exciting bite after bite. Limit add-ins to ¼ cup total to avoid compromising the bar structure.
3. Perfect Chocolate Tempering Without Tools
For a glossy chocolate top that doesn’t melt at room temp, temper the chocolate. Melt two-thirds of the chocolate chips, remove from heat, and stir in the remaining third until smooth. This lowers the temperature and creates stable crystals, giving you a shiny, snappy finish—without the need for candy thermometers or double boilers.
4. Ultra-Firm Bars with a Double Press Method
After initially pressing the nut base into the pan, chill it for 10 minutes, then press again with a spatula or a second pan. This double-press method helps eliminate air pockets and ensures your bars are firm and compact—key for cutting clean slices later.
5. Drizzling vs. Full Coating Chocolate
If you’re looking to reduce sugar or calories, opt for a chocolate drizzle rather than a full top layer. Use a fork to zigzag chocolate over the pressed bars before chilling. You’ll still get chocolate flavor in every bite, but with a lighter feel and faster setting time.
See more advanced recipes at cookingwhite.com
Storage, Shelf Life, and Maintenance Tips
1. Storing in the Fridge
Once set, store bars in an airtight container in the fridge. They’ll stay fresh for 7–10 days. Use parchment between layers to prevent sticking. The chilled environment keeps the chocolate firm and prevents melting in warmer climates.
2. Freezing for Long-Term Use
These bars freeze beautifully! Wrap each one in parchment paper and store in a freezer-safe container for up to 2 months. To eat, thaw at room temperature for 15–20 minutes, or enjoy slightly frozen for a firmer texture.
3. Keeping Bars from Getting Sticky
If your bars get sticky in humid environments, store them in the fridge with a silica pack (like the kind found in dried goods). Also, always ensure the chocolate layer is fully set before slicing or stacking.
4. Room Temperature Storage Tips
You can store these at room temperature for 2–3 days, especially if your environment is cool. However, the chocolate may soften. If storing on the counter, keep them in a dark, airtight tin to avoid melting or humidity absorption.
5. Best Containers for Transport or Lunchboxes
Use individual parchment wrappers or silicone snack bags for lunchboxes or snack packs. Bento boxes work well too. If packing for travel, place bars next to a mini ice pack to avoid melting.

Dietary Adaptations and Substitutions
1. Vegan-Friendly Version
This recipe is naturally vegan if you choose dark chocolate chips labeled dairy-free. Many brands like Enjoy Life offer vegan chocolate. Just double-check labels and swap honey (if used) with brown rice syrup or maple syrup for strict vegans.
2. Gluten-Free Assurance
These bars are inherently gluten-free, but always verify that your puffed rice and chocolate chips are certified gluten-free. Some puffed grains are processed in facilities that handle wheat, which can lead to cross-contamination.
3. Nut-Free Option
For a nut-free version, substitute sunflower seeds, pumpkin seeds, and crispy soy nuts for the nuts. Ensure all ingredients are labeled nut-free. This adaptation still gives a great crunch while being school-safe and allergy-friendly.
4. Low-Sugar or Keto-Friendly Swap
Use a sugar-free brown rice syrup alternative or make a binder using almond butter and monk fruit syrup. Replace regular chocolate with 90% dark chocolate or sugar-free chips like Lily’s. Be sure to reduce the amount of puffed rice or replace with hemp hearts for a lower-carb option.
5. Protein-Packed Snack Bars
To turn these into protein bars, add 2 tablespoons of your favorite protein powder to the nut mixture. You may need to slightly increase the syrup or add a tablespoon of nut butter to help bind the extra dry ingredients.
FAQs About the Recipe
1. Can I use maple syrup instead of brown rice syrup?
Technically yes, but the bars won’t hold together as well. Brown rice syrup is much stickier and thicker, which is key for no-bake bar integrity. Maple syrup tends to be runnier and may cause the bars to fall apart.
2. What if my bars are too hard or too soft?
If too hard, they may have been over-chilled or compacted too firmly. Let them sit at room temperature for 10–15 minutes before eating. If too soft, press more firmly next time or reduce syrup slightly. Make sure chocolate is completely set before slicing.
3. Can I make these without coconut oil?
Yes! Coconut oil helps the chocolate set smoothly, but it
can be omitted or replaced with a neutral oil like avocado oil. Just note the chocolate layer may be slightly softer or less glossy without it.
4. Why is my chocolate separating or dull?
This could be due to overheating. Use a microwave in 20-second intervals or melt gently over low heat. Avoid letting water get into the chocolate as it can cause seizing. For a shiny finish, try the tempering trick mentioned above.
5. How do I cut bars without cracking the chocolate?
Use a sharp knife dipped in hot water and wiped dry between cuts. Scoring the chocolate layer lightly before cutting all the way through also helps prevent cracking.
Conclusion & Final Thoughts
Dark Chocolate and Sea Salt Nut Bars offer the ultimate balance between indulgence and nutrition. With bold flavor, clean ingredients, and that addictive mix of crunch and chew, they’re a snack that feels like a treat but performs like fuel. Whether you’re packing them in lunchboxes, eating one after a workout, or pairing them with coffee during your afternoon slump, these bars deliver every time.
They’re also infinitely customizable. With just a few tweaks, you can make them nut-free, low-sugar, vegan, or high-protein. Plus, they store beautifully—making them ideal for batch prepping and reducing your reliance on store-bought snacks.
So go ahead—make a batch today. Your future self will thank you when that 3 p.m. craving hits and you have one of these chocolate-coated wonders ready to go.