Chocolate Peppermint Loaf: A Festive Delight
Indulge in Chocolate Peppermint Loaf
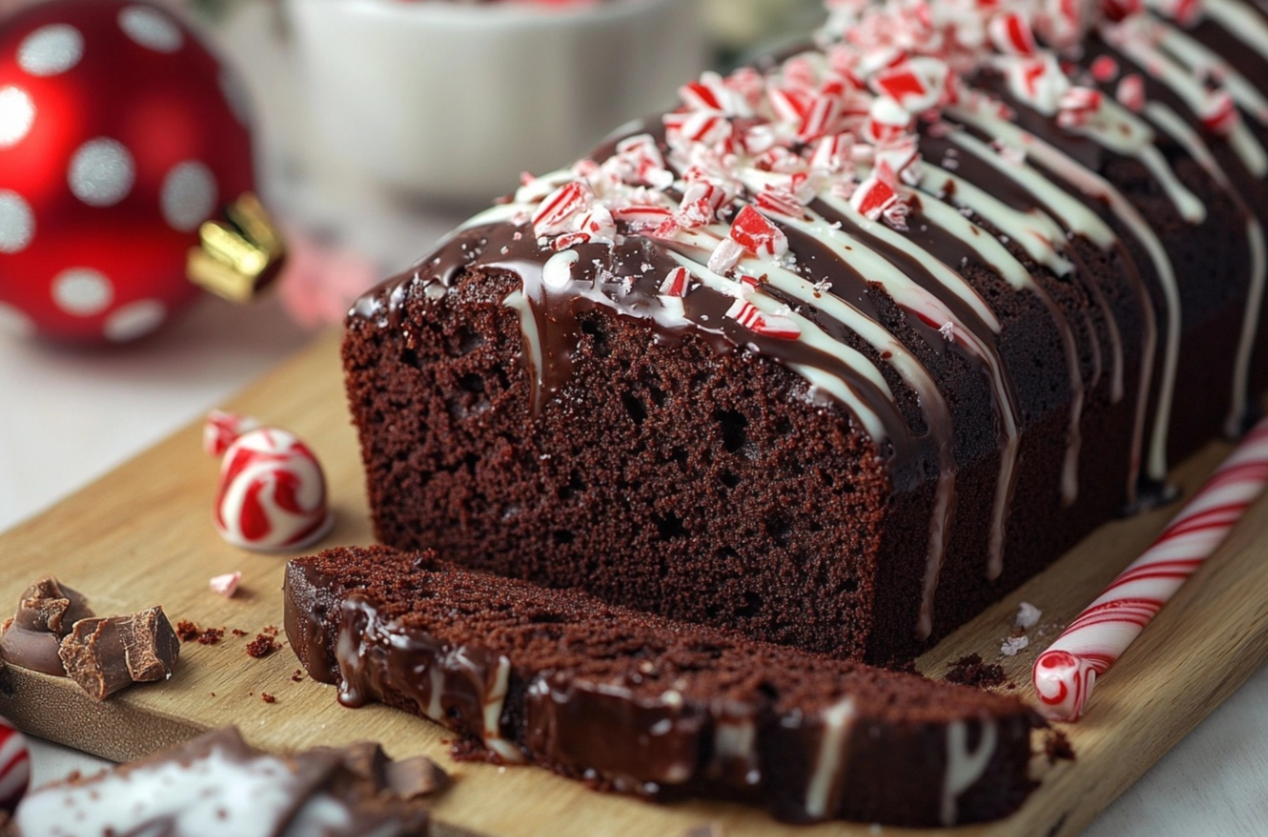
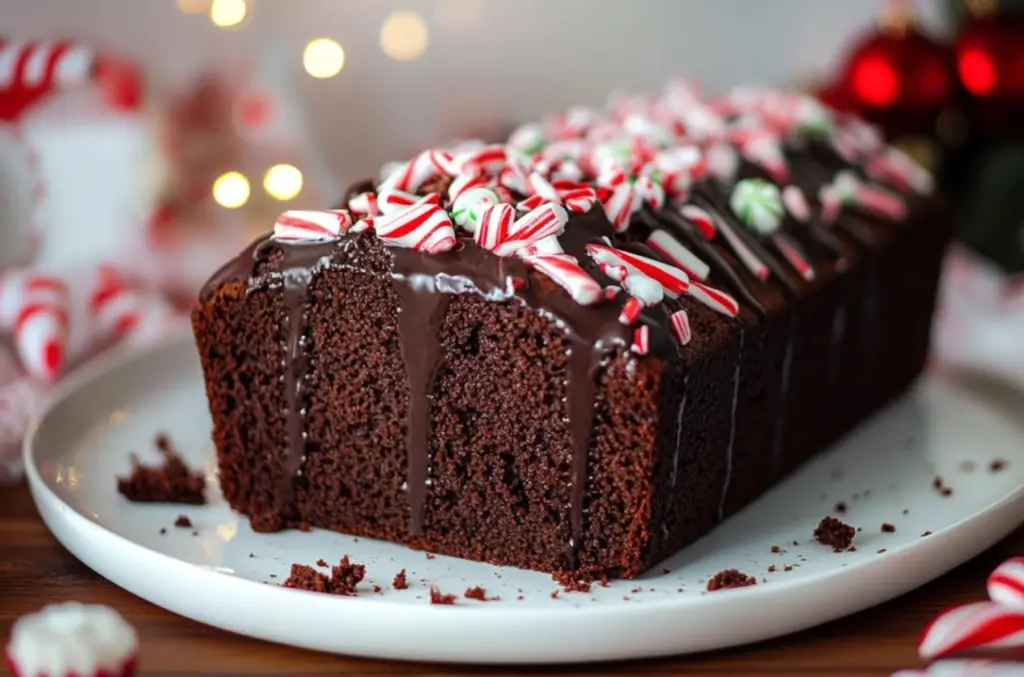
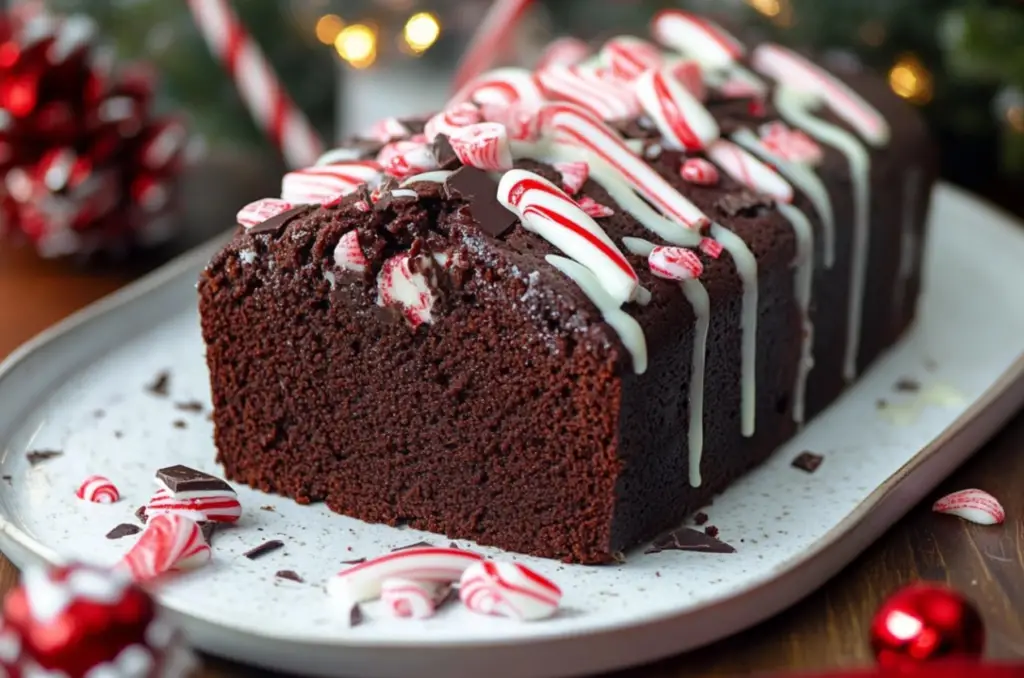
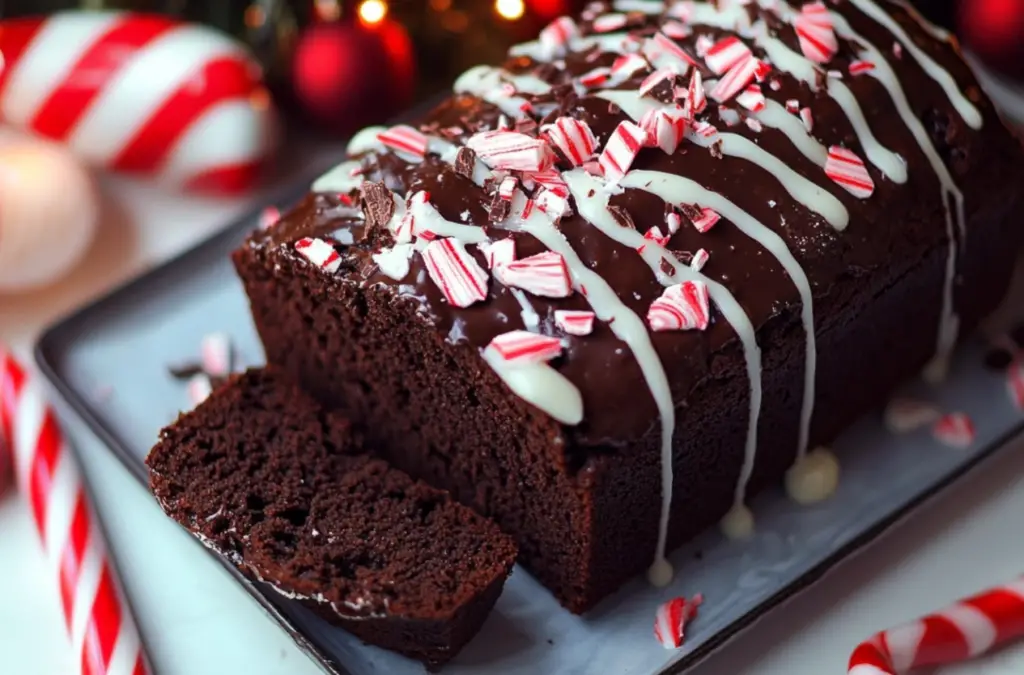
The Chocolate Peppermint Loaf is a delightful blend of rich chocolate and refreshing peppermint. This festive dessert captures the essence of the holiday season, making it perfect for gatherings and celebrations. With its moist texture and delicious flavor, this loaf is sure to impress your guests.
A Perfect Holiday Treat
When baking, mastering the basics is essential. For anyone interested in improving their skills, understanding the fundamentals of baking can elevate your creations. Check out these baking basics to get started. The Chocolate Peppermint Loaf shines during festive occasions, offering a unique twist that everyone will love.
Elevate Your Baking Experience
To truly enhance your baking journey, consider exploring gluten-free options. This can make your treats accessible to everyone at your gathering. For tips on adapting recipes, visit this gluten-free baking guide. By incorporating different ingredients, you can personalize your Chocolate Peppermint Loaf to fit various dietary needs without compromising on flavor.
Celebrate with Flavor
The combination of chocolate and peppermint creates an unforgettable taste experience. This loaf is not only a feast for the taste buds but also a visual treat. Whether you serve it warm or cold, the Chocolate Peppermint Loaf will become a favorite in your holiday repertoire. Enjoy every bite, and watch it disappear from the table!
Basic Recipe
Print
Chocolate Peppermint Loaf
- Total Time: 1 hour 10-15 minutes
- Yield: 1 loaf (about 10 slices) 1x
- Diet: Vegetarian
Description
A moist and delicious chocolate loaf infused with refreshing peppermint, perfect for holiday gatherings or as a delightful dessert.
Ingredients
- 1 and 1/4 cups all-purpose flour
- 1 teaspoon baking powder
- 1/2 teaspoon salt
- 1/3 cup dark cocoa powder
- 6 and 1/2 tablespoons unsalted butter at room temperature
- 3/4 cup white granulated sugar
- 2 tablespoons vegetable/canola oil
- 2 large eggs at room temperature
- 1 teaspoon vanilla extract
- 1/4 teaspoon peppermint extract (adjust to taste)
- 1/2 cup milk at room temperature
- 3/4 cup Andes Peppermint Chocolate
Instructions
- Preheat the oven to 350°F (175°C) and prepare a loaf pan.
- In a bowl, combine flour, baking powder, salt, and cocoa powder.
- In another bowl, cream together butter, sugar, and oil until light and fluffy.
- Add eggs, vanilla extract, and peppermint extract; mix well.
- Gradually add dry ingredients, alternating with milk until combined.
- Fold in Andes Peppermint Chocolate.
- Pour batter into the prepared loaf pan and bake for 50-60 minutes.
- Allow to cool before slicing.
Notes
- Tips for ensuring perfect texture and flavor.
- Prep Time: 15 minutes
- Prep Time: 15 minutes
- Cook Time: 50-60 minutes
- Category: Dessert
- Method: Baking
- Cuisine: American
Nutrition
- Serving Size: 1 slice
- Calories: 210
- Sugar: 18g
- Sodium: 150mg
- Fat: 10g
- Saturated Fat: 5g
- Unsaturated Fat: 3g
- Trans Fat: 0g
- Carbohydrates: 27g
- Fiber: 1g
- Protein: 3g
- Cholesterol: 40mg
Keywords: Chocolate Peppermint Loaf
STEPS
Step 1: For the loaf
Prepare your loaf pan : Grease your pan with softened butter and flour it too. Tap down good so any leftover flour comes out. .Preheat your oven to 350F.
Step 2
In a medium size bowl sift your flour, baking powder, salt and cocoa powder. Mix with a fork and set aside.
Step 3
In another bowl and using an electric mixer, cream your butter for about 2 minutes. Then, add sugar and mix for 3 minutes until light and fluffy. Slowly add in oil and mix for another minute. Add eggs one by one mixing well after each addition. Add milk and when you do this, you’ll notice that your batter will look like it curdles but do NOT worry, keep mixing in medium speed, add in vanilla extract, mix for 30 seconds.
Step 4
Add the dry ingredients into the wet ingredients and mix in low speed until everything is just well combined. DO NOT overmix otherwise your cake will be hard.
Step 5
Turn off your mixer and using a spatula fold in the chopped peppermint chocolate.
Step 6
Pour the batter into your prepared pan and using a spoon smooth all the top. Bake for about 50-55 minutes or until a toothpick inserted comes out clean.
Step 7
Take your cake out of the oven and place it on a cooling rack. After 30 minutes. Run a knife around the cake and flip it over another cooling rack. Cool off completely before icing.
Step 8: For the chocolate drizzle
Melt white chocolate in a heat-proff bowl using the microwave. Please, check your chocolate every 60 seconds to make sure it doesn’t burn. Use a spoon. When is melted, let it cool off for 5 minutes (We don’t want to use the chocolate when is super hot).
Step 9
Using a pastry bag or a spoon drizzle all the top part of the cake with this melted chocolate. Right after the drizzle, sprinkle some chopped candy canes/chocolate on top and let it sit for 30 minutes.
Step 10
Slice and enjoy!

Advanced Techniques for Chocolate Peppermint Loaf
Master the Art of Baking
When making the Chocolate Peppermint Loaf, precision is key. Start by ensuring all ingredients are at room temperature. This simple step helps create a smooth batter and improves texture. Mixing techniques also matter. Cream the butter and sugar well to incorporate air, which contributes to the loaf’s lightness.
Choose Quality Ingredients
Select high-quality cocoa powder and peppermint extract. These ingredients greatly influence the flavor of your Chocolate Peppermint Loaf. A good cocoa powder adds richness, while peppermint extract gives that refreshing kick. Be cautious with the amount of peppermint extract; even a small change can impact the overall taste.
Baking Time and Temperature
Baking time can vary based on your oven. To ensure even baking, consider using an oven thermometer. Check the loaf for doneness by inserting a toothpick into the center. If it comes out clean, your Chocolate Peppermint Loaf is ready. Overbaking can lead to a dry texture, so keep a close eye as it nears completion.
Experiment with Variations
Feel free to customize your loaf. Adding chocolate chips or nuts can create a unique twist. Additionally, consider making mini loaves for individual servings. These variations make your Chocolate Peppermint Loaf even more appealing to guests.
Resources for Further Learning
For more advanced baking tips, check out this helpful guide on baking techniques. Mastering these techniques will elevate your baking skills, making each loaf better than the last. Enjoy your baking journey!
Maintenance Tips for Chocolate Peppermint Loaf
Proper Storage Methods
To keep your Chocolate Peppermint Loaf fresh, store it in an airtight container. This prevents it from drying out and maintains its moisture. Ideally, place the loaf at room temperature for up to three days. If you plan to enjoy it later, refrigeration can help extend its shelf life.
Freezing for Longevity
If you want to save your Chocolate Peppermint Loaf for a special occasion, freezing is an excellent option. First, wrap the cooled loaf tightly in plastic wrap. Then, place it in a freezer-safe bag to avoid freezer burn. Properly stored, the loaf can last for up to three months. When you’re ready to eat it, simply thaw it overnight in the refrigerator.
Reheating Tips
To enjoy your Chocolate Peppermint Loaf warm, reheat it in the oven. Preheat your oven to 350°F (175°C) and wrap the loaf in foil to prevent drying out. Heat for about 10-15 minutes, and it will taste freshly baked. This method brings back the delightful aroma and texture.
Serving Suggestions
When serving, slice the loaf evenly for a polished presentation. Pair it with a dollop of whipped cream or a scoop of vanilla ice cream. These additions enhance the flavors and make your Chocolate Peppermint Loaf even more enjoyable.
Enjoy Every Bite
By following these maintenance tips, you can savor your Chocolate Peppermint Loaf at its best. Whether it’s freshly baked or reheated, the delicious combination of chocolate and peppermint will always be a hit!

Dietary Adaptations for Chocolate Peppermint Loaf
Gluten-Free Options
Making a gluten-free Chocolate Peppermint Loaf is easier than you think. Substitute all-purpose flour with a gluten-free flour blend. Ensure that the blend contains xanthan gum for better texture. This allows everyone to enjoy the delicious flavors without the gluten.
Dairy-Free Alternatives
To create a dairy-free version, replace butter with coconut oil or a plant-based butter substitute. Use almond or soy milk instead of regular milk. These substitutions will keep your Chocolate Peppermint Loaf moist and flavorful while accommodating dairy-free diets.
Reducing Sugar
For those looking to reduce sugar intake, consider using natural sweeteners. Ingredients like maple syrup or agave nectar can replace granulated sugar. Keep in mind that you may need to adjust other liquid ingredients to maintain the loaf’s consistency. This way, you can enjoy your Chocolate Peppermint Loaf with less guilt.
Add More Nutrition
Enhancing the nutritional value of your Chocolate Peppermint Loaf is also an option. Incorporate ingredients like chia seeds or ground flaxseeds. These additions increase fiber and omega-3 fatty acids, making your loaf not only delicious but also nutritious.
Experiment and Enjoy
Don’t hesitate to experiment with these dietary adaptations. Each variation offers a unique twist on the classic recipe. By customizing your Chocolate Peppermint Loaf, you can cater to various dietary needs while ensuring everyone enjoys this festive treat. Enjoy your baking journey!
FAQs About Chocolate Peppermint Loaf
What Chocolate Can I Use?
When making Chocolate Peppermint Loaf, you can use various types of chocolate. Dark chocolate, semi-sweet chocolate, or even white chocolate can add unique flavors. Experimenting with different chocolates will change the taste profile of your loaf.
How Do I Make Mini Loaves?
If you prefer smaller portions, you can easily convert the Chocolate Peppermint Loaf recipe into mini loaves. Use a mini loaf pan and reduce the baking time to about 30-40 minutes. Keep an eye on them to avoid overbaking.
Can I Enhance the Peppermint Flavor?
To boost the peppermint flavor in your Chocolate Peppermint Loaf, simply add a bit more peppermint extract. However, be cautious, as too much can overpower the chocolate. Start with small increments until you reach your desired flavor.
How Do I Know When It’s Done?
Check for doneness by inserting a toothpick into the center of the loaf. If it comes out clean, your Chocolate Peppermint Loaf is ready. If it has batter on it, bake for an additional 5-10 minutes and test again.
What Should I Serve With It?
Serving your Chocolate Peppermint Loaf with a dollop of whipped cream or a scoop of ice cream adds a delightful touch. A drizzle of chocolate sauce can also enhance its appeal. These accompaniments make the loaf even more enjoyable for everyone.
Enjoy Your Baking Experience
By addressing these common questions, you’ll feel more confident making your Chocolate Peppermint Loaf. Each baking session will lead to delicious results!
Conclusion: Enjoying Your Chocolate Peppermint Loaf
A Festive Favorite
The Chocolate Peppermint Loaf is truly a festive favorite. Its delightful combination of rich chocolate and refreshing peppermint makes it an irresistible treat. Whether for gatherings or cozy nights in, this loaf brings joy to every occasion.
Sharing with Loved Ones
Baking this delicious loaf provides a wonderful opportunity to share with family and friends. The experience of creating something special together enhances the enjoyment of the Chocolate Peppermint Loaf. Consider hosting a baking party where everyone can participate and customize their loaves.
Endless Possibilities
The versatility of the Chocolate Peppermint Loaf allows for endless possibilities. You can adapt the recipe to suit various dietary needs, making it accessible for all. Additionally, experimenting with flavors and add-ins can lead to delightful new variations.
Storing and Enjoying Later
Don’t forget to store any leftover loaf properly. Using the maintenance tips shared earlier ensures that your Chocolate Peppermint Loaf stays fresh for future enjoyment. A slice of this loaf can brighten any day, so be sure to save some for later.
Final Thoughts
In conclusion, the Chocolate Peppermint Loaf is not just a recipe; it’s an experience filled with warmth and flavor. Enjoy the process of baking and savor the delicious results. Your holiday celebrations will be even more special with this delightful treat at the center of it all!