1. Introduction to the Recipe
Crispy, savory, and delightfully portable, Chicken Flautas are a favorite whenever you want to bring a little fiesta to your table. These golden, rolled tortillas stuffed with seasoned shredded chicken (or beef), melted cheese, and a kick of spice are perfect as appetizers, main courses, or party finger foods. You get that satisfying crunch on the outside, while inside the filling is tender, flavorful, and juicy. In Mexican cuisine, flautas are sometimes called “taquitos” (though taquitos are often smaller), and the name “flauta” comes from the Spanish word for “flute,” owing to their long, tubular shape.
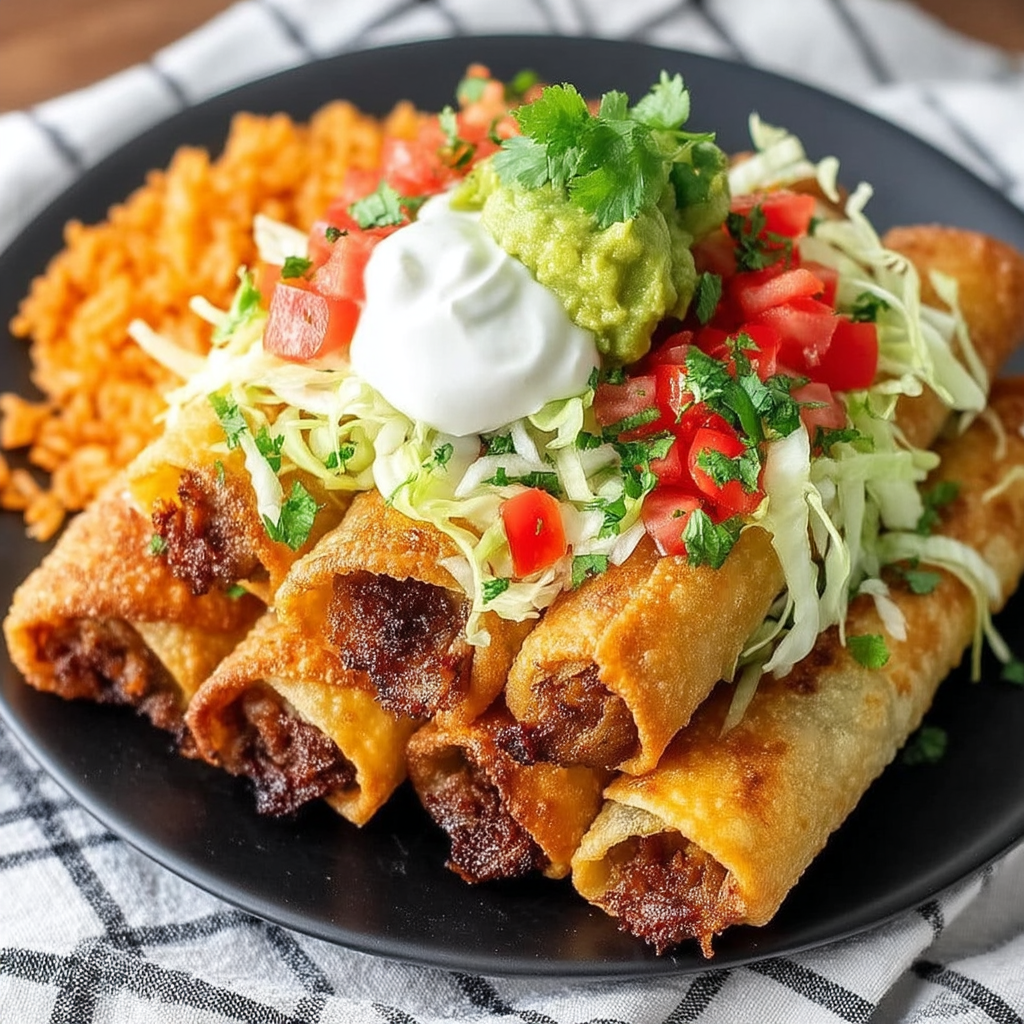
The heart of this recipe lies in simple, bold ingredients: shredded cooked chicken (or beef), a melty Mexican cheese blend, zesty salsa and diced chiles, plus seasonings like garlic salt, pepper, and parsley. You roll the mixture into flour or corn tortillas, then fry them until crisp and golden. Top them with shredded lettuce, tomato, guacamole, green salsa, or a cilantro ranch dressing for contrast and freshness. For another variation, you can check out a beef flautas recipe or a guide to making perfect crispy tortillas to get the crisp just right.
In the sections below, you’ll find a clear ingredients list and step‑by‑step instructions. After that, I’ll dig into advanced techniques (to make them extra crunchy, tweak spices, or adapt to different cooking methods), storage and reheating tips, substitutions for dietary needs, FAQs, and a closing reflection. Let’s roll into making some irresistible Chicken Flautas!
2. Basic Recipe: Ingredients and Instructions
Print
Easy Chicken Flautas Recipe
Description
Make crispy Chicken Flautas filled with shredded chicken, cheese, salsa. Quick, delicious, party‑friendly flautas you’ll love.
Ingredients
For the Flautas:
- Vegetable or canola oil, for frying
- 3 cups shredded cooked chicken (or shredded beef)
- 1 cup shredded Mexican blend cheese
- ½ cup salsa (store-bought or homemade)
- 1 (4-ounce) can diced chiles
- Garlic salt with parsley flakes, to taste
- Pepper, to taste
- 12 (6-inch) flour tortillas (or corn tortillas)
- Salt, to taste
Toppings (optional but recommended):
- Shredded lettuce
- Chopped tomatoes
- Green salsa
- Guacamole
- Cilantro Ranch dressing
Instructions
- Prep the filling
- In a bowl, combine the shredded chicken (or beef), shredded Mexican blend cheese, salsa, and diced chiles (with their liquid).
- Season with garlic salt (with parsley) and pepper, adjusting to your taste. Mix thoroughly until all ingredients are evenly distributed.
- Warm the tortillas
- Warm each tortilla briefly (10–15 seconds per side) in a hot, dry skillet or microwave (with a damp paper towel on top) to make them pliable. This reduces cracking when rolling.
- Assemble the flautas
- Place about 2 to 3 tablespoons of the filling near one edge of each tortilla, leaving margins on the sides.
- Roll the tortilla tightly around the filling, tucking in the edges as you go so it forms a snug cylinder (like a flute). Place seam-side down on a plate. Repeat for all tortillas.
- Heat the oil for frying
- In a deep skillet or frying pan (or a Dutch oven), pour oil to a depth of about ¼ to ½ inch (enough to partially submerge the flautas).
- Heat the oil over medium-high heat until shimmering and around 350 °F (175 °C). You can test by dropping a small piece of tortilla — it should sizzle gently and rise.
- Fry the flautas
- Carefully place flautas seam-side down in the hot oil in batches (don’t overcrowd).
- Fry until golden and crisp on one side (2–3 minutes), then turn and fry the other side until uniformly golden (another 2–3 minutes).
- Use tongs to turn gently and avoid puncturing the tortillas.
- Drain & salt
- When they’re crisped all around, remove flautas from oil and place them on a plate lined with paper towels or a wire rack to drain excess oil.
- While still warm, sprinkle a little salt lightly over them if needed.
- Serve with toppings
- Serve the flautas hot, with shredded lettuce, chopped tomatoes, green salsa, guacamole, and/or Cilantro Ranch dressing on the side. Enjoy while crisp!
Notes
Don’t overfill: Too much filling makes them hard to roll tightly and more likely to burst while frying.
Warm tortillas: Cold, stiff tortillas crack when rolled — warming them makes them pliable.
Oil temperature matters: If too hot, the tortilla burns before filling heats; if too cool, they absorb too much oil and become greasy.
Space the flautas: When frying, give each enough space to crisp properly.
Keep cooked ones warm: Place cooked flautas on a baking sheet in a low oven (about 200°F / 95°C) while you finish frying the rest to serve them all crisp and hot.
3. Advanced Techniques
Double Crisping for Extra Crunch
If you love flautas that are super crisp, use a two-stage frying technique. First fry at a slightly lower temperature (around 325 °F / 163 °C) for a minute per side, just to “set” the tortilla shell. Then drain briefly and raise the oil temperature to 350–360 °F (175–182 °C) and fry again for about 1 minute per side until the perfect golden color. The initial frying helps cook the filling and solidify structure, while the second gets the shell crunchy without burning—the result is a crisp that stays longer after plating.
Oven-Baked or Air-Fryer Option
For a lighter version, try baking or air-frying your flautas. Preheat the oven to 425 °F (220 °C) or preheat your air fryer. Brush or spray each rolled flauta lightly with oil to help crisp the outside. Arrange them seam-side down on the rack or basket, leaving space between. Bake or air-fry for about 10–15 minutes (turning halfway) until golden and crisp. Flavor may differ slightly (less deep-fried flavor), but the texture can still be delightful, and it’s healthier.
Flavor Layering with Seasoned Filling
To deepen flavor, sauté the shredded chicken (or beef) first with a dash of onion, minced garlic, or a pinch of cumin and chili powder before mixing with salsa and chiles. This gives a base layer of flavor. You might also incorporate a small amount of cream cheese or queso fresco for creaminess, or a squeeze of lime to add brightness. Just ensure any added moisture is well absorbed so the tortilla doesn’t get soggy.
Rolling & Sealing Tricks
A tight roll is key to avoid leaking. After placing filling, fold in the edges slightly, then roll firmly. You can dab a small amount of water or beaten egg on the final seam of the tortilla to help seal it. Also, placing the seam side down in the oil first helps it to seal further from the heat. Using warmed tortillas, rolling on a flat surface, and avoiding overstuffing all reinforce the tight roll.
Spice Adjustments & Variations
You can adjust heat and flavor by choosing different salsas or chiles (e.g., mild, medium, hot, or jalapeños, chipotles). Add extra spices like smoked paprika, a pinch of cayenne, or taco seasoning. For a smoky twist, mix in a bit of smoked chipotle salsa. If you like freshness, finely chopped cilantro or a drizzle of lime juice just before serving brightens the flavor. These subtle tweaks let you tailor the spice and flavor intensity.
See more advanced recipes at cookingwhite.com

4. Storage, Shelf Life, and Maintenance Tips
Short-Term Holding (for Serving Later Same Day)
If making ahead for a gathering, you can fry the flautas just before serving, but you can also pre-roll them and chill until ready to fry. Keep them covered and refrigerated. Avoid frying too early and letting them sit—they’ll lose crispness. After frying, lay on wire racks (not stacked) to maintain airflow and prevent sogginess. Serve within a couple of hours for best texture.
Refrigerator Storage (Up to 2 Days)
Allow flautas to cool to room temperature, then store them in a shallow container in one layer, placing parchment between layers to absorb moisture. Cover loosely (so some air can escape). They will lose some crispness in the fridge, but you can re-crisp them (see below). Eat within 1–2 days for best quality.
Freezing for Later Use
Fully cooked flautas can be frozen for future reheating. After frying and cooling, freeze in a single layer on a baking sheet until firm (1–2 hours). Then transfer to a freezer-safe bag or container, with parchment between layers. Use within 1–2 months for best flavor. Alternatively, you can freeze unfried, rolled flautas: after rolling, place them seam-side down on a tray, freeze, then store. When ready, you can fry them straight from frozen (they may take a little longer).
Reheating & Re-crisping
Do not microwave, as this makes the tortillas soggy. Instead, preheat your oven to 400 °F (200 °C). Place flautas on a baking sheet on a wire rack or foil, and heat for 5–10 minutes until crisp. You can also re-crisp in an air fryer for 3–5 minutes. If desired, finish with a quick flash in a hot skillet for extra crunch. This revives much of the original crispiness.
Avoiding Oil Sogginess & Oil Conditions
When frying, ensure your oil is hot enough (approx. 350 °F / 175 °C). If it’s too cool, the tortillas will absorb oil and become greasy. Use fresh oil if possible—oil that’s been reused too many times degrades and imparts off-flavors. Keep flautas spaced apart while frying to ensure proper crisping. After frying, drain well and do not stack until fully drained, so trapped steam doesn’t soften them.

5. Dietary Adaptations and Substitutions
Vegetarian / Bean-Based Version
If you want a meat-free version, substitute the shredded chicken with seasoned beans (black beans, pinto beans, refried beans) or a mixture of beans and vegetables (mushrooms, zucchini). Mix beans with salsa, chiles, cheese, and spices just the same, and roll as usual. You may want to mash part of the beans for better binding. The frying and crisping method remains the same.
Gluten-Free Adaptation
To make these Chicken Flautas gluten-free, use gluten-free tortillas (check for corn or flour-variant gf tortillas). Many corn tortillas are naturally gluten-free—just ensure they are pliable (you may steam or warm them gently). Also ensure that any seasonings or chiles used are certified gluten-free. Frying and assembly steps remain identical.
Lower-Fat / Baked Version
To reduce fat, use the oven or air-fryer technique described above. Also, you can decrease the cheese quantity slightly or use a lower-fat cheese blend. Use just enough oil (or spray) to crisp outer surfaces. The flavor profile remains good even with lighter options, though the deep-fry crisp is partially sacrificed.
Lower Sodium / Milder Heat
Choose a mild salsa and mild diced chiles to tone down spice. Use unsalted or low-salt cheese, and use garlic salt sparingly (or replace with garlic powder + parsley + a pinch of regular salt). Taste and adjust in small increments. If you like, you can swirl in a bit of lime juice or vinegar to bring brightness without relying entirely on salt.
Vegan / Plant-Based Option
For a full vegan version, substitute shredded chicken with seasoned plant‑based “chicken” shreds or textured vegetable protein (TVP) rehydrated and flavored. Use vegan cheese (or a blend of cashew cheese or nutritional yeast) instead of the cheese. Fry in vegetable oil as usual. Ensure the tortillas, salsa, and chiles are all vegan (no hidden dairy or animal-based ingredients). The rolling and frying method works the same.
6. FAQs About the Recipe
Why do my flautas burst or leak while frying?
This typically happens when the roll is loose, overfilled, or the seam is not sealed tightly. Make sure to tuck the filling edges in slightly, roll firmly, and even dab a little water or egg on the final seam to glue it. Also, warm the tortillas before rolling to avoid cracks. Do not overfill; leave edges free so the tortilla can wrap fully. Finally, ensure oil is hot—slow cooking may cause internal pressure to force seams open.
Can I use corn tortillas instead of flour ones?
Yes—you can use corn tortillas (they are more traditional) but they tend to crack more easily. To prevent breakage, you should soften them before rolling (steam, microwave covered with damp cloth, or warm on a griddle) to increase pliability. Roll gently, and fry carefully. The flavor will be more “authentic” but the texture risk is higher.
How do I keep flautas from getting soggy after frying?
After frying, drain them well on a wire rack or paper towels, and serve promptly. Avoid stacking while hot—stacking traps steam and softens crusts. If you need to hold them for a short while, place them on a baking rack in a low oven (around 200 °F / 95 °C) to keep dry and warm. Don’t cover tightly until ready to serve.
Can I prepare flautas ahead of time?
Yes! You can roll and chill them a few hours ahead (or even the night before), then fry just before serving. Alternatively, you can fry them ahead and reheat (see reheating tips). Just be mindful of crispness—the sooner the better. If freezing, follow the freezing method described above (either cooked or uncooked rolled form).
What proteins or fillings can I vary with this recipe?
Beyond shredded chicken or beef, you can try pulled pork, shredded turkey, or even seafood like shrimp (with care). You can mix in cooked vegetables (onion, peppers, mushrooms), or beans for vegetarian versions. Additionally, adding ingredients like corn, jalapeño slices, or diced onion to the filling changes the texture and flavor. Just ensure fillings aren’t too wet, or they’ll weaken the tortilla.

7. Conclusion & Final Thoughts
Chicken Flautas combine wonderful textures and flavors: the crisp, golden exterior gives way to a tender, savory interior bursting with seasoned meat, cheese, and salsa. They’re perfect for casual dinners, party appetizers, or anytime you want comfort food with flair. Their rollable nature makes them portable, shareable, and customizable—ideal for feeding a crowd.
One of the strengths of this recipe is its balance between simplicity and flexibility. With basic pantry ingredients, you can turn out a crowd-pleasing dish. Yet, with the advanced techniques (double crisping, flavor layering, baking alternatives), you can push your version higher in texture and flavor. The storage and reheating strategies help you prepare ahead or handle leftovers without losing too much crispness. And with the substitutions, you can adapt flautas to vegetarian, vegan, gluten-free, or lower-fat diets without losing the essential spirit of the dish.
For best results, pay attention to tortilla pliability, roll tightness, proper oil temperature, and draining strategy. A flawlessly crisp flauta served immediately with vibrant toppings—fresh lettuce, juicy tomato, creamy guacamole, a drizzle of cilantro ranch or green salsa—is a delight to eat. The contrast between warm, crisp shells and the cool, creamy toppings makes every bite exciting.
Next time you find yourself craving a crispy, flavorful Mexican-style treat, go for Chicken Flautas. Their approachability, adaptability, and sheer deliciousness make them a winner in your recipe collection. Try them, tweak them, and share them—you may find they become a staple for get-togethers, snacks, or fun weeknight dinners.
Enjoy your flautas—and the crunch!