Introduction
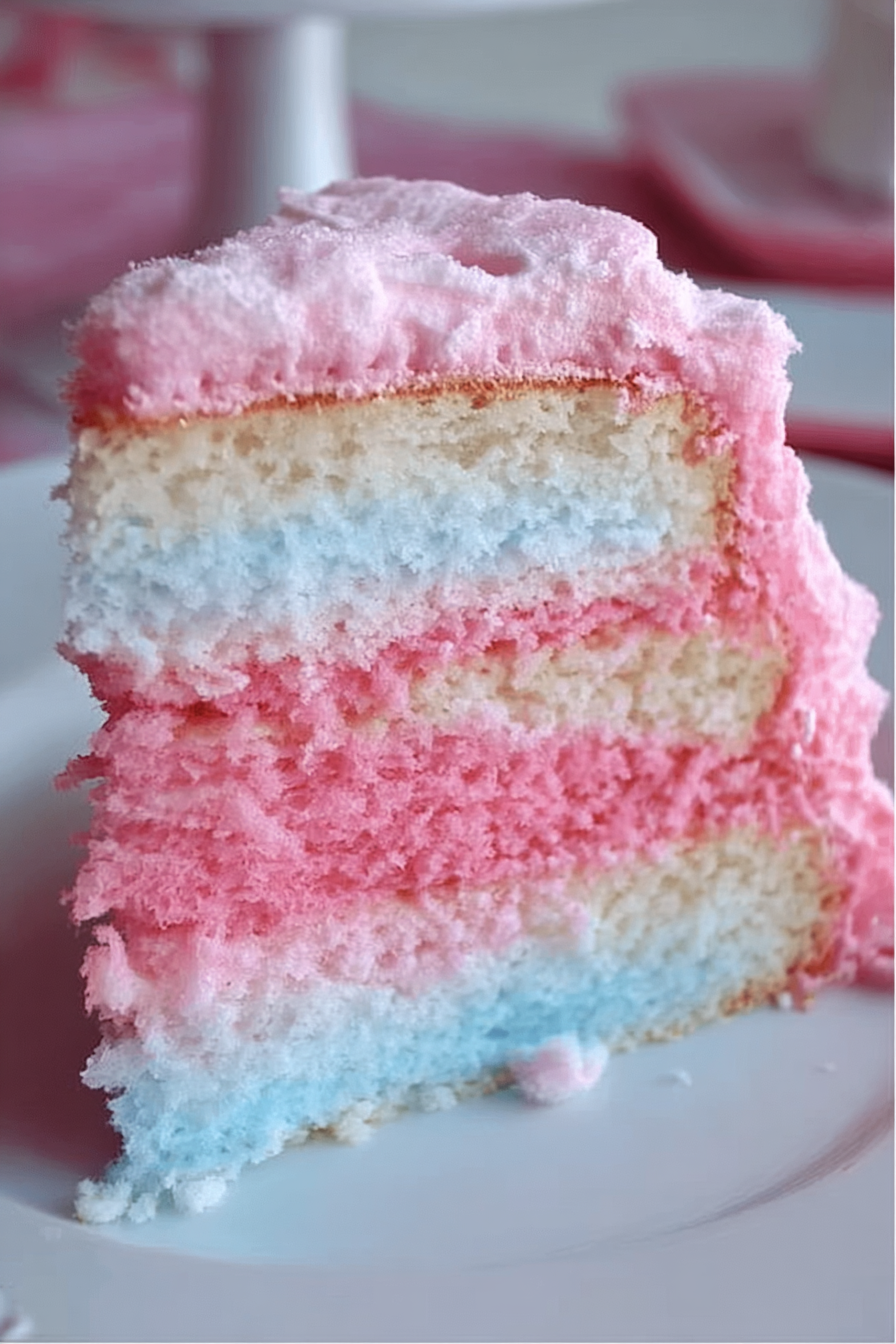
Cotton candy isn’t just for fairs and carnivals anymore—it can also be the star of your dessert table. This Cotton Candy Cake combines the nostalgic flavor of fluffy spun sugar with a soft, tender cake and a rich buttercream frosting. It’s a recipe that will delight kids and adults alike, perfect for birthdays, themed parties, or any occasion where you want to add a whimsical touch. With its pastel layers and cloud-like sweetness, this cake is both visually stunning and absolutely delicious.
My recipe story
The first time I had cotton candy, I was at a county fair with my family. The sticky sweetness and light, airy texture always stuck in my memory. Years later, when I started baking, I wanted to capture that childhood joy in a dessert that was both playful and elegant. That’s how this Cotton Candy Cake was born. Over time, I perfected the recipe by balancing fluffy cake layers with just the right amount of cotton candy flavoring. The result? A dessert that feels like stepping back into those carnival days, but with a touch of sophistication suitable for any celebration.
💡 Why You’ll Love This Recipe
- The whimsical cotton candy flavor makes it a unique showstopper dessert.
- Moist, fluffy cake layers pair perfectly with smooth buttercream.
- Pastel colors make it a beautiful centerpiece for birthdays or parties.
- Easy to customize with sprinkles, extra cotton candy, or food coloring.
- A perfect way to bring carnival nostalgia into your kitchen.
Ingredient breakdown
The magic of this Cotton Candy Cake lies in its simple yet flavorful ingredients. At its base, the recipe uses standard baking staples like flour, sugar, and baking powder, ensuring that the cake rises perfectly with a soft crumb. The addition of milk and butter creates a rich and moist texture that pairs beautifully with the sweet cotton candy essence.
What really makes this cake special is the cotton candy flavoring, which is available at many specialty baking shops or online. Unlike real cotton candy, which melts quickly, cotton candy flavoring captures that signature sweetness without overpowering the cake. Food coloring adds a whimsical pastel look, giving your cake the playful flair it deserves.
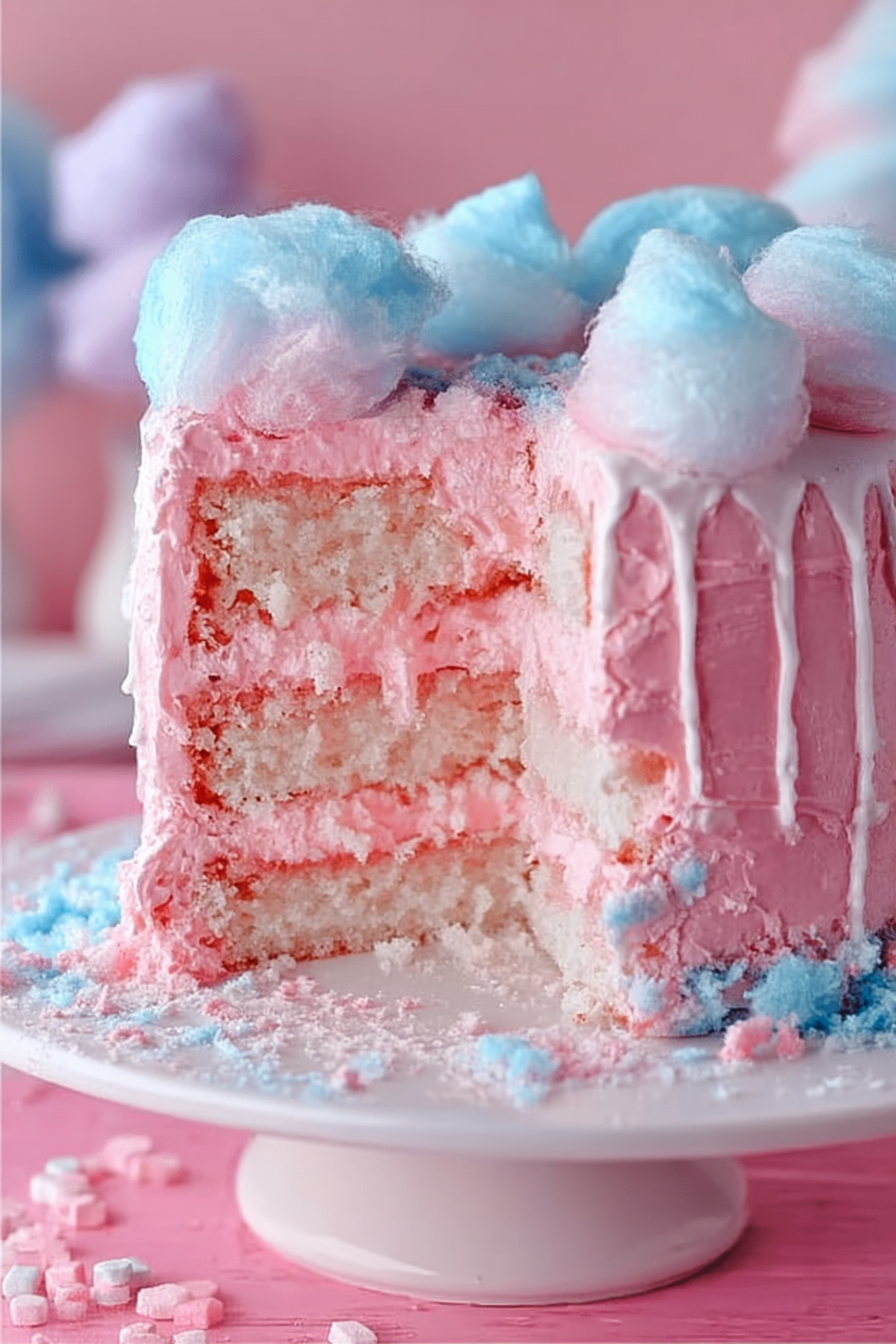
Buttercream frosting ties everything together with a silky, creamy finish. The frosting can be lightly tinted with pink or blue to enhance the cotton candy theme, or kept white for a classic touch. If you’d like, you can even top the cake with actual cotton candy just before serving for a dramatic presentation.
Equipment you’ll need
- Two 9-inch round cake pans
- Mixing bowls
- Hand mixer or stand mixer
- Measuring cups and spoons
- Rubber spatula
- Cooling racks
- Cake turntable (optional, but helpful for frosting)
- Offset spatula for smooth frosting application
Step-by-step directions
Step 1: Preheat and prepare
Preheat your oven to 350°F (175°C) and grease two 9-inch round cake pans. Line the bottoms with parchment paper for easy release. This step ensures your cake layers bake evenly and come out cleanly without sticking to the pan. Preheating also guarantees a consistent baking temperature.
Step 2: Mix dry ingredients
In a large mixing bowl, whisk together 2 cups of all-purpose flour, 1 tablespoon baking powder, and a pinch of salt. Combining dry ingredients separately helps to distribute the leavening agent evenly, which is essential for a fluffy cake texture.
Step 3: Cream butter and sugar
Using a hand mixer or stand mixer, cream together 1 cup of softened unsalted butter with 1 ½ cups granulated sugar until light and fluffy. This process incorporates air, giving your cake a tender crumb and adding volume to the batter.
Step 4: Add eggs and flavoring
Beat in 4 large eggs one at a time, ensuring each is fully incorporated. Add 2 teaspoons of cotton candy flavoring and mix until combined. This gives the cake its signature sweetness while maintaining balance with the other ingredients.
Step 5: Combine wet and dry ingredients
Gradually add the dry mixture to the butter mixture, alternating with 1 cup of milk. Begin and end with the dry mixture. Mix on low speed until just combined to avoid overmixing, which could make the cake dense.
Step 6: Color the batter
Divide the batter evenly into two bowls. Add a few drops of pink food coloring to one bowl and blue to the other. Stir gently until evenly tinted. This creates the whimsical pastel look reminiscent of cotton candy clouds.
Step 7: Bake the cakes
Pour the batter into the prepared pans and smooth the tops. Bake for 25–30 minutes, or until a toothpick inserted into the center comes out clean. Allow the cakes to cool in the pans for 10 minutes before transferring to a wire rack.
Step 8: Make the frosting
In a clean mixing bowl, beat 1 cup of softened butter until creamy. Gradually add 4 cups of powdered sugar, ¼ cup milk, and 1 teaspoon of vanilla extract. Mix until smooth and fluffy. For extra cotton candy flavor, you can add ½ teaspoon of the flavoring here as well.
Step 9: Assemble the cake
Once the cakes are completely cool, place one layer on a cake board or plate. Spread a generous layer of frosting on top, then place the second cake layer. Frost the entire cake with a thin crumb coat, chill for 20 minutes, then finish with a smooth final coat of frosting.
Step 10: Decorate and serve
Tint the frosting with pastel colors if desired, and pipe decorative swirls around the edges. Right before serving, top with fresh cotton candy for a magical presentation. Serve immediately and enjoy the sweet nostalgia in every bite.
Variations & substitutions
If you don’t have cotton candy flavoring, you can substitute with vanilla or almond extract for a different twist. For a more vibrant cake, try layering pink, blue, and purple batters. If you’re looking for a lighter option, use half butter and half applesauce in the batter for reduced fat without losing moisture. You can also switch out the buttercream for whipped cream frosting if you prefer something less sweet. Vegan bakers can substitute non-dairy milk, plant-based butter, and flax eggs to achieve a similar texture and flavor.
💡 Expert Tips & Troubleshooting
- Make sure your butter and eggs are at room temperature for a smooth, even batter.
- If your cake layers dome too much, level them with a serrated knife before frosting.
- Don’t add cotton candy directly into the batter—it will dissolve and affect the texture.
- Always let the cakes cool completely before frosting to prevent melting.
- If your frosting feels too stiff, add milk one tablespoon at a time until spreadable.
Storage, freezing & make-ahead
This Cotton Candy Cake can be stored at room temperature for up to 2 days if covered with a cake dome. For longer storage, refrigerate it for up to 5 days. Be sure to let the cake come to room temperature before serving so the buttercream softens. The cake layers can also be baked ahead and frozen for up to 2 months. Wrap each layer tightly in plastic wrap and foil, then thaw overnight in the refrigerator before frosting. Avoid storing cotton candy decorations on the cake, as they will dissolve—add them just before serving for the best effect.
Serving ideas & pairings
This cake is perfect for birthday parties, baby showers, or any event where you want a touch of whimsy. Pair slices with a glass of milk or a fruity punch for kids, or serve alongside sparkling rosé or champagne for adults. Cotton candy-themed cupcakes or sugar cookies make a fun companion on the dessert table. You could even create a carnival-inspired dessert bar with popcorn, candy apples, and this cake as the centerpiece.

FAQ
Can I make this cake without cotton candy flavoring?
Yes! Substitute with vanilla or almond extract, though it won’t have the same signature flavor.
Can I use real cotton candy inside the cake layers?
No, real cotton candy dissolves when mixed into batter. It’s best used as a garnish right before serving.
Can I bake this cake in advance?
Absolutely. You can bake the cake layers 1–2 days ahead, store them wrapped tightly, and frost them before serving.
How do I get the pastel swirl effect inside the cake?
Divide the batter into portions, tint with food coloring, and gently swirl together before baking.
Is this recipe kid-friendly?
Yes! Kids love the flavor and colors. Just be sure to add the cotton candy decoration right before serving to keep the magic alive.
Final thoughts
This Cotton Candy Cake is more than just a dessert—it’s an experience. From the pastel colors to the nostalgic flavor, it’s sure to bring smiles to everyone who takes a bite. Whether you’re making it for a birthday, a themed party, or simply to brighten up an ordinary day, this cake delivers both beauty and taste in every slice. With a few simple steps, you can transform classic baking ingredients into a whimsical masterpiece that feels straight out of a carnival. Bake it once, and it’s bound to become a family favorite for years to come.
Print
Easy Cotton Candy Cake
- Total Time: 55 minutes
- Yield: 12 servings
- Diet: Vegetarian
Description
A whimsical, pastel-colored cake infused with nostalgic cotton candy flavor. Perfect for birthdays, parties, or any fun celebration.
Ingredients
- 2 cups all-purpose flour
- 1 tablespoon baking powder
- 1/2 teaspoon salt
- 1 cup unsalted butter, softened
- 1 1/2 cups granulated sugar
- 4 large eggs
- 1 cup milk
- 2 teaspoons cotton candy flavoring
- Pink and blue food coloring
- 4 cups powdered sugar
- 1 teaspoon vanilla extract
- 1/4 cup milk (for frosting)
Instructions
- Preheat oven to 350°F (175°C). Grease and line two 9-inch round cake pans with parchment paper.
- In a bowl, whisk together flour, baking powder, and salt. Set aside.
- In a separate bowl, cream butter and sugar until light and fluffy.
- Beat in eggs one at a time, then add cotton candy flavoring.
- Alternate adding the flour mixture and milk to the butter mixture until just combined.
- Divide batter into two bowls, tinting one pink and the other blue. Pour into pans.
- Bake for 25–30 minutes or until a toothpick comes out clean. Cool completely.
- For frosting, beat butter until creamy, then add powdered sugar, vanilla, and milk until fluffy.
- Frost and stack the cooled cake layers. Decorate with pastel swirls and cotton candy before serving.
Notes
Add cotton candy garnish just before serving to prevent it from melting. Store cake covered at room temperature for 2 days or refrigerate up to 5 days.
- Prep Time: 25 minutes
- Cook Time: 30 minutes
- Category: Dessert
- Method: Baking
- Cuisine: American