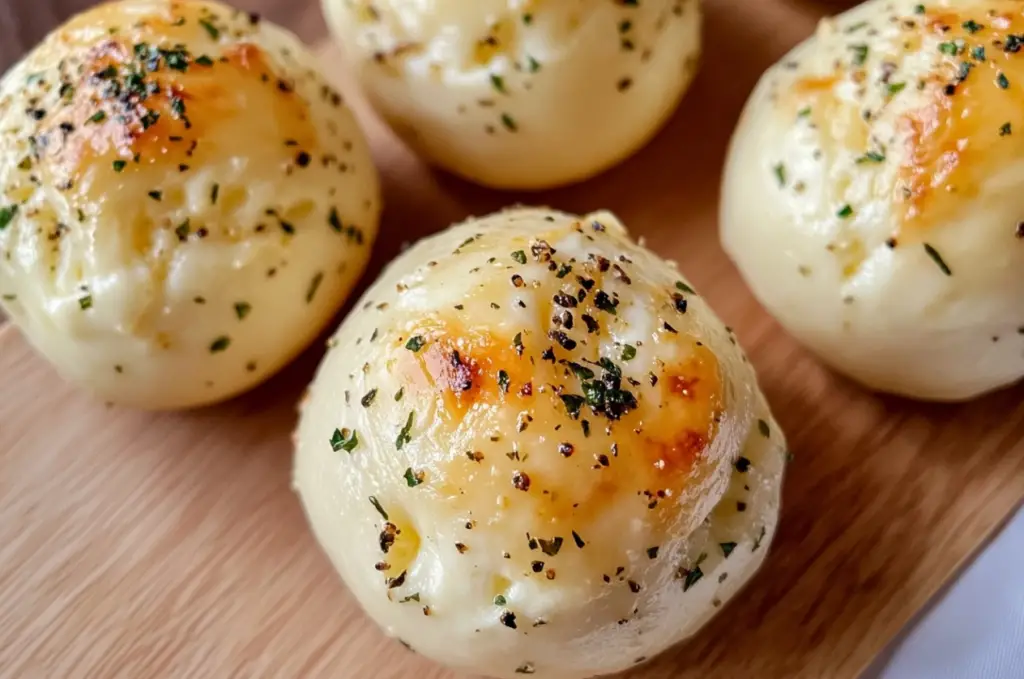
Introduction to Garlic Butter Cheese Bombs Recipe
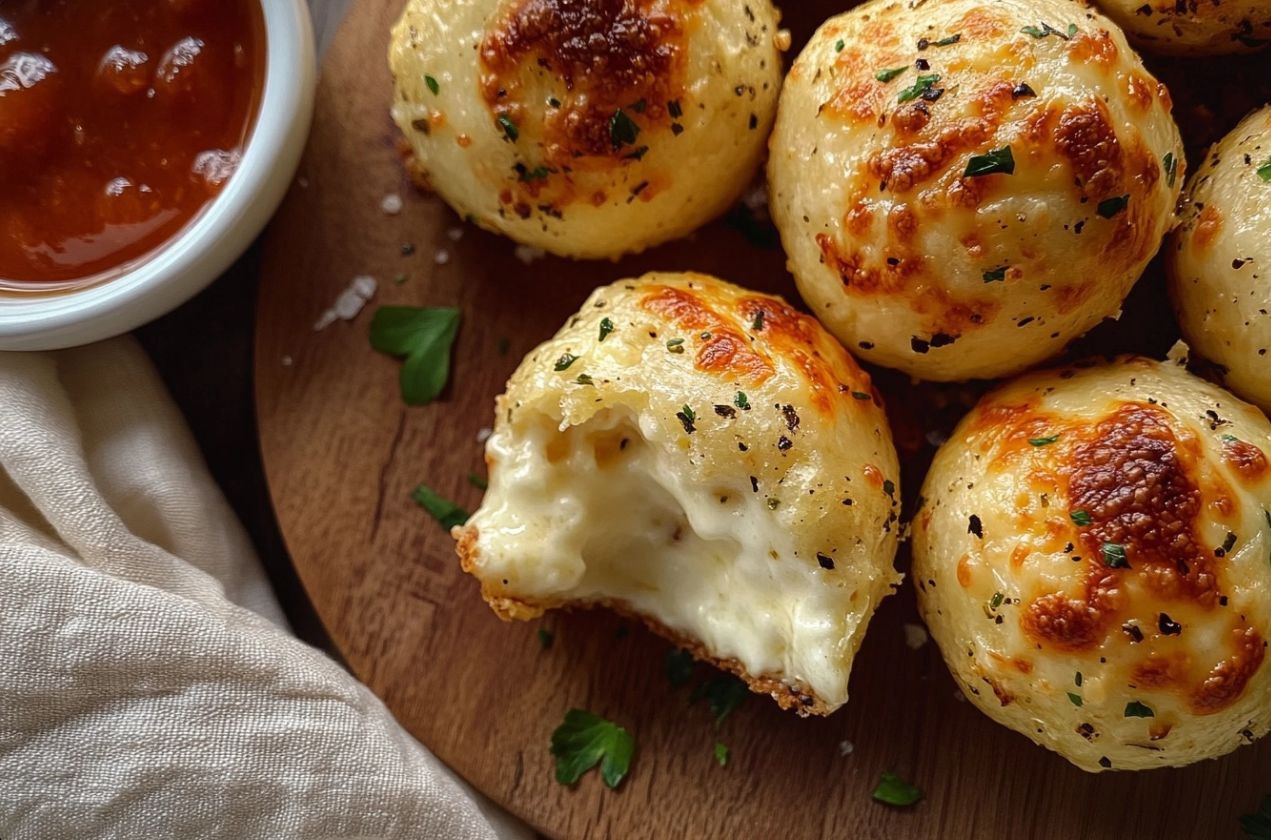
Garlic Butter Cheese Bombs Recipe are the ultimate comfort food that will quickly become a favorite in your household. These tasty bites are ideal for any situation—whether you’re throwing a party, needing a speedy snack, or just craving something warm and cheesy. With only a few simple ingredients, you can quickly whip up these irresistible cheese bombs.
- Quick to Make: The beauty of Garlic Butter Cheese Bombs lies in their simplicity. Using refrigerated biscuit dough, mozzarella cheese, and a few pantry staples, these cheesy delights are ready in under 30 minutes. This speedy recipe is perfect for hectic weeknights or impromptu get-togethers.
- Party-Perfect: These cheese bombs aren’t just delicious; they’re also wonderfully adaptable to any occasion. Serve them as appetizers or alongside a meal. The garlic butter coating adds a burst of flavor that pairs perfectly with dipping sauces like marinara or ranch. For more ideas, check out the best dipping sauces for cheese bombs.
- Customizable Options: While Garlic Butter Cheese Bombs are delicious as is, you can easily customize them to suit your taste. Consider adding pepperoni or jalapeños to the filling for a spicy kick. If you’re looking for a homemade touch, you might want to try this homemade biscuit dough recipe instead of store-bought dough.
In conclusion, Garlic Butter Cheese Bombs are a must-try for anyone who loves quick, cheesy snacks. Their simplicity, adaptability, and irresistible flavor make them a top choice for any occasion. Whether you’re preparing them for a solo treat or a group gathering, these cheese bombs are guaranteed to wow everyone.
Ingredients and Preparation
Print
Garlic Butter Cheese Bombs Recipe
- Total Time: 22 minutes
- Yield: 8 cheese bombs 1x
- Diet: Vegetarian
Description
These cheesy, buttery, and garlicky delights are the ultimate comfort food, perfect for any occasion. Made with simple ingredients, they’re ready in no time.
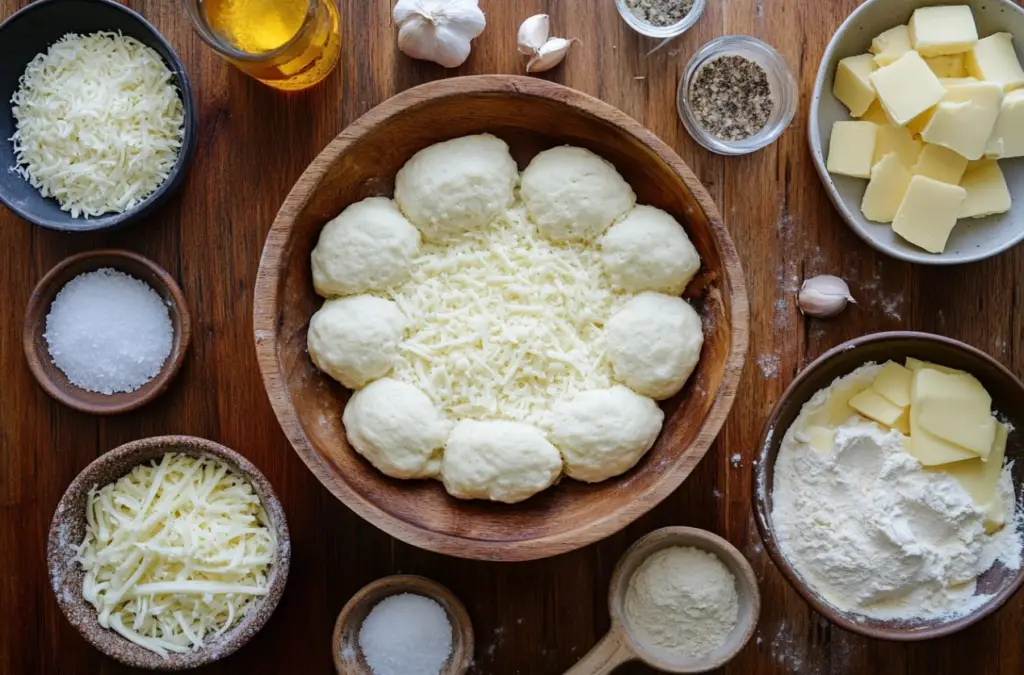
Ingredients
- 1 (16oz) container of refrigerated biscuit dough (8 biscuits)
- 4 ounces mozzarella cheese (soft, shredded or diced string cheese)
- 4 tbsp melted butter (half a stick)
- 1 tsp garlic powder
- 1 tsp Italian seasoning
- Pinch of salt
Instructions
- Preheat the oven to 375°F (190°C) and line a baking sheet with parchment paper.
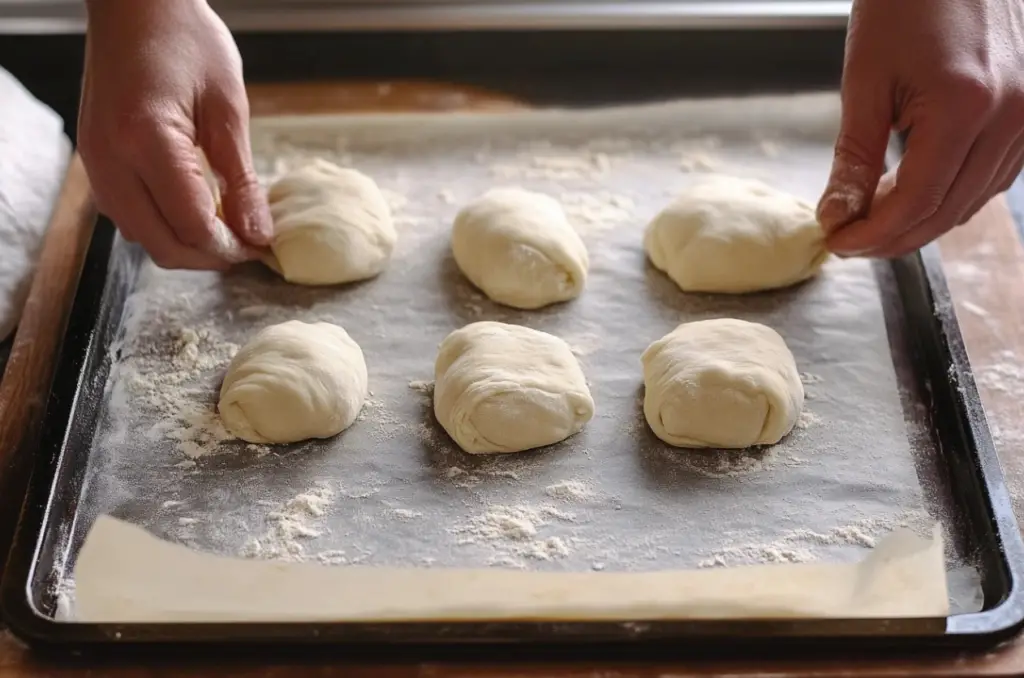
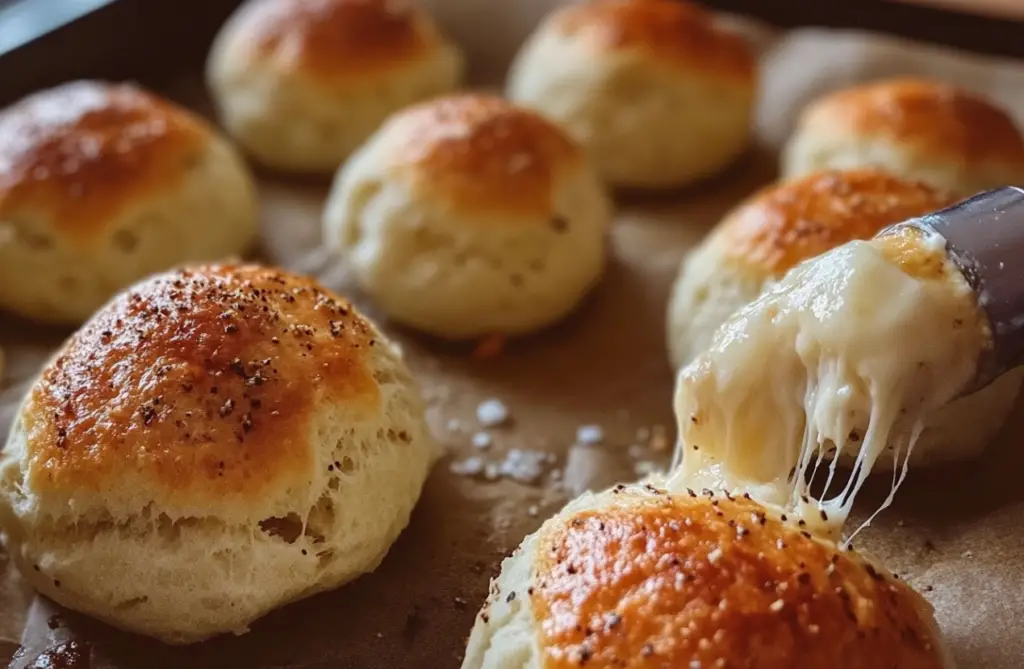
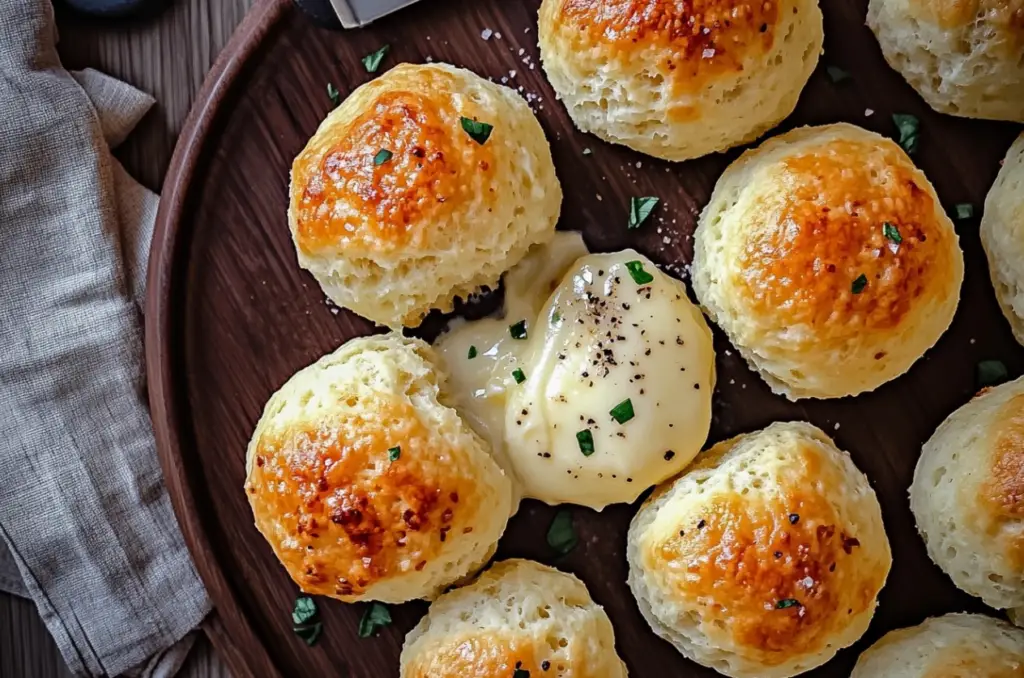
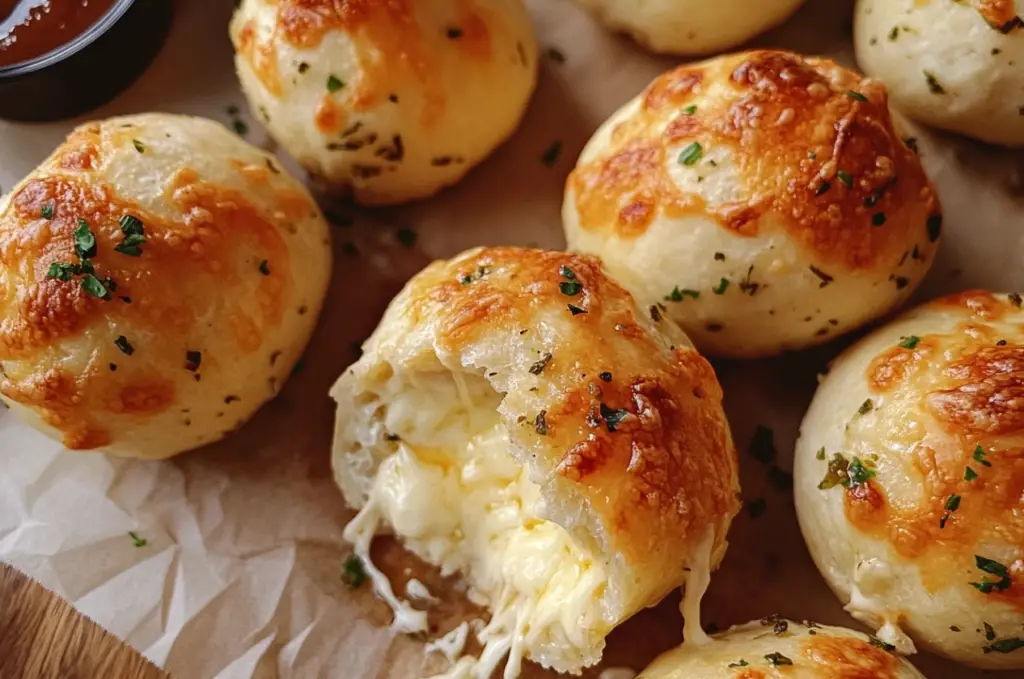
- Flatten each biscuit dough into a circle and place a piece of mozzarella in the center.
- Wrap the dough around the cheese, sealing the edges to form a ball.
- Arrange the cheese bombs on the baking sheet.
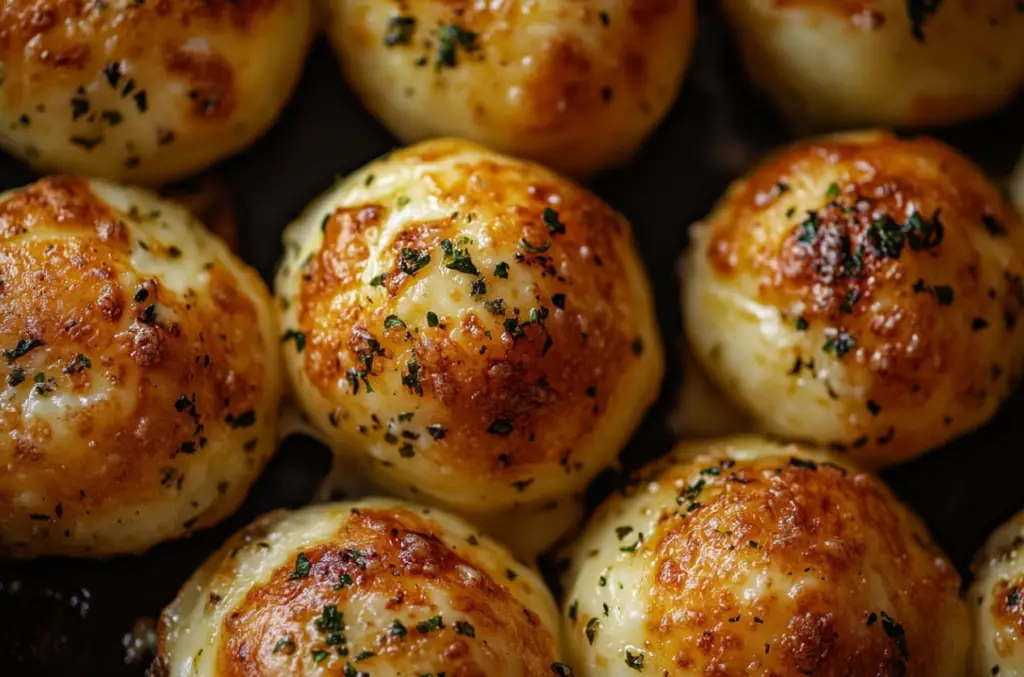
- In a small bowl, mix the melted butter, garlic powder, Italian seasoning, and salt.
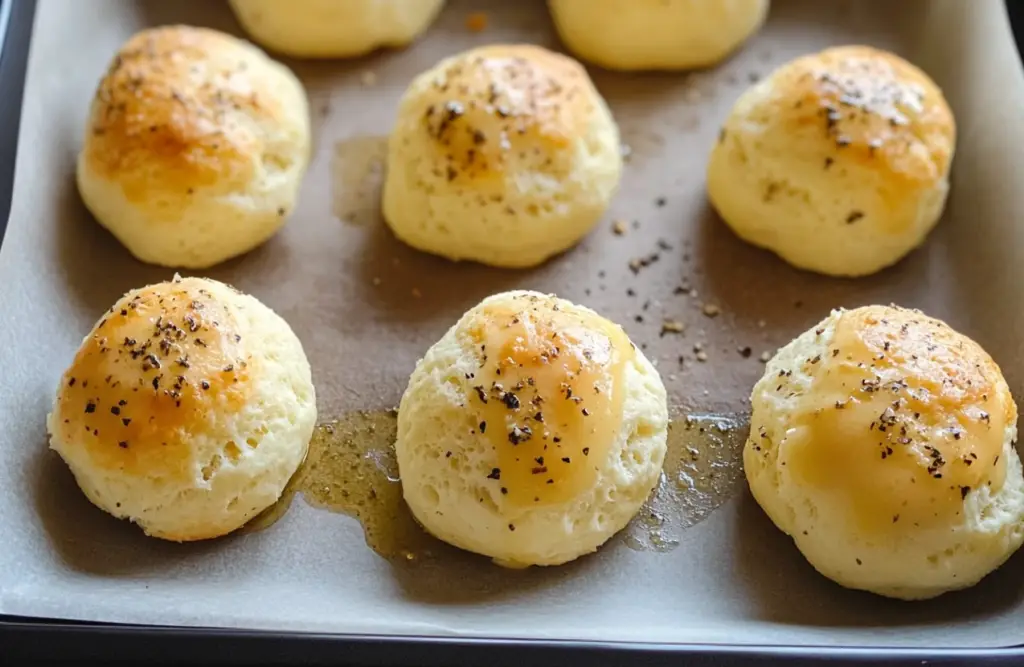
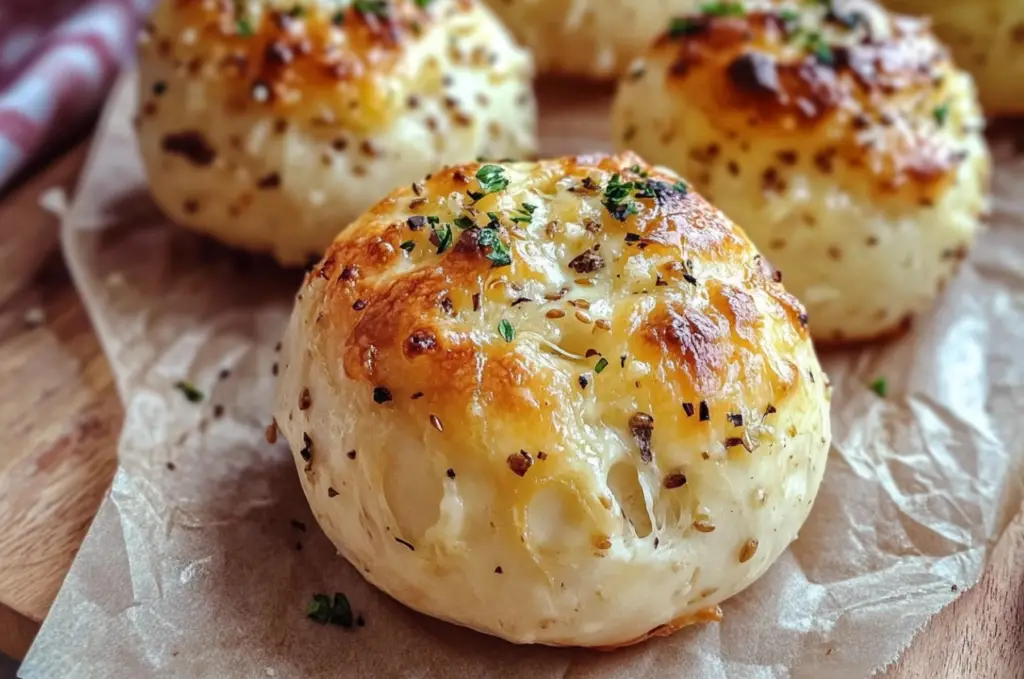
- Brush the butter mixture over each cheese bomb.
- Bake for 10-12 minutes or until golden brown.
- Serve warm and enjoy!
Notes
You can add a sprinkle of Parmesan cheese or fresh parsley on top before serving.
- Prep Time: 10 minutes
- Cook Time: 12 minutes
- Category: Appetizer, Snack
- Method: Baking
- Cuisine: American
Nutrition
- Serving Size: 1 cheese bomb
- Calories: 200 kcal
- Sugar: 1g
- Sodium: 450mg
- Fat: 12g
- Saturated Fat: 7g
- Unsaturated Fat: 4g
- Trans Fat: 0g
- Carbohydrates: 17g
- Fiber: 1g
- Protein: 5g
- Cholesterol: 30mg
Keywords: Garlic Butter Cheese Bombs
For those looking to create an even more authentic experience, consider making your dough from scratch using this homemade biscuit dough recipe. This extra step can add a touch of personalization and elevate the flavor of your Garlic Butter Cheese Bombs.
STEPS
Step 1
Gather all ingredients.
Step 2
Warm your oven to 400°F and prepare a baking sheet by covering it with parchment paper or foil. Arrange the biscuits on the sheet, then gently press them down with your hand. Slice the cheese into 8 equal portions and place one piece on each biscuit.

Step 3
Now comes the enjoyable bit! Encase the cheese with the dough, using your fingers to seal the edges firmly. It’s worth taking a moment to really squeeze and pinch the dough tightly together, ensuring that the cheese stays securely inside while baking.
Step 4
Return them to the baking sheet, seal side down, and put them in the oven for approximately 12 minutes, or until the dough turns a golden brown. Aim for a longer baking time to ensure the cheese melts completely, becoming warm and delightfully gooey.
Step 5
As the biscuits bake, heat the butter in the microwave until melted, then mix in the garlic powder, Italian seasoning, and salt. Once the biscuits are out of the oven, lavishly coat each cheese ball with this seasoned butter mixture.
Step 6
Enjoy them solo or paired with a pizza sauce for dipping! For an extra touch, you can garnish with a sprinkle of parsley and some grated Parmesan.
Advanced Techniques and Variations for Garlic Butter Cheese Bombs
Cheese Options
While mozzarella is a go-to, feel free to try other cheeses for a different flavor. Cheddar adds a sharp bite, while gouda brings a smoky richness. Mixing different cheeses together can create a unique flavor profile that suits your taste, making your Garlic Butter Cheese Bombs Recipe truly special.
Stuffing Options
Beyond cheese, consider adding extra ingredients to the center of your Garlic Butter Cheese Bombs Recipe. Consider adding a slice of pepperoni or some cooked sausage for extra heartiness. For a spicy kick, try jalapeños or crushed red pepper flakes. These additions can transform your cheese bombs into something more hearty and flavorful, catering to diverse palates.
Herb Butter Enhancements
The garlic butter is key to the flavor of these bombs, but you can easily enhance it with additional herbs and spices. Integrate fresh herbs such as rosemary, thyme, or parsley into your butter mixture for a burst of aromatic flavors. If you prefer a little heat, sprinkle in some cayenne pepper or paprika to give your Garlic Butter Cheese Bombs an extra kick.
Baking Tips
Achieving the perfect golden crust requires attention to detail. Ensure your oven is fully preheated and place the cheese bombs on the middle rack to achieve even baking. Brushing the tops with a second layer of garlic butter halfway through baking will give them an extra crispy and flavorful exterior, making your Garlic Butter Cheese Bombs irresistibly delicious. For more advanced recipes, visit cookingwhite.
Maintenance and Storage Tips for Garlic Butter Cheese Bombs Recipe
Proper storage and reheating are key to enjoying your Garlic Butter Cheese Bombs at their best, even after they’ve been made.
Storing Leftovers
Preserve the freshness of your Garlic Butter Cheese Bombs by sealing them in an airtight container and placing them in the refrigerator.This method keeps them fresh for up to three days. To maintain their taste and texture, ensure the container is tightly sealed to prevent moisture from getting in. This simple step preserves the garlicky, cheesy goodness for later enjoyment.
Reheating Instructions
When you’re ready to reheat your Garlic Butter Cheese Bombs, there are a few options. For the best results, reheat the cheese bombs in the oven to restore their crispy exterior and melty center. Set your oven to 350°F (175°C), arrange the cheese bombs on a baking sheet, and warm them for roughly 5-7 minutes, or until they’re thoroughly heated. If you’re in a hurry, you can use a microwave, but be aware that the texture might not be as crispy. For a quick warm-up, microwave the cheese bombs for 20-30 seconds, but keep an eye on them to prevent overcooking.
Freezing for Future Enjoyment
Garlic Butter Cheese Bombs Recipe also freeze well, making them a convenient option for meal prep or quick snacks. For long-term storage, arrange the cooled cheese bombs on a baking sheet in a single layer to freeze. Once they’re frozen solid, transfer them to a freezer-safe bag or container. When it’s time to indulge, reheat the frozen cheese bombs directly in the oven for a quick and delicious treat. This method ensures they retain their delicious, cheesy quality without becoming soggy or losing flavor.
These maintenance and storage tips help you make the most of your Garlic Butter Cheese Bombs, ensuring they’re just as tasty whether fresh, reheated, or frozen.
Dietary Adaptations and Substitutions for Garlic Butter Cheese Bombs Recipe
Garlic Butter Cheese Bombs are delicious and adaptable to various dietary preferences and restrictions. Here’s how you can enjoy them while meeting specific dietary needs.
Gluten-Free Adaptation
For those who need to avoid gluten, you can easily modify this recipe by using gluten-free biscuit dough. Many brands offer gluten-free options that work just as well as traditional dough. Be sure to check the labels for gluten-free certification. The result will be equally satisfying, with the same cheesy, garlicky goodness intact.
Vegan Substitutions
To make Garlic Butter Cheese Bombs Recipe vegan-friendly, substitute the mozzarella cheese with a plant-based alternative. There are several vegan cheeses available that melt beautifully, maintaining that gooey center everyone loves. Additionally, swap the butter for a vegan margarine or coconut oil, and ensure your biscuit dough is free from dairy and eggs. These simple substitutions will allow you to enjoy this savory treat without compromising on flavor.
Low-Carb/Keto-Friendly Version
If you’re following a low-carb or keto diet, you can still indulge in Garlic Butter Cheese Bombs Recipe. Use a low-carb dough made from almond flour or coconut flour to reduce the carbohydrate content significantly. Cheese and butter are naturally low in carbs, making them perfect for this diet. The result is a keto-friendly snack that doesn’t skimp on taste or satisfaction.
Allergy-Friendly Options
For those with dairy allergies, consider using dairy-free cheese and butter substitutes. There are many high-quality options available that closely mimic the taste and texture of their dairy counterparts. You can also experiment with nut-based cheeses for a rich and creamy filling that’s free from common allergens. These adjustments ensure that everyone can enjoy Garlic Butter Cheese Bombs safely and deliciously.
Frequently Asked Questions (FAQs) About Garlic Butter Cheese Bombs Recipe
When making Garlic Butter Cheese Bombs, a few common questions often arise. Here are essential tips to guarantee your cheese bombs are flawless every time.
Is it possible to prepare Garlic Butter Cheese Bombs in advance?
Absolutely, you can assemble Garlic Butter Cheese Bombs ahead of time. Assemble the cheese bombs following the instructions, but wait to bake them. Keep them in the fridge, securely wrapped, for as long as 24 hours until you’re ready to bake. When it’s time to eat, bake them according to the directions, possibly adding a minute or two to the oven time if needed. This method is perfect for planning ahead, ensuring you can serve fresh, warm cheese bombs with minimal effort.
How Can I Stop the Cheese from Oozing Out?
Cheese escaping during baking is typical, but there are ways to reduce it. Initially, ensure the dough is firmly sealed around the cheese to prevent any leaks. Press the edges firmly together, and then give them an extra pinch or twist to secure them. Additionally, avoid overfilling the dough with cheese. A small, compact piece of mozzarella works best to keep the cheese contained inside the Garlic Butter Cheese Bombs.
Can I Use Different Types of Dough?
Absolutely! While refrigerated biscuit dough is convenient, you can use other types of dough to customize your Garlic Butter Cheese Bombs. Pizza dough, crescent roll dough, or even homemade dough can be used to create a different texture and flavor. Each type of dough offers a unique experience, so feel free to experiment and find your favorite.
These FAQs address the most common concerns, helping you achieve perfect Garlic Butter Cheese Bombs every time you make them.
Conclusion
Garlic Butter Cheese Bombs Recipe are the perfect combination of simplicity, flavor, and versatility, making them a must-try recipe for any occasion. From their quick preparation to their delicious, cheesy center, these bombs deliver a satisfying experience every time.
Why You’ll Love Them
Whether you’re serving them as an appetizer, a side dish, or a party snack, Garlic Butter Cheese Bombs are sure to impress. Their warm, buttery exterior combined with a gooey, cheesy filling makes them an irresistible treat that everyone will enjoy. Plus, with the ability to customize the recipe to suit various dietary needs, they’re a versatile addition to your recipe collection.
Endless Possibilities
The beauty of Garlic Butter Cheese Bombs lies in their adaptability. You can experiment with different cheeses, fillings, and dough types to create a unique version that reflects your personal taste. Whether you stick to the classic recipe or explore new variations, these cheese bombs are a guaranteed hit.
Final Thoughts
In conclusion, Garlic Butter Cheese Bombs offer a delightful mix of flavors and textures that are easy to make and even easier to enjoy. They’re perfect for any occasion, whether you’re hosting a gathering or simply looking for a comforting snack. With their endless possibilities and crowd-pleasing appeal, these cheese bombs are sure to become a favorite in your kitchen.
By mastering this simple yet delicious recipe, you’ll have a go-to dish that never fails to impress. So, gather your ingredients, preheat your oven, and get ready to enjoy the mouthwatering goodness of Garlic Butter Cheese Bombs.