Introduction
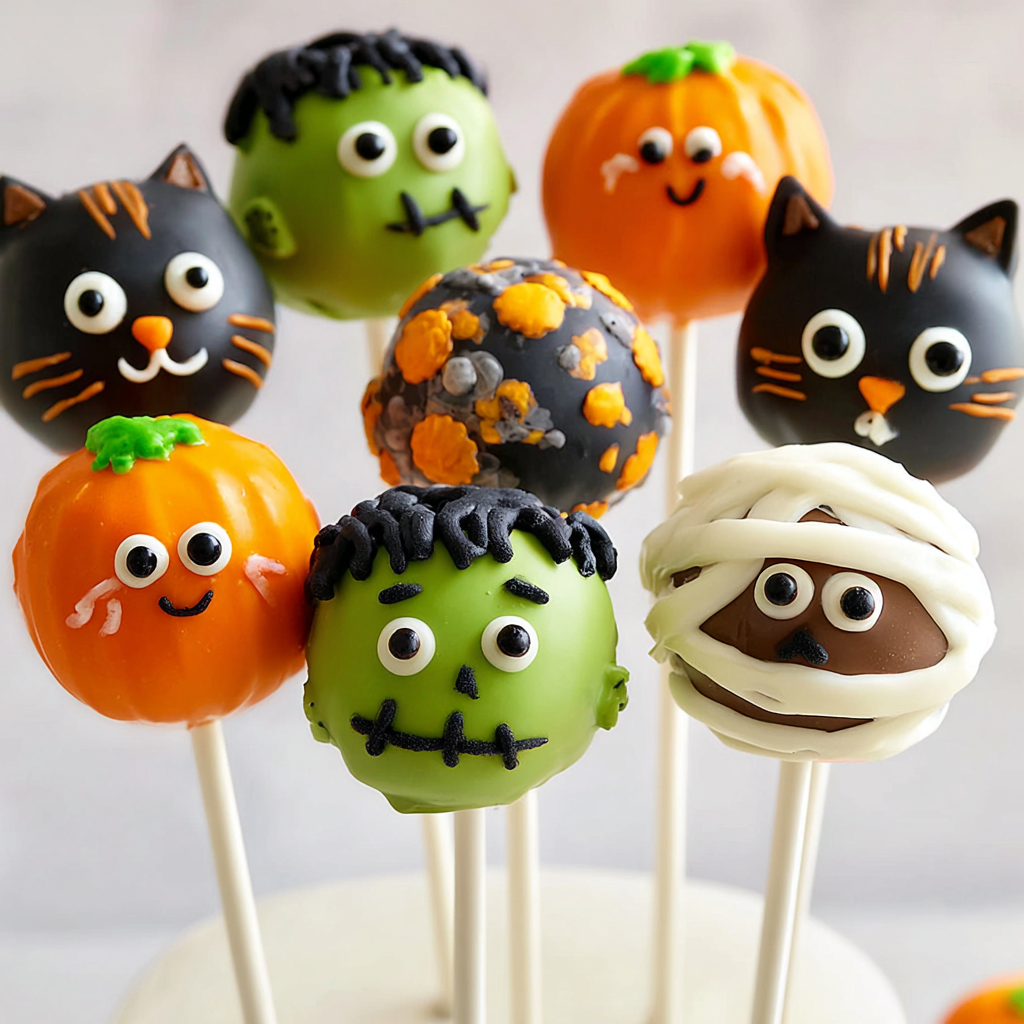
There’s no treat that combines creativity and sweetness quite like Halloween Cake Pops. These bite-sized delights are festive, fun, and endlessly customizable. Whether you’re making ghosts, pumpkins, mummies, or little green monsters, each cake pop becomes a tiny edible work of art. Beneath all that spooky decoration lies rich, moist chocolate fudge cake mixed with creamy frosting, dipped in colorful candy coatings that set to a smooth, glossy finish. They’re the ultimate grab-and-go Halloween dessert—perfect for parties, bake sales, or as trick-or-treat surprises.
What makes Halloween Cake Pops so irresistible is how playful they are. You can transform simple cake crumbs into an entire cast of characters using just candy melts, candy eyeballs, and a few sprinkles. They’re a creative project the whole family can enjoy—kids love dipping and decorating, while adults can get delightfully meticulous adding tiny eyes, fangs, or candy corn hats. Best of all, they taste every bit as good as they look. Each bite is a blend of soft chocolate cake and smooth, fudgey frosting coated in a satisfying candy shell.
I remember the first time I made these cake pops—it was a last-minute addition to a Halloween dessert table, and they completely stole the show. Since then, they’ve become a staple in my October baking lineup. If you’re looking for more Halloween dessert ideas, check out Taste of Home’s Halloween sweets collection or Wilton’s Halloween cake pop tutorials. But for now, let’s grab our candy melts and dive into the most fun Halloween baking project you’ll make this year!
Recipe Card
Print
Halloween Cake Pops
Description
These Halloween Cake Pops are made from moist chocolate fudge cake, shaped into balls, dipped in colorful candy coatings, and decorated as ghosts, pumpkins, and monsters. They’re fun to make, perfect for parties, and guaranteed to impress!
Ingredients
- 15 oz chocolate fudge cake mix, prepared in a 9×13 dish and cooled
- ½ cup butter
- 2 tablespoons shortening
- 1 cup powdered sugar
- ½ cup cocoa powder
- ½ teaspoon vanilla extract
- 2–3 tablespoons milk
- 8 oz white candy melts
- 8 oz orange candy melts
- 10 oz green candy melts
- 10 oz black candy melts
- 30 candy eyeballs
- 20 candy corn pieces
- 10 heart sprinkles (for vampire mouths or monster decorations)
- 40 lollipop sticks (6-inch)
- Piping bags (or ziplock bags with a snipped corner)
Instructions
- Prepare the cake:
Bake the chocolate fudge cake according to the package directions in a 9×13 pan. Let it cool completely. - Make the frosting:
In a bowl, beat butter and shortening until creamy. Add powdered sugar, cocoa powder, vanilla, and 2 tablespoons of milk. Beat until smooth, adding more milk if needed for a thick but spreadable consistency. - Form the cake balls:
Crumble the cooled cake into fine crumbs in a large bowl. Add ½ to ¾ cup of frosting and mix with your hands until the texture is moist and holds together. Roll into 1½-inch balls and place on a parchment-lined tray. - Insert sticks and chill:
Melt a small amount of any candy melts. Dip the end of each lollipop stick into the melted candy, then insert it halfway into each cake ball. Chill for at least 1 hour or freeze for 15 minutes until firm. - Melt the candy coatings:
Place each color of candy melts into separate microwave-safe bowls. Microwave in 30-second intervals, stirring until smooth. Add a teaspoon of shortening if the coating seems too thick. - Dip and decorate:
Working with a few pops at a time, dip each chilled cake pop into the desired color and gently tap off excess coating. Stick the pops upright in a foam block or cake pop stand to set. Decorate immediately before the coating hardens. - Create spooky characters:
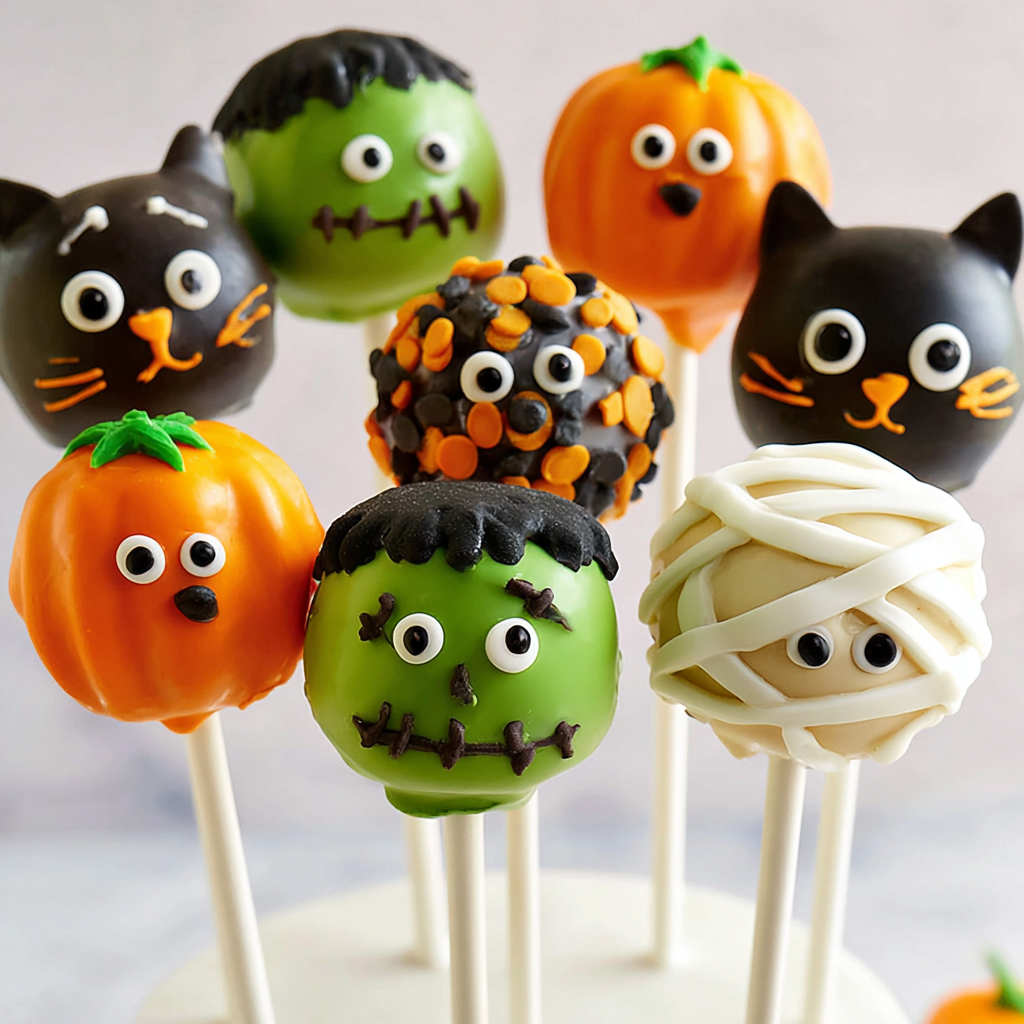
- Ghosts: Use white candy melts and attach candy eyeballs before the coating dries. Pipe on small black mouths once set.
- Pumpkins: Dip in orange candy melts, then draw vertical lines using a piping bag filled with melted orange or brown coating. Add a green candy stem or a candy corn top.
- Monsters: Dip in green or black candy melts. Add candy eyes, heart sprinkles as mouths or fangs, and drizzle different colors for texture.
- Vampires: Use black candy melts, add red heart “mouths,” and draw fangs with white melted candy.
- Let them set completely:
Allow the candy coating to harden fully at room temperature (about 30 minutes) before serving or packaging.
Notes
Active prep: 40 minutes
Chilling time: 1 hour
Tip: Always ensure the cake pops are well-chilled before dipping—cold pops prevent cracking and keep the candy coating smooth. If your candy coating becomes thick, add a teaspoon of vegetable oil or shortening to loosen it up.
Advanced Techniques
Mastering Smooth, Shiny Candy Coating
The key to gorgeous Halloween Cake Pops is mastering your candy melt consistency. Always melt slowly in short bursts and stir frequently. If the candy seems thick, add shortening one teaspoon at a time. For glossy results, dip in one smooth motion and gently tap off the excess. Avoid humidity—it can make the coating dull.
Decorating Like a Pro
Get creative with details! Use piping bags to add spiderwebs, monster scars, or dripping “blood.” You can also use edible markers for fine lines once the coating sets. For 3D effects, stack candy eyes or add mini chocolate chips as horns. Keep pops upright in styrofoam while decorating for mess-free artistry.
Color Coordination and Halloween Themes
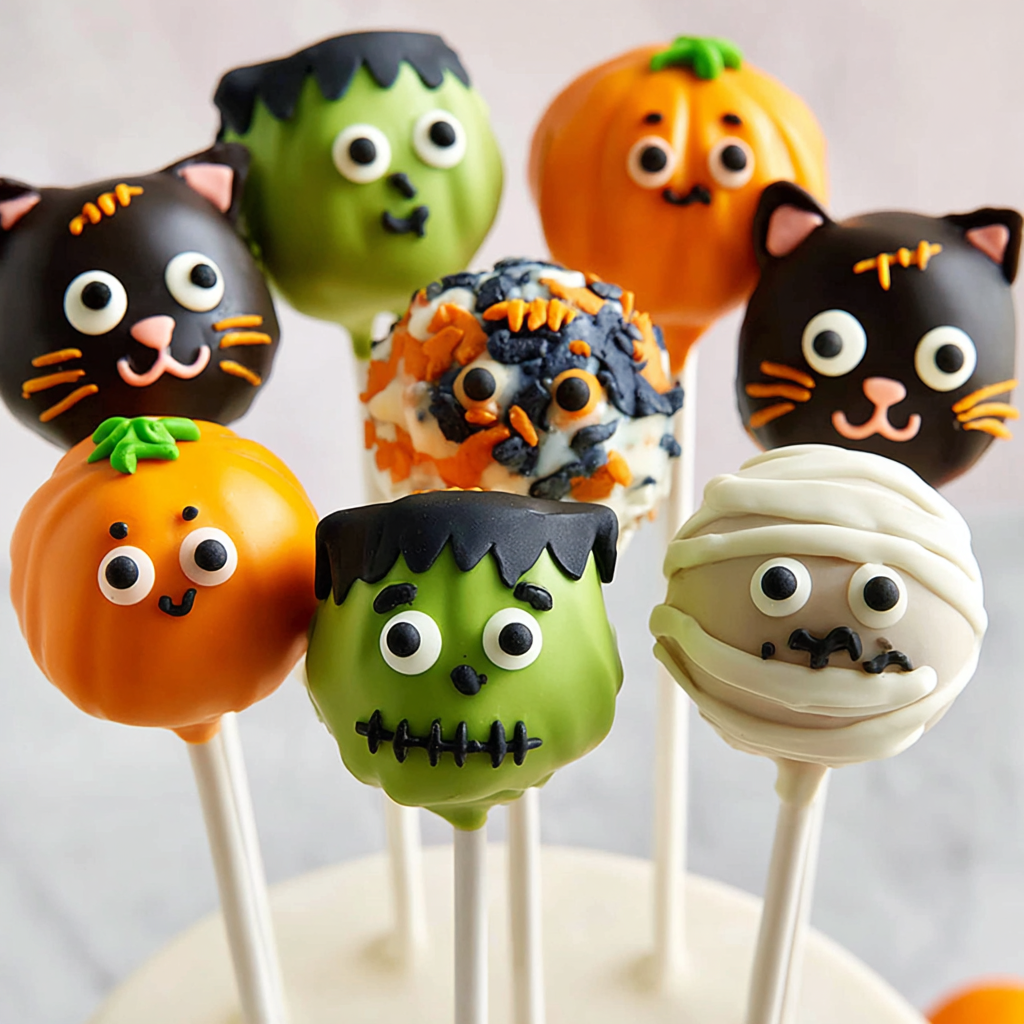
Stick to classic Halloween colors—black, orange, green, and white. Alternate coatings to make your display pop. For example, serve orange pumpkin pops next to black spider pops for contrast. You can even mix colors by marbling candy melts before dipping for a swirling “witch’s cauldron” effect.
Keeping Cake Pops Moist Inside
Avoid overmixing the cake and frosting—just enough to hold together is perfect. Too much frosting makes the pops heavy and greasy. If your cake seems dry, add a spoonful of milk or extra frosting. Moist but firm dough is the secret to a perfect cake pop texture.
Turning Cake Pops into Party Favors
Once set, wrap each pop in cellophane and tie with festive ribbon. Label them with spooky names like “Monster Bites” or “Pumpkin Pops.” They make adorable party favors or gifts. You can also display them upright in a pumpkin-shaped vase filled with candy corn for a stunning centerpiece.
Storage, Shelf Life, and Maintenance Tips
Storing Cake Pops at Room Temperature
If your house is cool, you can store finished cake pops at room temperature for up to 2 days. Keep them in an airtight container away from sunlight. The candy shell keeps them moist and fresh.
Refrigerating for Extended Freshness
For longer storage (up to 5 days), refrigerate the pops in an airtight container. Place parchment paper between layers to prevent sticking. Allow them to come to room temperature before serving to prevent condensation on the candy coating.
Freezing Cake Pops
You can freeze undecorated cake balls for up to 2 months. Thaw in the refrigerator before dipping and decorating. Freezing decorated pops isn’t ideal, as condensation can ruin the coating.
Reviving Dull or Cracked Coating
If your candy coating cracks after chilling, re-dip the cake pop in melted candy and let it set again—it creates a flawless second layer. You can also drizzle contrasting candy melts over cracks to disguise them stylishly.
Transporting for Parties
To safely transport cake pops, stand them in a sturdy foam block or wrap individually. Keep them cool during travel—warm conditions can soften the candy coating and cause the decorations to slide.
Dietary Adaptations and Substitutions
Making Gluten-Free Halloween Cake Pops
Use a gluten-free chocolate cake mix and ensure your candy melts and sprinkles are gluten-free. The texture and flavor remain just as rich and moist.
Dairy-Free Adaptation
Replace butter with vegan margarine and milk with almond or oat milk. Use dairy-free candy melts (brands like Sweetapolita or Enjoy Life). The flavor stays chocolatey and satisfying without any dairy.
Vegan Halloween Cake Pops
Prepare a vegan chocolate cake using a flaxseed egg substitute (1 tablespoon flaxseed meal + 3 tablespoons water per egg). Use vegan butter and dairy-free candy melts. Vegan cake pops hold their shape beautifully and taste decadent!
Sugar-Free or Low-Sugar Option
Use sugar-free cake mix and frosting (brands like Swerve or Lakanto). Opt for dark chocolate coating instead of candy melts for lower sugar content—it also gives a sophisticated, not-too-sweet balance.
Nut-Free Halloween Cake Pops
This recipe is naturally nut-free, but double-check candy decorations for cross-contamination warnings. Always use nut-free candy melts if serving at parties with allergy concerns.
FAQs About Halloween Cake Pops
Why Are My Cake Pops Cracking After Dipping?
This usually happens if the cake balls are too cold and the melted candy is too hot. Let the chilled pops sit for 5 minutes before dipping, and ensure your candy coating isn’t overheated.
Can I Use Store-Bought Frosting?
Yes! Canned chocolate frosting works perfectly for binding the cake crumbs. Use about ¾ cup per batch. Homemade frosting gives you more control over sweetness, but either works great.
How Do I Keep Cake Pops from Falling Off the Stick?
Be sure to dip the stick in melted candy before inserting it into the cake ball—it acts as edible glue. Chill well before dipping, and hold the stick firmly while tapping off excess coating.
Can I Make Halloween Cake Pops Without Candy Melts?
If you don’t have candy melts, use melted chocolate or white chocolate chips. Add a teaspoon of coconut oil to thin it for dipping. You can color white chocolate with oil-based food coloring for vibrant effects.
How Can I Display Cake Pops for a Party?
Stick them into a decorated foam block or carve holes into a pumpkin to hold the sticks upright. Arrange by color for a festive Halloween display—ghosts, monsters, and pumpkins all together look fantastic!
Conclusion & Final Thoughts
Halloween is the perfect excuse to play with your food—and Halloween Cake Pops are proof that spooky can be sweet! These adorable, edible creations are as fun to make as they are to eat. From gooey chocolate interiors to colorful candy shells, every bite is a little burst of festivity. They’re also the perfect project to make with kids—expect laughter, sprinkles everywhere, and a kitchen full of delicious chaos.
What I love most about this recipe is its flexibility. You can adapt it to any skill level or party theme. Whether you go for elegant black-and-orange pops for an adult soirée or goofy monster faces for a children’s bash, they’ll always steal the spotlight. The mix of textures—the fudgy center, creamy frosting, and crisp coating—is utterly addictive.
So this Halloween, skip the store-bought treats and make something unforgettable. Whip up a batch of Halloween Cake Pops, unleash your creativity, and watch your guests’ faces light up when they see your edible army of ghosts, pumpkins, and monsters. Because in the world of Halloween desserts, these tiny pops pack a big bite of magic, mischief, and pure joy!