1. Introduction to the Recipe
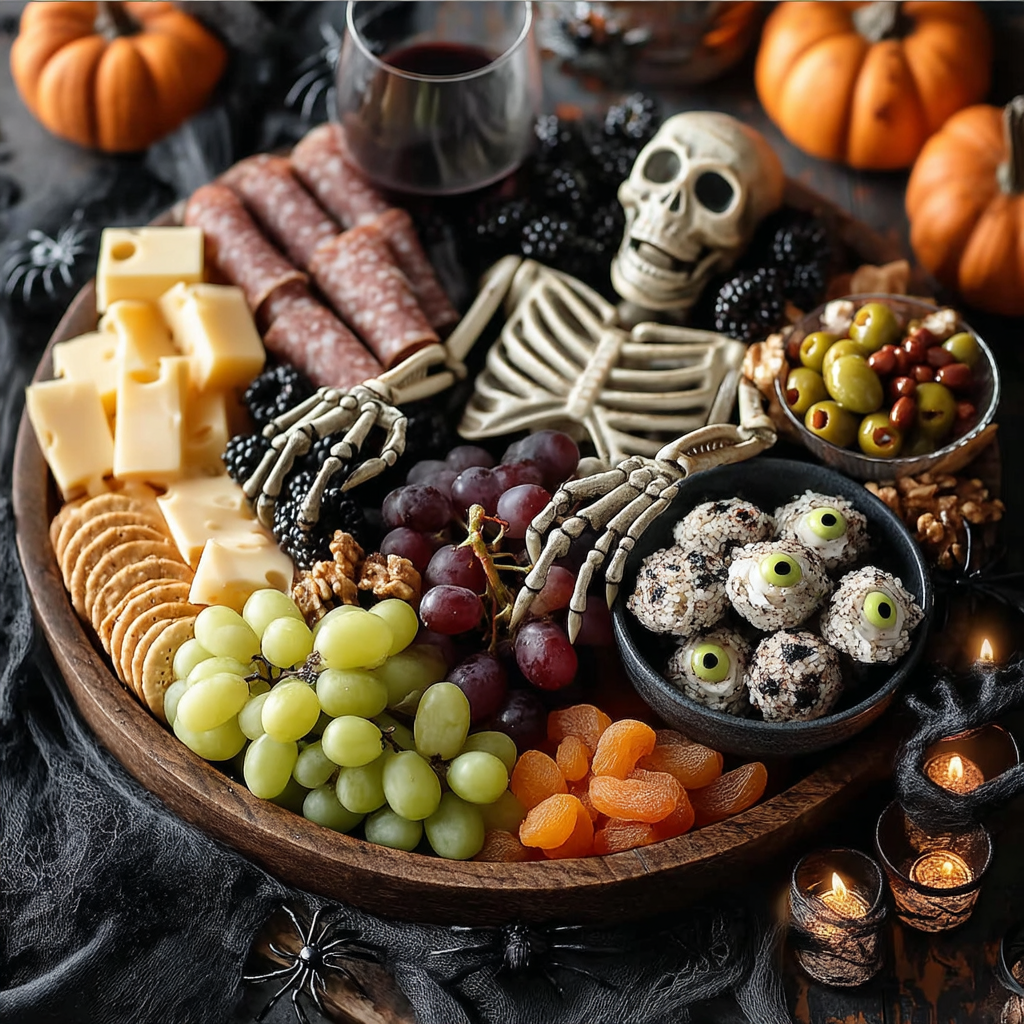
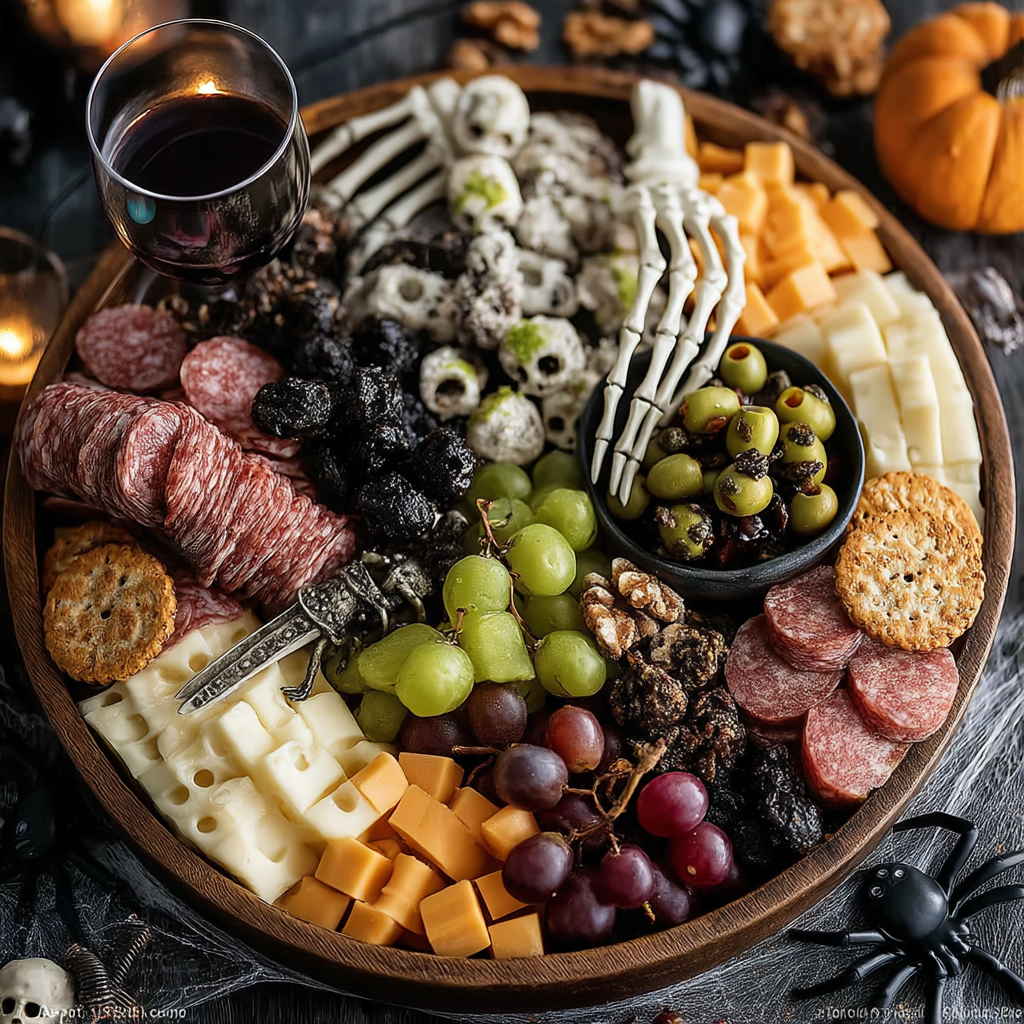
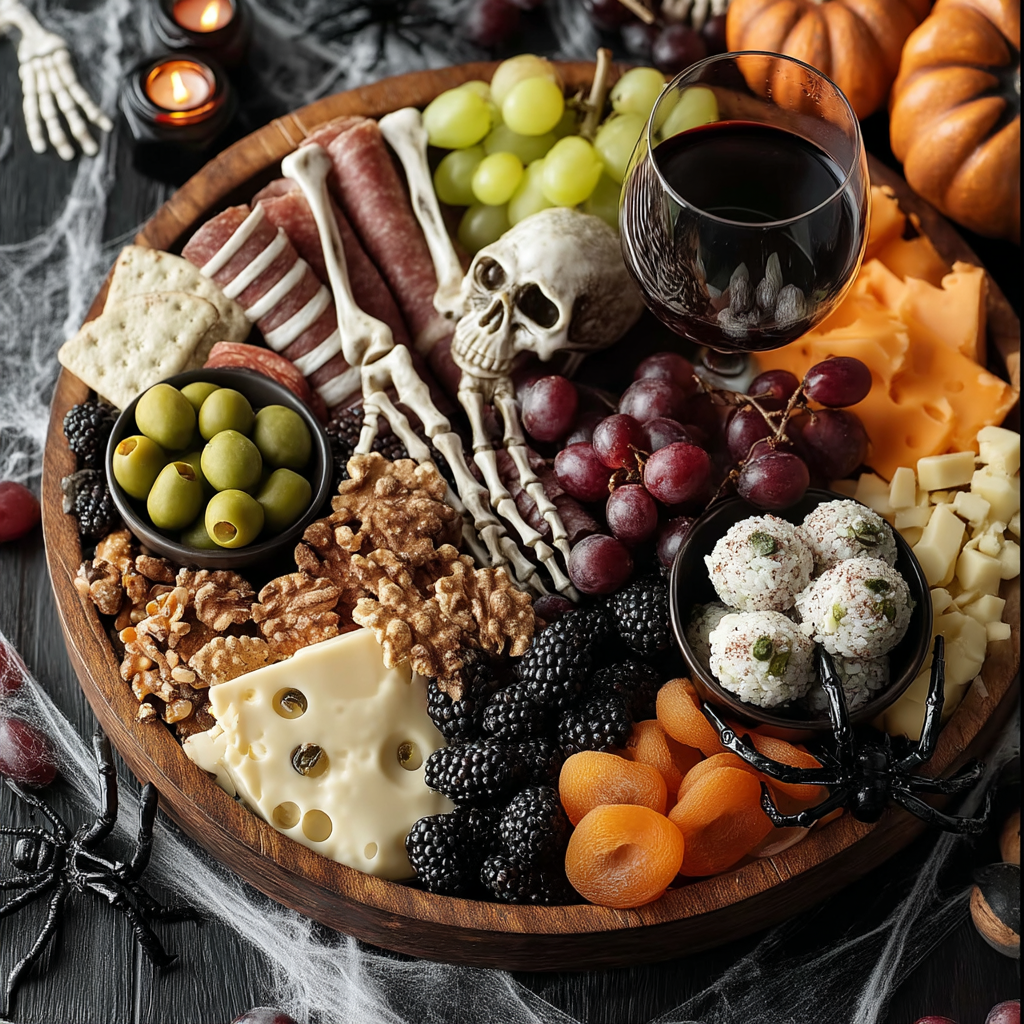
A Halloween Charcuterie Board is the ultimate way to combine frightfully festive flair with savory sophistication. Whether you’re hosting a spooky soirée or enjoying a cozy October evening with family, this themed grazing board is a crowd-pleaser that’s as visually impressive as it is delicious. Packed with a variety of cheeses—like sharp cheddar, creamy brie, spicy jalapeño pepper jack, and adorable mozzarella eyeballs—alongside rich cured meats, fresh and dried fruits, nuts, crackers, and even chocolate-covered peanuts, this board blends classic charcuterie with playful Halloween charm.
It’s the balance of contrasting textures and seasonal colors that makes this board stand out. Crisp green apples and juicy grapes play beautifully against the richness of brie and the bite of pepper jack. Add a few eerie elements like candy eyeballs, plastic spiders, and skeleton hands, and you’ve got a centerpiece that’ll have your guests snapping photos before they even take a bite.
For those new to the world of charcuterie, this board is a great place to start. You don’t need expensive ingredients or advanced skills—just a bit of creativity and the willingness to mix textures and flavors. If you’re looking for tips on general board layout, check out this guide to building the perfect cheese board. And for pairing inspiration, this charcuterie and wine pairing article is a helpful resource.
In this article, you’ll learn everything you need to know to build your own Halloween Charcuterie Board—from ingredient choices and assembly to advanced styling tricks and dietary adaptations. Whether you’re an entertaining pro or a newbie, you’ll walk away with a complete game plan for creating a board that’s not only on-theme, but unforgettable. So let’s get spooky and snacky!
2. Basic Recipe: Ingredients and Instructions
Print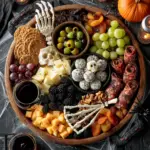
Halloween Charcuterie Board Recipe
Description
Create a spooky Halloween Charcuterie Board with cheese, meats, fruit, and themed decor—perfect for fall parties and gatherings.
Ingredients
Cheese:
- 16 oz sharp cheddar cheese, cubed or sliced
- 8 oz brie cheese round
- 8 oz jalapeño pepper jack cheese, sliced
- 8 oz fresh mozzarella balls (ciliegine), decorated with candy eyeballs
Meat:
- 4 oz prosciutto
- 4 oz genoa salami
Fruit:
- 1 cup blackberries
- 1 cup green grapes
- 1 green apple, thinly sliced
- ½ cup dried apricots
Crackers:
- Everything bagel seasoned crackers
- Fig and olive crisps
Other Additions:
- ½ cup walnuts
- ¼ cup pimento-stuffed green olives
- ½ cup chocolate covered peanuts
Decorations:
- Plastic spiders
- Candy eyeballs
- Skeleton hands
- Skeleton centerpiece
Instructions
- Prep Your Board
Choose a large wooden, marble, or slate board. Clean it thoroughly and, if wooden, condition with food-safe mineral oil. - Arrange the Cheeses
- Cube or slice the cheddar cheese.
- Place the brie round as a visual centerpiece.
- Slice the pepper jack and fan out into a wedge.
- Drain and pat dry the mozzarella balls. Decorate them with candy eyeballs using a dab of honey or cream cheese to stick.
- Place the Meats
- Fold prosciutto into loose ribbons or rosettes.
- Roll or fold salami slices, or arrange in concentric circles.
- Add Fruits
- Cluster blackberries and grapes in opposite corners.
- Fan out apple slices and tuck dried apricots into empty spaces for pops of orange.
- Insert Crackers
- Stack everything bagel crackers and fig crisps on either side of the board. Use ramekins if needed to separate flavors.
- Add Nuts and Extras
- Scatter walnuts around cheese clusters.
- Add olives in a small bowl or tuck into crevices.
- Disperse chocolate-covered peanuts evenly, keeping them away from heat sources.
- Decorate
- Place candy eyeballs strategically on cheeses or near mozzarella balls.
- Add plastic spiders near fruit and crackers.
- Use a skeleton centerpiece behind or beside the board for dramatic effect.
- Serve with Style
Provide small plates, napkins, toothpicks, and cheese knives for easy serving. Optional: surround the board with mini pumpkins or faux cobwebs.
Notes
Always allow cheeses to sit out for 30 minutes before serving to enhance flavor and texture.
Brush apple slices with lemon juice to prevent browning.
Keep spicy and mild ingredients separated to accommodate all palates.
Make sure decorative elements do not touch the food directly unless they are food-safe.
Keywords: Halloween Charcuterie Board Recipe
3. Advanced Techniques
Bold Presentation & Height Play
Add visual interest by incorporating various levels on your board. Use ramekins, small bowls, or upside-down cups to lift some elements higher than others. Brie can sit on a mini pedestal, while crackers can be layered against upright slices of cheese for vertical appeal. This layered look draws the eye and makes the board feel more abundant and professional. Skeleton props can also be placed higher or lower to create depth and eerie drama.
Flavor Contrast Optimization
An unforgettable board needs more than good looks—it needs contrast. Sweet dried apricots next to salty olives. Crunchy walnuts beside creamy brie. Spicy pepper jack paired with cooling mozzarella. These dynamic combos keep guests reaching for more. Aim for at least one flavor from each category: salty, sweet, creamy, spicy, acidic, and crunchy. This layered approach elevates the flavor journey with each bite.
Themed Color Coordination
Create a spooky aesthetic with a Halloween color palette: orange (apricots), black (blackberries), green (olives and apples), and white (mozzarella). Keep colors evenly distributed across the board so one side doesn’t appear dull or imbalanced. Use black ramekins for olives and dark napkins to further enhance the gothic vibe. It’s a subtle but effective way to make the theme cohesive.
Seasonal Ingredient Swaps & Freshness
Adapt ingredients for what’s in season or available locally. Swap dried apricots for fresh figs or roasted butternut squash cubes. Instead of green apples, try pear slices. If brie isn’t available, go for camembert. Always choose fresh, high-quality ingredients—especially cheeses and fruits—as these are the stars of the board. Buy fresh and prep close to serving time for peak flavor.
Spooky Decorative Styling without Sacrificing Taste
While decorations are fun, they should never interfere with food safety. Place props like skeleton hands on parchment or keep them on the outer rim. Anchor candy eyeballs with food-safe adhesives (honey, cream cheese) and avoid overcrowding the board. Visual storytelling is important, but always prioritize hygiene and edibility.
See more advanced recipes at cookingwhite.com
4. Storage, Shelf Life, and Maintenance Tips
Storing Leftover Cheeses
Wrap brie and mozzarella in wax paper or parchment, then loosely in plastic wrap. Hard cheeses like cheddar and pepper jack should be wrapped in parchment and stored in airtight containers. Refrigerate all cheeses and consume soft cheeses within 5–7 days, hard cheeses within 2–3 weeks.
Keeping Fruits Fresh
Apples can be stored in lemon-water for a few hours, but best served fresh. Grapes and blackberries should be refrigerated in dry, breathable containers. Avoid washing berries until just before serving to prevent mold.
Preserving Crackers & Crisps
Keep crackers in airtight containers after opening. If exposed to moisture from fruits or soft cheeses, discard soggy ones and restock with dry replacements. For long events, keep backup crackers sealed and replenish as needed.
Freezing & Pre‑Prep Options
While you can’t freeze the entire board, you can freeze hard cheeses like cheddar and slice before assembling. Meats and soft cheeses are better stored refrigerated. Most fruits don’t freeze well for board use, so prep close to serving time.
Handling Decorations & Safety
Always clean plastic decorations before placing them near food. Keep non-edible items separated with parchment or in designated corners. Be cautious of small decorations if children are present. Consider edible alternatives like sugar eyes for safety.
5. Dietary Adaptations and Substitutions
Gluten-Free Adaptation
Use gluten-free crackers, seed crisps, or rice crackers instead of traditional ones. Verify meat and cheese labels for hidden gluten. Many brands now offer certified gluten-free charcuterie products.
Nut-Free Option
Skip the walnuts and use roasted pumpkin or sunflower seeds instead. Replace chocolate-covered peanuts with chocolate chips or candy corn. Always check packaging for cross-contamination warnings.
Vegetarian & Lactose-Friendly Choices
Remove meats and replace with roasted red peppers, marinated mushrooms, or veggie deli slices. Use aged cheeses (lower in lactose) or lactose-free options like goat cheese. Plant-based cheeses also work well.
Vegan Adaptation
Replace cheeses with plant-based varieties. Swap meats for vegan cold cuts or grilled veggies. Use dairy-free chocolates and crackers. Load up on fruit, nuts, and savory dips to maintain variety and richness.
Low Sugar & Low Carb Options
Use berries instead of dried fruits. Stick to low-carb nuts and cheeses. Choose seed-based crackers or veggie slices (like cucumber or zucchini coins) as a base. Omit candy decorations or choose sugar-free versions.
6. FAQs About the Recipe
What’s the Best Way to Prevent Apple Slices from Turning Brown?
Dip apple slices in lemon juice or soak in a mixture of 1 cup water + 1 tbsp lemon juice. This prevents oxidation and preserves appearance for hours. Pat dry before placing on the board.
How Long Can the Board Sit Out Before Food Safety Becomes a Concern?
Most items are safe for up to 2 hours at room temperature. For warmer environments, reduce time to 1 hour. Use ice packs under the board or refresh with backups from the fridge to keep ingredients cool and safe.
Can I Assemble the Board Ahead of Time?
Yes, but with care. Pre-slice cheeses and meats the night before and store in airtight containers. Assemble fruits, crackers, and decorations just before serving to maintain texture and color.
How Do I Clean Up Leftovers Without Wasting?
Wrap leftovers individually and label them. Use fruits in smoothies, cheeses in pasta or sandwiches, and meats in wraps or omelets. Store decorative items for reuse next year after sanitizing.
What If Some Guests Don’t Like Strong or Spicy Flavors?
Keep milder cheeses and meats on one side of the board and bolder items on the other. Label spicy options. Offer plain crackers and sweet fruits nearby to cleanse the palate between flavors.

7. Conclusion & Final Thoughts
The Halloween Charcuterie Board is more than a collection of snacks—it’s an edible centerpiece that brings people together. It celebrates seasonal flavors, encourages creativity, and adds a dramatic, fun twist to your Halloween table. With layers of texture, color, and flavor, plus themed decorations that delight all ages, this board is the perfect blend of style and substance.
It’s also incredibly adaptable. Whether you’re catering to dietary needs, customizing for flavor preferences, or working with what’s in season, this board can be tweaked to suit any event. It’s simple enough for beginners and flexible enough for seasoned hosts to turn into a gourmet experience. From the savory cheddar cubes to the whimsical mozzarella “eyeballs,” every bite is both festive and flavorful.
Hosting during Halloween can feel overwhelming, but this board makes it easy. It looks fantastic, requires no cooking, and can be prepped in advance. Plus, the ability to scale up or down means it works just as well for a cozy family movie night as it does for a big costume party. And because it’s self-serve, guests can graze and mingle while enjoying the presentation.
So whether you’re new to entertaining or simply want a no-fuss, Instagram-worthy spread, the Halloween Charcuterie Board is your go-to recipe this spooky season. It’s hauntingly good—and your guests won’t forget it anytime soon.