Description
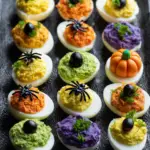
These Halloween Deviled Eggs are a festive twist on the classic appetizer. Made with creamy yolk filling and decorated as pumpkins, mummies, and spiders, they’re perfect for parties and spooky celebrations.
Ingredients
Scale
Base Deviled Egg Mixture
- 6 hard-boiled eggs (see link for our Perfect Hard Boiled Eggs Recipe)
- 2 tablespoons mayonnaise (we like Best Foods brand)
- 1½ teaspoons mustard
- ⅛ teaspoon sugar
- ½ teaspoon white vinegar
- Salt and pepper to taste
For Mummy Deviled Eggs
- Capers (for the eyes)
- Extra mayonnaise (for “bandage” stripes)
For Pumpkin Deviled Eggs
- Red and yellow food coloring (or orange food coloring)
- Chives (for the stem)
For Spider Deviled Eggs
- Large black olives
Instructions
- Prepare the eggs:
Boil the eggs, let them cool, and peel them carefully. Slice each egg in half lengthwise and remove the yolks. Place yolks in a small mixing bowl. - Make the filling:
Mash the yolks with a fork until smooth. Add mayonnaise, mustard, sugar, vinegar, and salt and pepper. Stir until creamy and well-blended. - Divide the mixture:
If making multiple designs, divide the filling into separate bowls for each type (Pumpkin, Mummy, Spider). - For Pumpkin Deviled Eggs:
Add a few drops of red and yellow food coloring to one portion of filling until you get a pumpkin-orange shade. Spoon or pipe the mixture into egg whites. Use a fork to make vertical lines for a pumpkin texture, then add a small chive piece as the stem. - For Mummy Deviled Eggs:
Fill the egg whites with the plain yellow mixture. Using a piping bag or sandwich bag with a small corner snipped off, pipe thin “bandage” stripes of mayonnaise across the top. Add two capers for eyes peeking through the wrappings. - For Spider Deviled Eggs:
Fill the egg whites with the plain yellow mixture. Cut olives in half—use one half for the spider body and slice the other half into thin strips for legs. Arrange them on top of the filling to resemble a spider. - Serve or chill:
Arrange all your Halloween Deviled Eggs on a platter. Serve immediately, or cover and refrigerate until ready to serve.
Notes
Active prep time: ~20 minutes
You can make the filling ahead and refrigerate it (covered) for up to 24 hours. Assemble and decorate the eggs just before serving for the freshest appearance. Use gel-based food coloring for vibrant pumpkin tones without thinning the filling.