Halloween Pizza Skulls: Gooey, Spooky, and Utterly Irresistible
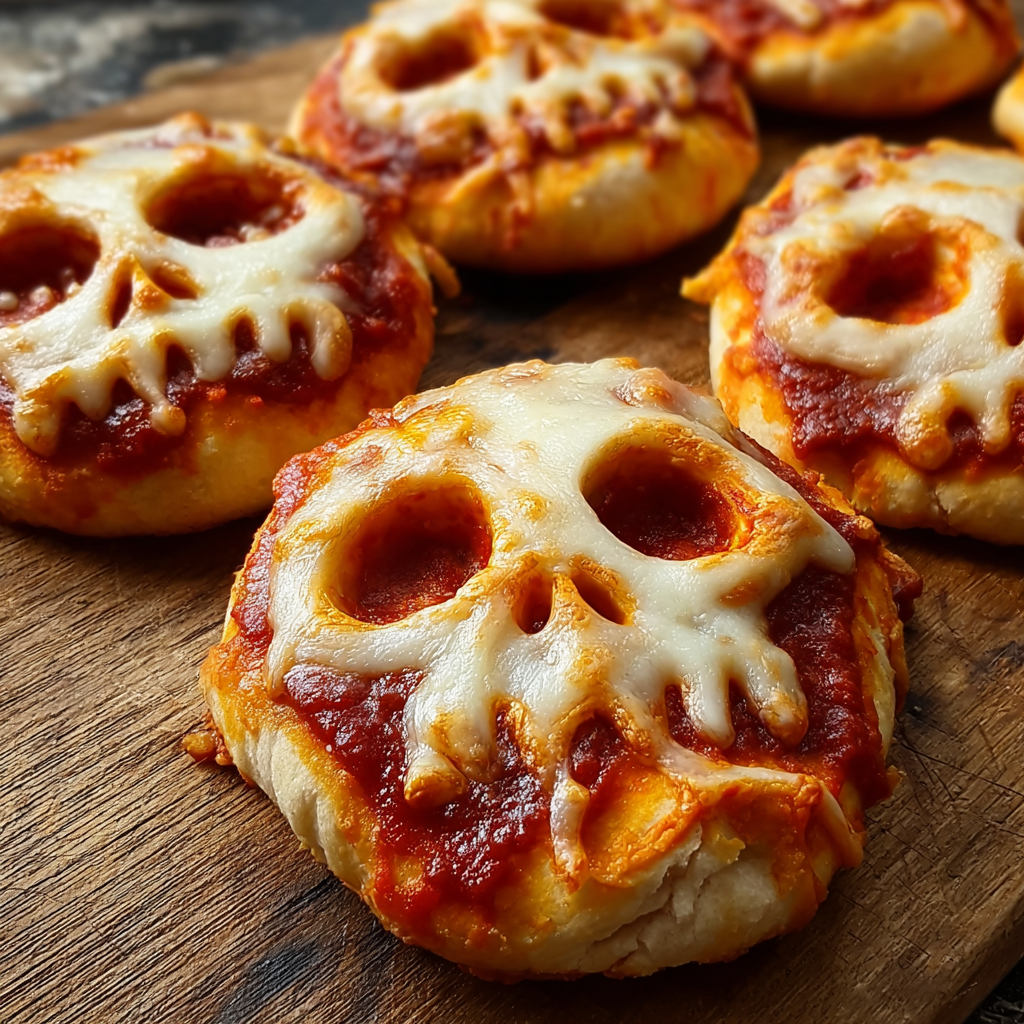
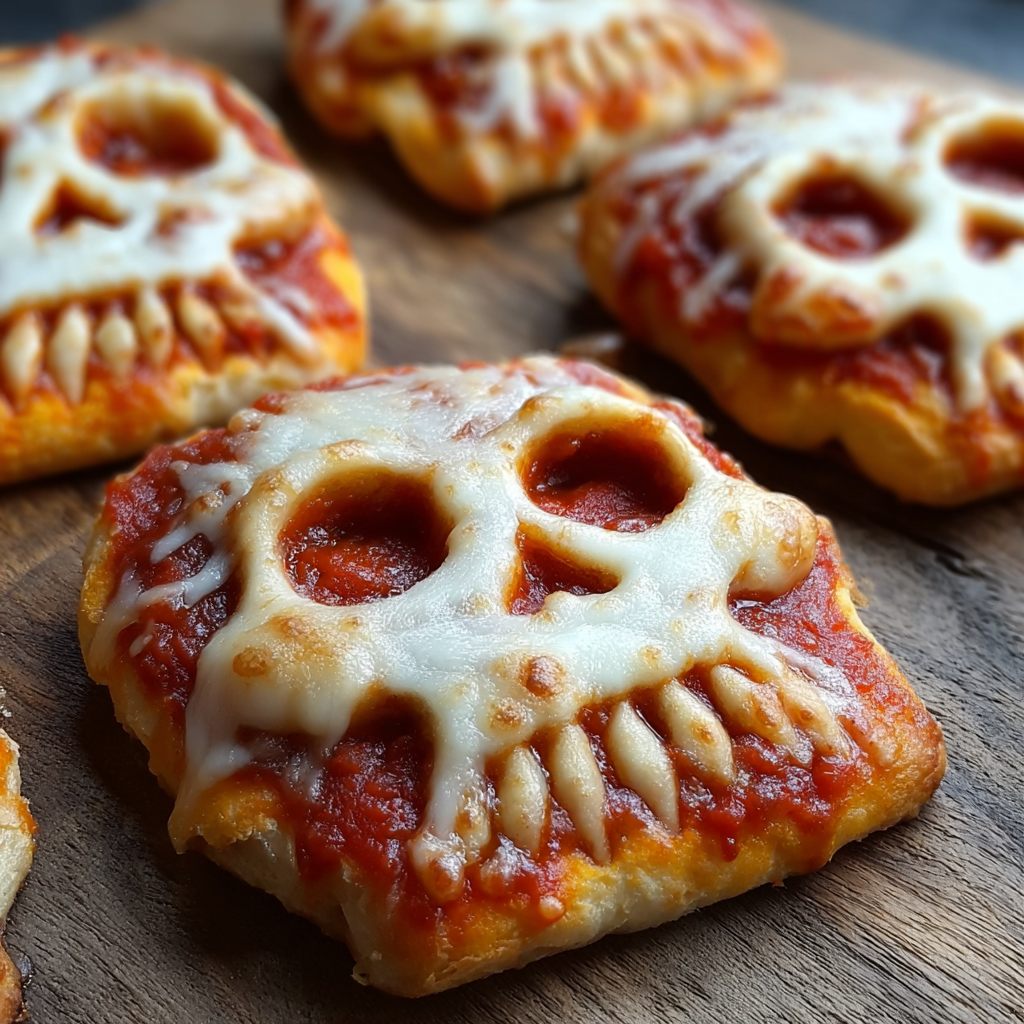
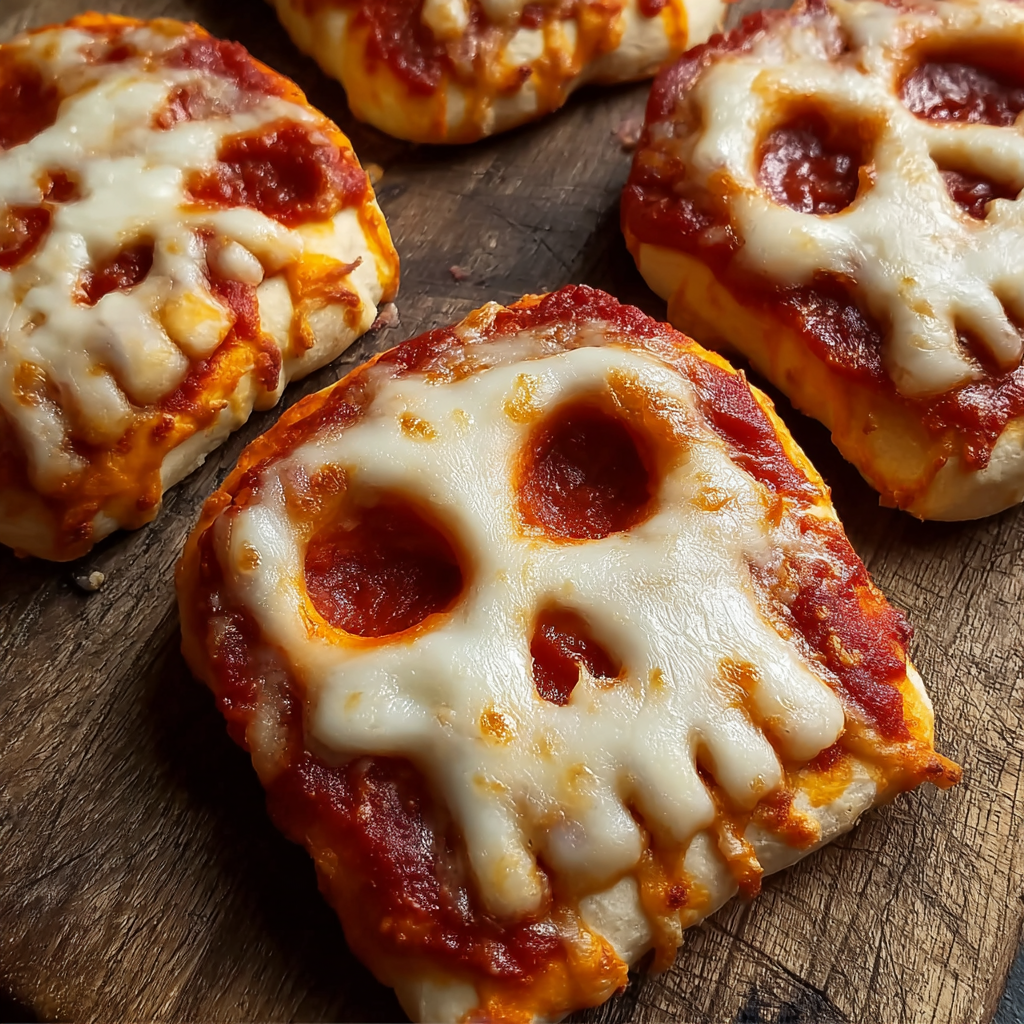
If you’ve ever wanted to make a Halloween dinner that’s both spooky and delicious, Halloween Pizza Skulls are the ultimate treat to try. Imagine biting into a golden, skull-shaped crust only to discover it’s filled with gooey mozzarella cheese, rich tomato sauce, and your favorite pizza toppings. They’re creepy, creative, and outrageously good — everything Halloween food should be.
These pizza skulls are made using simple ingredients and a skull-shaped baking mold, which turns ordinary pizza dough into edible art. The process couldn’t be easier: line your molds with pizza dough, fill them with sauce, cheese, and toppings, seal with more dough, and bake until golden brown. When you flip them out, you’re rewarded with spooky skulls that ooze melted cheese like molten “brains.” They’re perfect for Halloween parties, family movie nights, or even a haunted dinner before trick-or-treating.
I first made these for a neighborhood Halloween potluck, and they were gone before the desserts hit the table. Kids love the fun shape, adults appreciate the comfort-food flavor, and everyone agrees they’re the hit of the night. Plus, they’re fully customizable — you can stuff them with any toppings you love, from pepperoni to veggies to pineapple. If you’re feeling adventurous, try adding a bit of hot sauce or jalapeños for a “fiery skull” twist!
For even more eerie edible ideas, check out fun Halloween party food inspirations like Mummy Hot Dogs or Stuffed Pepper Jack-o’-Lanterns. But for now, let’s dive into this gory, cheesy goodness and learn how to make Halloween Pizza Skulls.
Recipe Card
Print
Halloween Pizza Skulls – Spooky Stuffed Pizza Pockets for Halloween
Description
These Halloween Pizza Skulls are stuffed with pizza sauce, cheese, and your favorite toppings, all wrapped in golden crusts shaped like creepy skulls. Fun, festive, and gooey inside, they make the perfect savory addition to any Halloween celebration.
Ingredients
- 1½ tablespoons melted butter (to grease the pan)
- 3 rolls Pillsbury Pizza Dough (or 33 ounces homemade pizza dough)
- 9 tablespoons pizza sauce
- ¾ cup pizza toppings (mini pepperoni, sausage, ham, pineapple, mushrooms, or veggies)
- 2 cups shredded mozzarella cheese
- 1 egg + 1 teaspoon water (for egg wash)
Instructions
- Preheat and Prepare:
Preheat your oven to 375°F (190°C). Generously grease your skull-shaped baking molds with melted butter to prevent sticking and to help the skulls release easily once baked. - Prepare the Dough:
Roll out your pizza dough on a lightly floured surface. Cut pieces large enough to line each skull cavity, leaving some overhang to seal the top later. - Assemble the Skulls:
Gently press one dough piece into each mold cavity, shaping it to fit snugly against the sides. Add 1 tablespoon of pizza sauce to the bottom, followed by a layer of mozzarella cheese and your favorite pizza toppings. - Seal with Dough:
Add a small piece of dough on top of the filling, then pinch the edges together to seal. Make sure there are no gaps — this keeps the cheese from leaking out during baking. - Brush with Egg Wash:
Lightly brush the tops with the egg wash. This gives the skulls a beautiful golden sheen and helps them hold their shape. - Bake:
Bake for 18–22 minutes, or until the skulls are golden brown and slightly crisp on the edges. - Cool and Release:
Let the skulls cool for 5–10 minutes, then carefully remove them from the molds. If you greased well, they should pop right out with detailed skull faces intact. - Serve:
Serve warm with extra pizza sauce or marinara for dipping — or drizzle sauce over them for a “bloody” effect!
Notes
Active time: 20 minutes
Baking time: 20 minutes
Total time: 40 minutes
You can make these ahead, store in the fridge, and reheat before serving. They’re perfect for prepping in advance for a party.
Advanced Techniques
Getting Perfectly Defined Skull Details
The secret to keeping your Halloween Pizza Skulls looking sharp and spooky is all in the butter. Grease the pan thoroughly — including the eye sockets and teeth details — with melted butter. You can even dust with a bit of flour afterward for extra insurance. Using slightly chilled dough also helps it hold its shape and pick up the mold’s intricate details.
Avoiding Leaks and Spills
Seal the dough well by pressing the top and bottom layers together firmly along the edges. If you’re using sauce-heavy toppings like mushrooms or pineapple, pat them dry first to reduce moisture. A well-sealed edge ensures your molten cheese and sauce stay tucked inside, ready for that dramatic reveal when you bite in.
Customizing the Filling for Different Tastes
The beauty of this recipe is its flexibility. Go classic with pepperoni and mozzarella, or try barbecue chicken, veggie-loaded, or even Hawaiian-style skulls. For an adult-friendly twist, mix in caramelized onions, spicy sausage, or a sprinkle of crushed red pepper for heat. I love doing a mix of flavors so every skull surprises the eater.
Making the “Bloody Skull” Effect
For a Halloween party wow-factor, brush or drizzle warm pizza sauce over the baked skulls right before serving so it drips down like blood. You can even tint a little extra sauce with black food coloring for an ultra-creepy effect that’ll make your guests gasp (and then reach for seconds!).
Cheese-Stuffing for Maximum Goo Factor
Want your skulls extra oozy? Add a cube of mozzarella or string cheese in the center of the filling before sealing. When you pull the skull apart, it’ll stretch like melty “zombie brains.” It’s dramatic, delicious, and crowd-pleasing every single time.
Storage, Shelf Life, and Maintenance Tips
Refrigerating Pizza Skulls
Store leftovers in an airtight container in the fridge for up to 3 days. Reheat in a toaster oven or conventional oven at 350°F (175°C) for about 10 minutes to bring back that crisp crust and melty cheese.
Freezing for Later
These Halloween Pizza Skulls freeze beautifully! After cooling completely, wrap each skull tightly in plastic wrap and place them in a freezer-safe bag. Freeze for up to 2 months. Reheat directly from frozen at 350°F for about 20 minutes.
Keeping the Crust from Getting Soggy
If you plan to make these ahead of time, bake them slightly under (about 15 minutes), then finish baking right before serving. This trick keeps the crust from absorbing moisture from the fillings.
Transporting for Parties
If you’re bringing these to a Halloween potluck, let them cool completely before transporting. Reheat briefly upon arrival if possible — or serve room temperature with warm marinara on the side for dipping.
Reviving Leftovers
Leftovers can be revived easily in an air fryer for 5 minutes at 375°F. The exterior crisps up beautifully while the inside turns melty again — as if freshly baked!
Dietary Adaptations and Substitutions
Making Gluten-Free Halloween Pizza Skulls
Swap in gluten-free pizza dough or a homemade blend using gluten-free flour and xanthan gum. Grease your molds especially well since gluten-free doughs can be stickier, but the results are just as delicious.
Dairy-Free and Vegan Options
Use vegan mozzarella-style cheese and your favorite dairy-free dough brand. For the egg wash, simply brush the tops with olive oil instead. Vegan pepperoni or sautéed veggies make excellent fillings, and you’ll still get that cheesy, gooey bite.
Low-Carb “Skull Bombs”
Try a low-carb dough like fathead dough (made from mozzarella, almond flour, and cream cheese). Fill with sugar-free marinara and low-carb toppings like pepperoni or spinach. The result is a keto-friendly version that’s just as spooky!
Kid-Friendly Customizations
For picky eaters, keep the fillings simple: just cheese and sauce, or mild pepperoni. Kids love the shape and can even help assemble the skulls — it’s a perfect hands-on Halloween kitchen activity.
Allergy-Friendly Adaptations
If you’re avoiding eggs, skip the egg wash and use melted butter for that golden color. To make it nut-free, double-check dough ingredients and avoid almond-based flour if baking gluten-free.
FAQs About Halloween Pizza Skulls
Can I Make These Without a Skull Mold?
Yes! If you don’t have a skull mold, use a muffin tin. Line each cup with dough, fill, seal, and bake — you’ll still get creepy, stuffed “pizza bombs” that taste incredible. You can even hand-shape little skull faces with olives or pepperoni for eyes.
How Do I Prevent Cheese from Leaking Out?
Press the top and bottom dough together firmly and seal with a bit of egg wash as “glue.” Avoid overfilling and leave a little room for the cheese to expand as it melts.
What Kind of Dough Works Best?
Refrigerated pizza dough (like Pillsbury) is convenient and works great, but homemade dough gives a chewier, more artisan texture. If making your own, don’t roll it too thin — a bit of thickness helps it hold the fillings and skull shape.
Can I Add Sauce on the Side Instead of Inside?
Definitely! If you prefer less mess inside the skulls, fill them with just cheese and toppings, then serve warm pizza sauce on the side for dipping. It’s easier for kids and still delicious.
How Do I Make the Skulls Look Extra Creepy?
After baking, brush a tiny bit of melted butter mixed with black food coloring into the eye sockets and crevices. It enhances the skull’s details and gives a smoky, charred look without affecting flavor.
Conclusion & Final Thoughts
These Halloween Pizza Skulls are proof that savory Halloween food can be just as fun and creative as the sweets. With their perfectly golden crusts, gooey cheese interiors, and hauntingly cool appearance, they’re guaranteed to steal the show at any spooky gathering. They’re the kind of dish that kids can’t wait to sink their teeth into — literally — and adults love for their flavor and presentation.
What makes this recipe so great is its versatility. You can fill each skull with different ingredients for variety, make them ahead for stress-free party prep, and even freeze extras for later. They’re quick to make, endlessly customizable, and incredibly satisfying — the ultimate combination of comfort food and Halloween flair.
When you set a platter of these skulls on the table, you can expect gasps, laughter, and plenty of “ewws” followed by “mmms.” They’re that perfect blend of creepy and cozy that captures the spirit of Halloween in every bite.
So this October, skip the ordinary pizza night and give your dinner a spooky makeover with Halloween Pizza Skulls. Whether you serve them as the main course for your Halloween feast or as a party snack, they’ll be the most deliciously ghoulish thing you cook all season.