Introduction to the Recipe
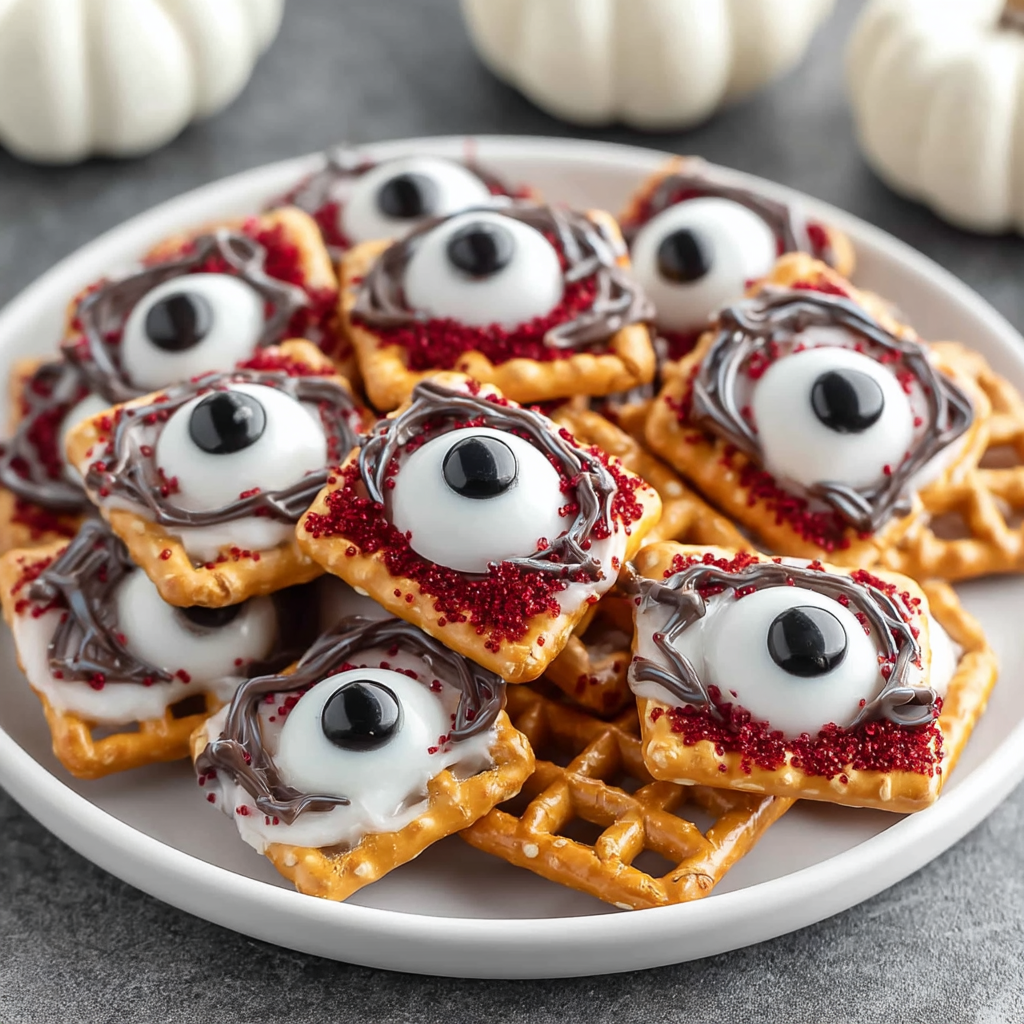
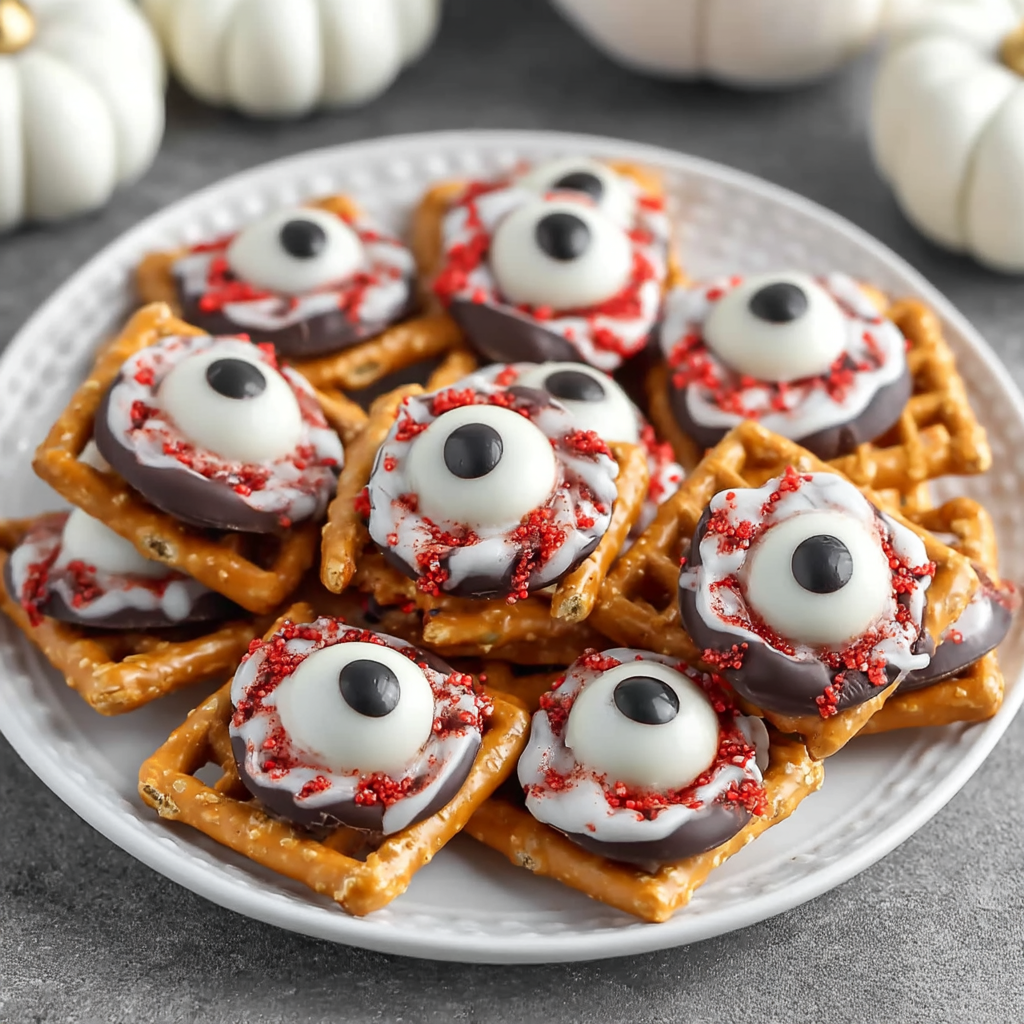
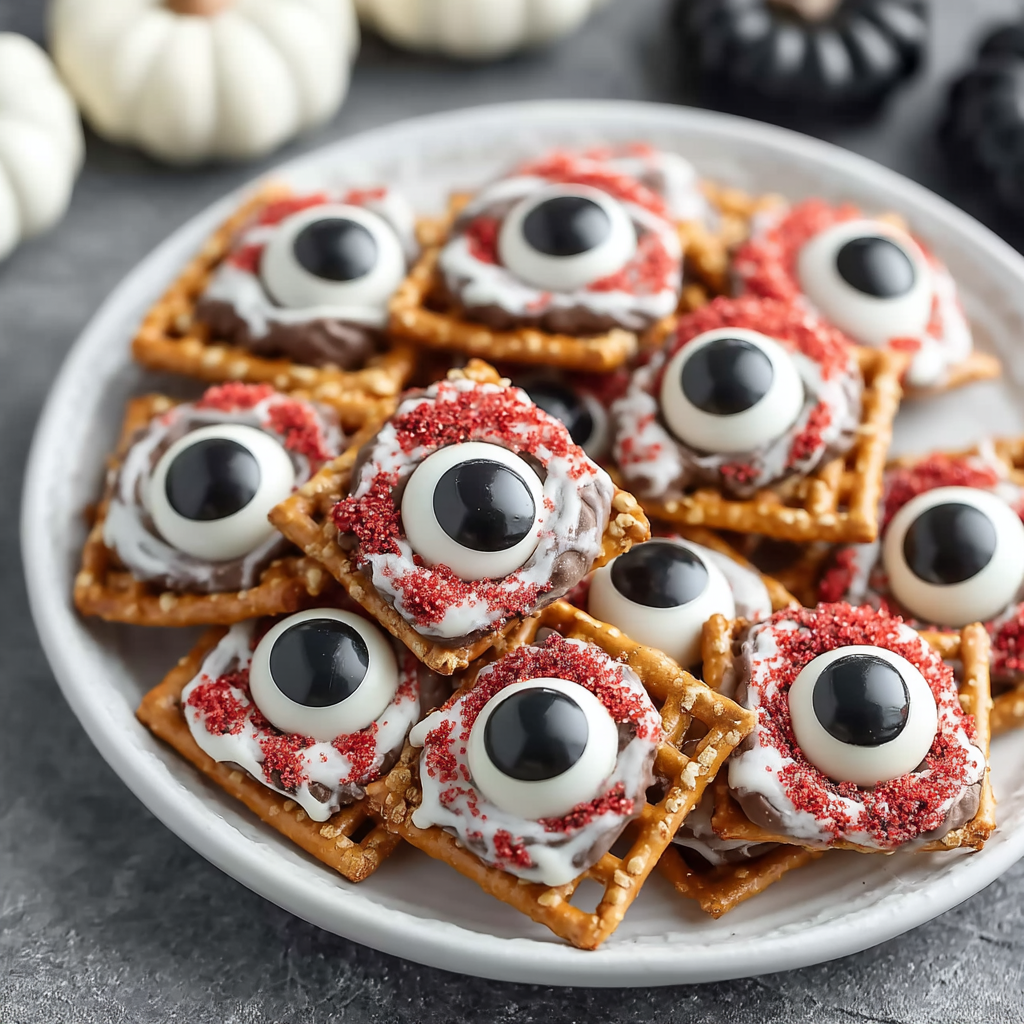
When the spooky season rolls around, Halloween treats that balance fun, flavor, and creativity always take center stage. If you’re looking for an easy-to-make yet impressively creepy snack, look no further than these Halloween Pretzel Monster Eyeballs. They’re a playful blend of salty and sweet flavors, with the salty crunch of waffle pretzels, the creamy sweetness of melted Hershey Hugs chocolate, and the burst of color and chocolate from M&M’s as the “iris.” To top it all off, a dash of black decorating gel turns these into monstrous, bloodshot eyeballs ready to haunt your Halloween party table.
What makes this recipe especially appealing is how simple it is to prepare, requiring no special baking skills, only basic ingredients, and just a few minutes in the oven. These treats are kid-friendly, visually impressive, and satisfy that sweet and salty craving in one bite. Plus, their festive appearance makes them a perfect addition to Halloween party platters, classroom treats, or even as fun homemade gifts.
If you want to explore other creative Halloween recipes, check out Fun Halloween Snacks for Kids or get inspired by Creative Candy Recipes. The Halloween Pretzel Monster Eyeballs recipe fits perfectly within these ideas and can be customized in many ways to suit your taste and party theme.
Whether you’re a novice or a seasoned baker, these eyeball treats offer a balance of flavor, fun, and festivity that’s sure to delight both kids and adults alike. Let’s dive into the details of this recipe and how you can make your own monster eyeballs come to life!
Basic Recipe: Ingredients and Instructions
Print
Halloween Pretzel Monster Eyeballs
Description
Make delicious Halloween Pretzel Monster Eyeballs with pretzels, Hershey Hugs, M&M’s, and decorating gel—perfect spooky snacks for your party!
Ingredients
- 35 waffle pretzels (round waffle-shaped work best)
- 35 Hershey Hugs (Do not use Kisses; Hugs melt better)
- Red sanding sugar (for bloodshot effect)
- 35 M&M’s (any bright color works well for the iris)
- Black decorating gel (for pupils and fine details)
Instructions
- Prepare the Oven and Baking Sheet
Preheat your oven to 220°F (approximately 105°C). Line a baking sheet with parchment paper or a silicone baking mat for easy cleanup and to prevent sticking. - Arrange Pretzels on Sheet
Spread the waffle pretzels in a single layer on the baking sheet, making sure they don’t touch. This will give each eyeball space to melt and set without merging. - Add Hershey Hugs on Pretzels
Place one Hershey Hug chocolate candy on top of each pretzel. Hugs are preferred because they melt smoothly and evenly, creating a perfect base for your “eyeball.” - Bake to Melt the Chocolate
Place the baking sheet in the preheated oven and bake for 3 to 5 minutes. Keep a close eye on the chocolates — you want them soft and slightly melted but not completely liquified or burnt. - Press M&M’s Into Melted Chocolate
Remove the tray from the oven. Immediately press one M&M candy into the center of each softened Hershey Hug. Gently press just enough to flatten the chocolate around the candy, anchoring the M&M in place. - Create Bloodshot Effect with Red Sugar
Quickly sprinkle red sanding sugar around the edges of the chocolate on each pretzel. This adds a spooky “bloodshot” appearance to your monster eyeballs. - Add the Black Pupil Details
Use black decorating gel to draw a small pupil dot on the center of each M&M. For extra fun, you can create tiny blood vessels extending from the pupil with thin gel lines. Let the gel dry for at least 10 minutes to set completely. - Cool and Serve
Let the pretzel eyeballs cool fully at room temperature, allowing the chocolate to harden and the gel to dry. Transfer to a serving platter and enjoy!
Notes
Hershey Hugs melt more evenly and hold their shape better than Kisses, preventing runny chocolate.
Don’t leave the chocolates in the oven too long or they will spread too much and lose the eyeball shape.
For the best bloodshot effect, sprinkle red sugar while the chocolate is still warm and sticky.
Use a toothpick or a fine-tipped decorating gel for more precise pupil designs.
Store in a cool, dry place and avoid humid environments to keep the pretzels crisp.
Keywords: Halloween Pretzel Monster Eyeballs
Advanced Techniques
1. Perfecting the Chocolate Melt
Achieving the perfect melt for the Hershey Hugs requires a balance — too short and the chocolate won’t soften enough to hold the M&M; too long and it becomes runny. Use a low oven temperature (around 220°F) and check frequently. You can also experiment with placing the tray under the broiler for a few seconds, but watch closely to avoid burning.
2. Bloodshot Vein Detailing
For a creepier, more realistic eyeball, add thin red veins extending from the iris by using red decorating gel or edible markers. Draw thin squiggly lines radiating out from the pupil on the chocolate surface after the initial red sanding sugar sprinkle. This adds depth and makes your eyeballs look freshly ‘alive.’
3. Flavored Chocolate Variations
Try swapping out Hershey Hugs for flavored or colored candy melts, such as white chocolate tinted with food coloring, peppermint-flavored melts for a cool twist, or caramel melts for a richer taste. Colored melts allow you to customize your eyeballs’ whites to different spooky themes.
4. Adding Texture and Shine
After assembling, lightly brush the pretzels with a bit of melted white chocolate or edible shimmer dust to give your eyeballs an eerie glossy finish. You can also sprinkle edible glitter around the edges for a magical, sparkling effect.
5. Using Edible Food Markers for Detail Work
If you’re making a large batch, edible food markers are faster for drawing pupils and veins compared to gel. They dry quickly and allow for precise, fine lines, making decorating easier especially for kids helping out.
See more advanced recipes at cookingwhite.com

Storage, Shelf Life, and Maintenance Tips
1. Optimal Room Temperature Storage
Store your finished pretzel eyeballs in an airtight container at room temperature, away from direct sunlight or heat sources. They will stay fresh and crunchy for up to 3 days.
2. Why Avoid Refrigeration
While refrigeration might seem like a way to keep them longer, the moisture inside the fridge can cause the pretzels to become soggy and the chocolate to bloom (develop a white, dusty look). Keep them out of the fridge for best texture and appearance.
3. Freezing for Long-Term Storage
If you want to store your eyeballs longer, freeze them in a single layer on a baking sheet, then transfer to a freezer-safe container or bag. Freeze for up to 1 month. Thaw at room temperature before serving to maintain crispness.
4. Preventing Chocolate Bloom
To keep the chocolate smooth and shiny, avoid drastic temperature changes. When bringing frozen eyeballs out, allow them to come to room temperature slowly in a sealed container.
5. Repairing or Touching Up Decoration
If pupils smudge or sanding sugar falls off during storage, once the chocolate is set, carefully reapply black decorating gel or add a new layer of sanding sugar to refresh their spooky look.
Dietary Adaptations and Substitutions
1. Nut-Free and Allergy Considerations
This recipe is naturally nut-free but always double-check ingredient labels, especially for candies, to ensure they are produced in nut-free facilities for sensitive guests.
2. Vegan and Dairy-Free Options
Swap Hershey Hugs for vegan or dairy-free chocolate melts. Vegan pretzels are widely available, and you can use plant-based candy melts and decorating gels. Look for vegan gummy candies or edible markers for decoration.
3. Gluten-Free Pretzel Substitutes
For gluten-sensitive guests, use certified gluten-free pretzels. Many brands offer gluten-free waffle pretzels that work well as the base.
4. Sugar-Free Variations
Use sugar-free or reduced-sugar chocolate melts and candies to make this treat lower in sugar. Some specialty stores carry sugar-free candy-coated chocolates.
5. Custom Colors for Themes
Customize the colors to match any party theme beyond Halloween. Use blue or green M&M’s for alien eyeballs or white and red sanding sugar for vampire or zombie effects.
FAQs About the Recipe
1. Can I use regular pretzels instead of waffle pretzels?
Yes, but waffle pretzels provide a better flat surface to hold the chocolate and candy. Regular pretzels can work but the eyeballs may be less stable.
2. What’s the difference between Hershey Hugs and Kisses for this recipe?
Hershey Hugs melt smoother and hold their shape better due to their composition. Kisses tend to melt unevenly and can run off the pretzels.
3. How long do these eyeballs stay fresh?
Stored properly at room temperature, they keep well for up to 3 days. After that, pretzels may lose their crunch.
4. Can I make these without an oven?
You can melt the Hershey Hugs in the microwave in short bursts but it’s harder to control the melting and prevent over-softening. Oven baking offers more even melting.
5. How do I avoid the pupils smudging?
Allow the black decorating gel to dry completely before moving or storing. Using edible food markers can also help with smudge-free detailing.
Conclusion & Final Thoughts
Halloween Pretzel Monster Eyeballs combine ease, flavor, and festive fun in a spooky snack that’s sure to delight at any Halloween gathering. With just five simple ingredients, this recipe allows you to create impressive monster eyeballs that are crunchy, creamy, and colorful — satisfying salty and sweet cravings in every bite.
They’re easy enough for kids to help make but sophisticated enough to impress guests of all ages. Their customizable design means you can tailor them to any party theme or dietary need, from gluten-free to vegan options.
By mastering the simple melting and decorating techniques described above, you can turn a handful of basic pantry ingredients into a memorable Halloween treat that’s as fun to make as it is to eat.
If you want a quick, creative, and crowd-pleasing snack, Halloween Pretzel Monster Eyeballs are the way to go. Get ready to impress your guests with these creepy, crunchy delights!