Description
Make chewy, fruity Homemade Peach Ring Gummies with real peaches. A healthy, simple candy recipe that’s kid-friendly and refined sugar-free!
Ingredients
Scale
- 1 lb peaches, peeled and sliced (you can use defrosted frozen peaches)
- ⅓ cup orange juice
- 2 tablespoons + 1 teaspoon (i.e. 2 Tbsp + 1 tsp) unflavored gelatin
- 2 tablespoons honey
- Optional: granulated sweetener (for coating)
Instructions
- Blend the peaches and juice
- Combine the peeled and sliced peaches and the ⅓ cup of orange juice in a blender or food processor. Blend until completely smooth and liquid.
- Strain the purée
- Place a fine mesh strainer over a medium pot. Pour the peach purée into the strainer and use a silicone spatula (or the back of a spoon) to press the pulp, extracting as much juice as possible. Discard or reserve the solids for another use. You should end up with about 1¼ cups of liquid peach juice after straining.
- Add sweetener & combine
- Pour the strained peach juice into the pot. Add the 2 tablespoons honey and stir well to fully incorporate.
- Bloom the gelatin
- Sprinkle the gelatin evenly over the peach‑honey mixture. Let it sit undisturbed for ~2 minutes to allow the gelatin to “bloom” (absorb moisture and swell).
- Heat gently to dissolve gelatin
- Place the pot on low heat. Warm gently for 3–4 minutes (or until the mixture is fully liquid again and gelatin is fully dissolved). Do not let it boil. Stir continuously to ensure full dissolution and prevent sticking.
- Fill molds
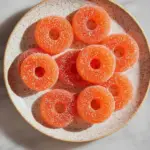
- Carefully spoon or use a dropper to transfer the liquid gummy mixture into silicone molds (preferably ring-shaped molds for the “peach ring” effect). You can also pour into a shallow glass container and cut rings later if molds aren’t available.
- Chill to set
- Transfer molds or container to the refrigerator. Let it set for 4–6 hours (or until firm).
- Unmold & (optional) coat
- Once fully set, gently remove the gummies from the molds. If desired, toss them in a bowl of granulated sweetener (or a mix of sugar + citric acid) to give a light coating and prevent sticking.
- Cure / dry (optional for chewiness)
- For a more gummy, less “jelly-like” texture, allow the gummies to air-dry (on a wire rack) uncovered in a cool, low-humidity place (or in the fridge) for 12 to 24+ hours. This helps firm the exterior and reduce residual moisture.
- Store & serve
- Store the gummies in an airtight container, preferably with parchment layers to prevent sticking, in the refrigerator. They’re ready to enjoy!
Notes
Be gentle with heat: gelatin breaks down if overheated or boiled.
Use a good-quality gelatin (powder or sheet) with good “bloom” for best texture.
Molds help with shape and ease, but a simple shallow pan works too if you’ll cut rings.
The optional drying / curing step significantly improves chewiness and reduces stickiness.
Add coatings (sugar, citric acid) just before serving so gummies don’t become soggy.