Ice Cream Cone Christmas Trees: A Fun, Festive, and Edible Holiday Craft
If there’s one holiday project that guarantees smiles all around, it’s making Ice Cream Cone Christmas Trees. They’re bright, festive, edible works of art — and best of all, they double as both dessert and decoration. Made with simple ingredients like sugar cones, green frosting, and colorful candies, these charming little trees are perfect for parties, family gatherings, or cozy afternoons spent baking and decorating together.
I still remember the first time I made these as a child — sitting at the kitchen table surrounded by bowls of sprinkles, M&Ms, and candy canes. It wasn’t just about making something to eat; it was about the joy of creating, laughing, and getting just a little bit messy. Now, I’ve passed this tradition on to my kids, and it’s one of our most treasured holiday activities. There’s something magical about watching everyone’s creativity come to life in icing and sugar.
The beauty of Ice Cream Cone Christmas Trees is that they’re completely customizable. You can make them tall or short, classic green or bright neon, minimalist or packed with candy ornaments. And since they’re no-bake, anyone can join in — kids, grandparents, even those who claim they “can’t cook.” They’re not just treats; they’re edible crafts that spark joy.
For inspiration and decorating ideas, check out Wilton’s Holiday Treat Guide or Taste of Home’s Christmas Craft Recipes. Both offer creative ways to transform simple ingredients into magical edible art.
So grab your frosting bags, gather your sprinkles, and get ready to deck the table — because these Ice Cream Cone Christmas Trees are about to become your new favorite holiday tradition.
Ice Cream Cone Christmas Trees Recipe
Print
Ice Cream Cone Christmas Trees – Fun & Festive Edible Holiday Craft
Description
These whimsical Ice Cream Cone Christmas Trees are festive, fun, and entirely edible. Made from sugar cones, frosting, cookies, and candies, they’re a delightful hands-on holiday project that’s perfect for all ages — no oven required!
Ingredients
- 4 sugar cones
- 1½ cups green icing (store-bought or homemade buttercream)
- 4 sugar cookies (for the base)
- 4 candy star sprinkles (for the tree toppers)
- 2 tablespoons white sugar sprinkles
- Assorted sprinkles and decorations (M&Ms, nonpareils, jimmies, edible glitter)
- Assorted candies for filling (peppermints, M&Ms, Skittles, or any favorites)
Instructions
- Prepare your workspace: Line a baking sheet with parchment paper or set out a large plate to hold your finished trees. This makes cleanup easier and gives you space to decorate freely.
- Fill the cones: Turn each sugar cone upside down (point side up). Fill the inside with small candies such as M&Ms, peppermints, or Skittles. This adds a fun surprise inside the “tree.”
- Attach the base: Spread a thin layer of green icing on the rim of the cone and gently press it onto the flat side of a sugar cookie. This forms the sturdy base of your tree.
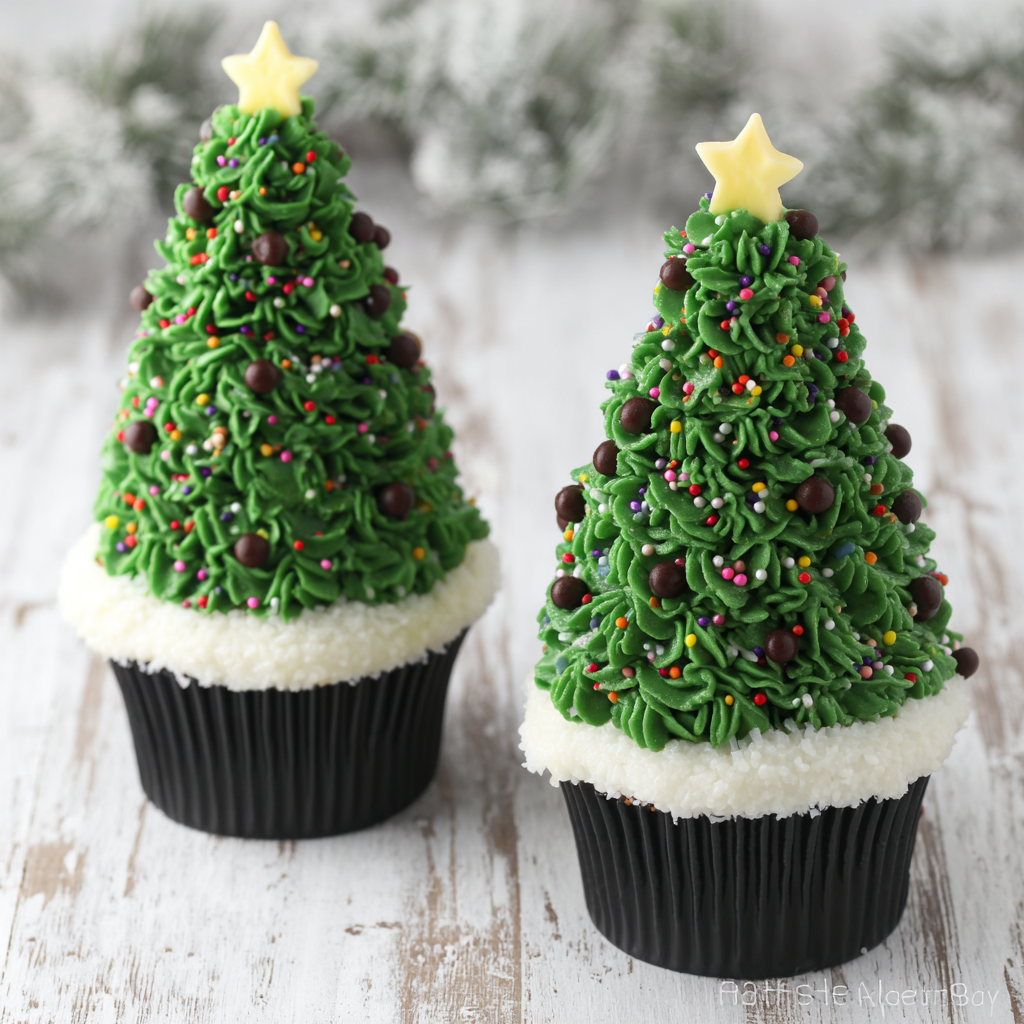
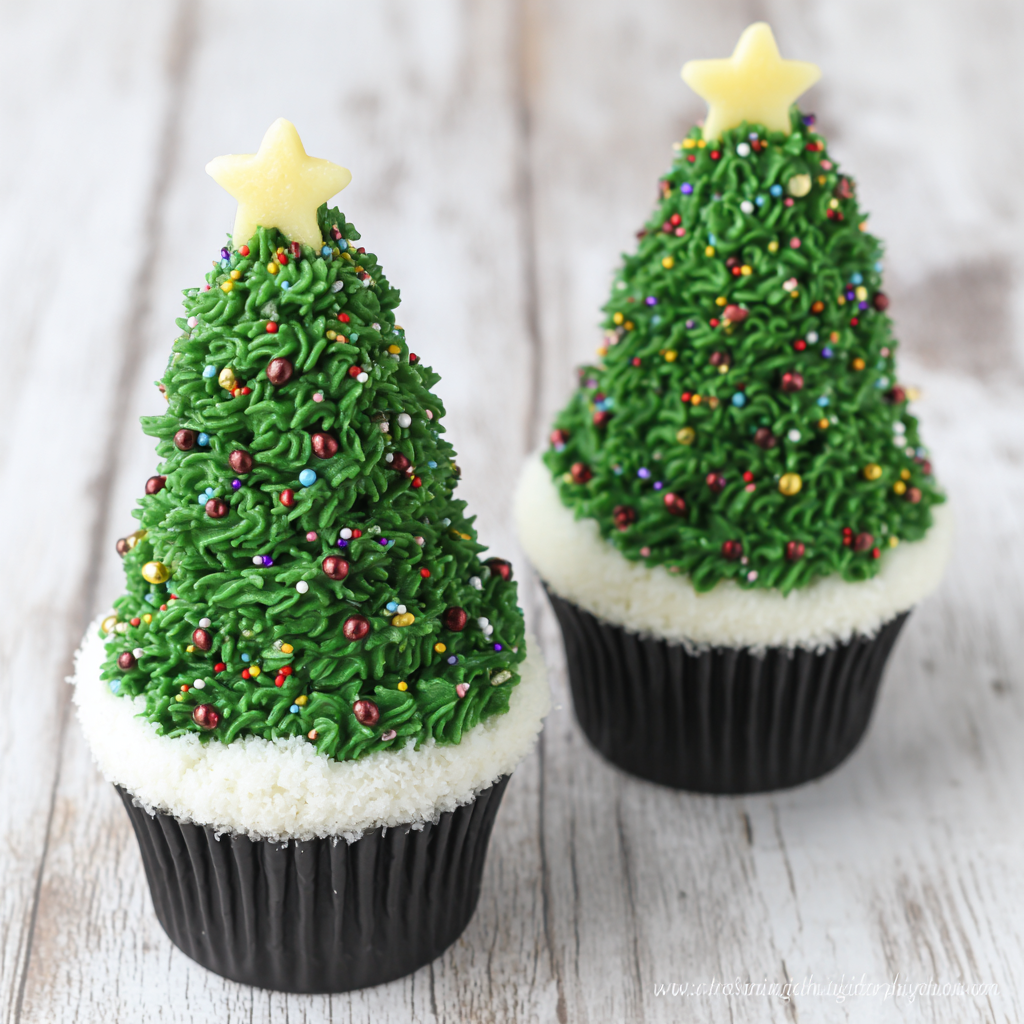
- Frost the cone: Using a small spatula or piping bag, coat the entire outside of the cone with green icing. You can swirl it to look like branches or use a star tip to pipe textured “needles.”
- Decorate the tree: While the icing is still soft, press on sprinkles, mini candies, and edible pearls to look like ornaments. Add sugar sprinkles for a snowy effect.
- Top it off: Finish each tree with a candy star on top.
- Let set: Allow the icing to firm up for about 15 minutes before moving or packaging.
Notes
Active time: about 25 minutes; passive time: optional 15 minutes for setting.
You can use royal icing for a firmer finish if you plan to display them for longer.
To make them more stable, attach the cookie base to the serving tray with a small dab of icing.
Kids love this project — set out bowls of candy and let them personalize their trees.
Advanced Techniques
Achieving Realistic “Tree Branch” Texture
To give your Ice Cream Cone Christmas Trees that lifelike evergreen texture, use a star or leaf piping tip and pipe small overlapping dollops of frosting in rows from bottom to top. For extra depth, tint portions of your icing slightly darker or lighter green and blend them for a natural, shaded look. This simple trick makes the trees look beautifully detailed and photo-ready.
Creating a Perfectly Smooth Icing Base
If you prefer a sleek, modern look, spread the icing smoothly using a small offset spatula or the back of a spoon. Dip your tool in warm water occasionally to prevent sticking and achieve a flawless finish. This style works especially well if you want to decorate your trees with shiny candies, metallic sprinkles, or edible glitter.
Adding Sparkle with Edible Snow
Dusting your trees with white sugar sprinkles, shredded coconut, or powdered sugar creates a magical snow-kissed effect. For an extra festive touch, mix fine white sanding sugar with a pinch of edible glitter — it reflects light beautifully and gives your trees a frosted glow.
Designing a Mini Winter Forest Display
If you’re making these for a holiday table centerpiece, create a little forest scene! Arrange multiple Ice Cream Cone Christmas Trees of varying sizes on a platter dusted with powdered sugar. Add mini marshmallows for “snowballs,” candy canes for lampposts, and gingerbread figures for an enchanting edible landscape.
Using Homemade Buttercream for Maximum Flavor
Store-bought icing works great, but homemade buttercream takes these trees to the next level. Combine ½ cup butter, 2 cups powdered sugar, 2 tablespoons milk, and a few drops of vanilla and green food coloring. Beat until fluffy and pipeable. It’s smoother, richer, and holds decorations better than canned frosting.

Storage, Shelf Life, and Maintenance Tips
Keeping Ice Cream Cone Christmas Trees Fresh
Store your finished trees in a cool, dry place away from humidity. If using buttercream frosting, refrigerate them overnight and let them sit at room temperature before serving. Royal icing trees can stay at room temperature for up to 3 days.
Storing for Display or Party Preparation
If you’re making them ahead for a holiday party, decorate up to a day in advance. Place them on a tray and loosely cover with plastic wrap or a cake dome to keep them protected from dust while preserving texture.
Avoiding Soggy Sugar Cones
To keep the cones crisp, avoid storing them in sealed containers with moisture. If you’re using buttercream, let it crust slightly before covering. You can also brush the inside of the cones with melted chocolate before filling — it creates a barrier that keeps them crunchy.
Transporting Your Edible Trees
For easy transport, use a baking sheet or sturdy box lined with parchment. To prevent toppling, secure each tree with a small dab of frosting on the base. If possible, refrigerate them briefly before moving to help set the icing.
Repurposing Leftover Decorations
Don’t toss extra candies or sprinkles! Store them in separate airtight jars for your next baking project or use them to decorate hot chocolate, cupcakes, or sugar cookies. They keep the festive spirit going all season long.

Dietary Adaptations and Substitutions
Making Vegan Ice Cream Cone Christmas Trees
Swap traditional icing for vegan buttercream made with plant-based butter and almond or oat milk. Use vegan-friendly sugar cones and sprinkles (many brands now label this clearly). The result tastes just as delicious and festive.
Dairy-Free Icing Options
Replace butter with coconut oil or dairy-free margarine, and mix with powdered sugar and dairy-free milk. This frosting stays creamy and pipes beautifully, adding a subtle coconut aroma that complements the candy decorations.
Gluten-Free Variation
Look for gluten-free sugar cones and cookies, which are increasingly available in grocery stores. You can also use gluten-free waffle cones for a slightly rustic look — just trim the tops to make them even before decorating.
Low-Sugar Decorating Alternatives
For a healthier twist, use unsweetened shredded coconut for “snow” and decorate with dried fruit bits instead of candy. You can also make sugar-free frosting with powdered erythritol or monk fruit sweetener.
Allergy-Friendly Holiday Fun
If serving a crowd with various allergies, set up a decorating station with labeled toppings (nut-free, dairy-free, etc.). Everyone can safely create their own personalized Ice Cream Cone Christmas Trees without worry.
FAQs About Ice Cream Cone Christmas Trees
Can I Use Store-Bought Frosting?
Absolutely! Store-bought green frosting saves time and works perfectly for this recipe. Just make sure to stir it well before using to get a smooth consistency. You can also tint white frosting with gel food coloring if you prefer to control the shade.
How Do I Keep Decorations from Sliding Off?
If your candies or sprinkles slide down, your frosting may be too soft. Chill it for 5–10 minutes before decorating. You can also gently press decorations in rather than rolling the cone in them to help them stick.
Can Kids Make These on Their Own?
Yes! This recipe is kid-approved and safe since it’s completely no-bake. Younger kids can spread the frosting while older ones can handle piping and decorating. It’s an ideal family-friendly holiday project.
Can I Use Different Frosting Colors?
Of course! Try making pastel pink, white, or blue trees for a winter wonderland theme. You can even create a gradient effect by blending two shades of green — it adds depth and a touch of sophistication to your forest display.
Do Ice Cream Cone Christmas Trees Taste Good or Just Look Cute?
They taste just as fun as they look! The crispy cone, buttery frosting, and candy fillings make every bite sweet and satisfying. They’re a festive combination of crunch and creaminess that even adults love.
Conclusion & Final Thoughts
Ice Cream Cone Christmas Trees perfectly capture the magic of the holidays — cheerful, creative, and irresistibly sweet. They’re not just desserts; they’re edible crafts that bring people together. Whether you’re making them as a family project, decorating a dessert table, or looking for a classroom-friendly activity, these little trees add joy and sparkle to every setting.
I love how versatile they are. You can keep them simple with classic green frosting and sprinkles, or go all out with metallic dragees and shimmering glitter for a winter wonderland vibe. The process is as fun as the result — laughter, frosting-smeared fingers, and a table sprinkled with color.
They’re also a great way to get everyone involved in holiday prep, from toddlers to grandparents. The best part? There’s no pressure to make them perfect. Each Ice Cream Cone Christmas Tree is unique — just like a real tree — and that’s what makes them so special.
So this holiday season, take a break from complicated recipes and embrace the joy of edible creativity. Gather your cones, candies, and imagination, and let your kitchen turn into a festive forest. These Ice Cream Cone Christmas Trees are proof that sometimes the simplest ideas bring the most holiday magic — one sprinkle at a time.