Lemon Sugar Cookies🍋🍪
Introduction
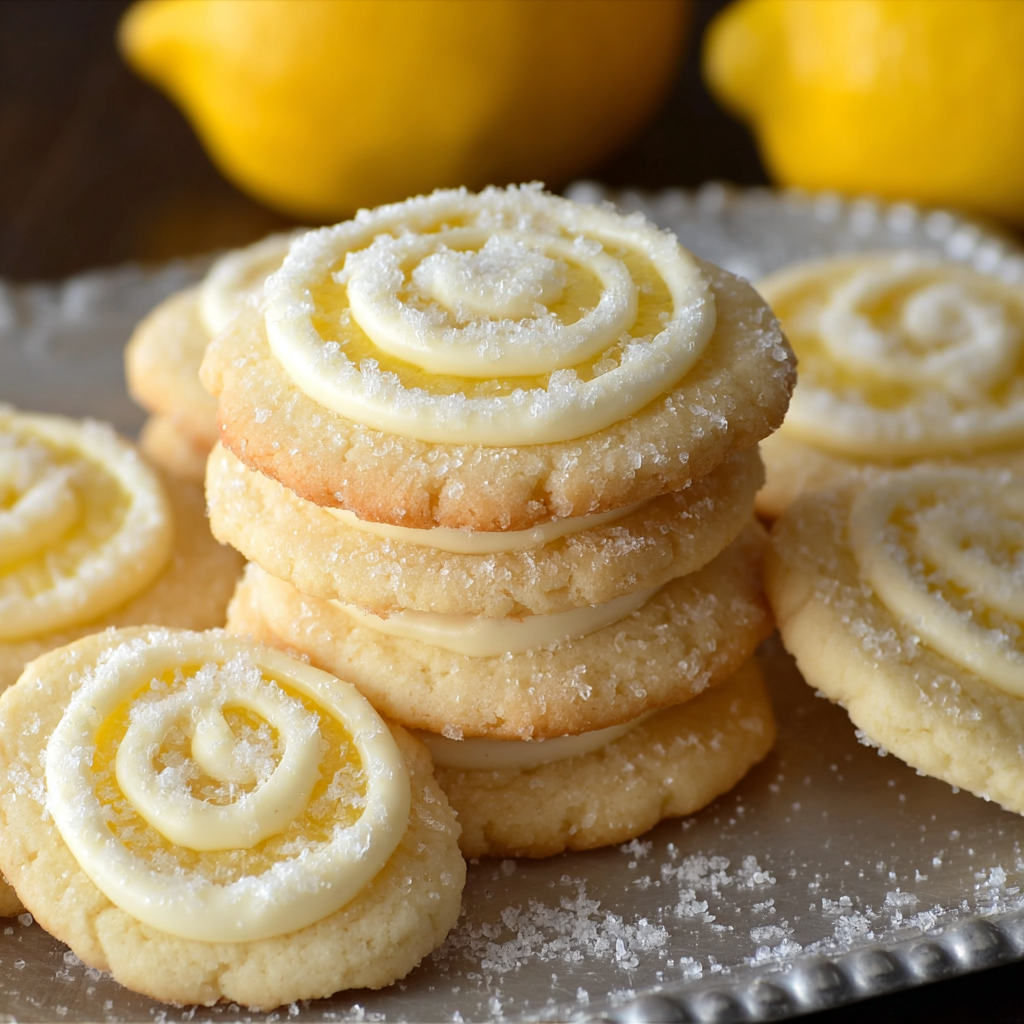
Bright, buttery, and irresistibly soft, Lemon Sugar Cookies capture everything we love about a classic sugar cookie while adding a burst of sunny citrus. Each bite combines delicate crisp edges with a tender, melt-in-your-mouth center, wrapped in a sparkling coat of granulated sugar. The fragrance of fresh lemon zest and juice perfumes the dough, delivering a flavor that is clean, zippy, and refreshing rather than heavy or cloying. If you are craving an easy cookie recipe that feels special enough for holidays yet simple enough for weeknights, these Lemon Sugar Cookies are the sweet spot.
From a baker’s perspective, this recipe is straightforward and reliable. The dough comes together with pantry staples, requires no special equipment beyond a hand or stand mixer, and bakes in under a dozen minutes per tray. The lemon flavor is thoughtfully layered by using both fresh zest and juice, so the cookies taste naturally bright rather than artificial. Because the dough is soft and forgiving, it is an ideal project for beginners, yet the results are polished enough to impress seasoned bakers and cookie connoisseurs.
For planning, here are the essentials that make these cookies perfect for your next bake: prep time is about 15 minutes, bake time 9 to 11 minutes, and total time roughly 26 minutes. The recipe yields about 24 cookies at approximately 145 calories each, making them a smart choice for a crowd, a bake sale, or a simple afternoon treat. Serve them plain, pair with tea or coffee, or stack them into giftable tins. However you present them, these Lemon Sugar Cookies deliver sunshine in every crumb.
Ingredients
Print
Lemon Sugar Cookies
Ingredients
- 2 3/4 cups all-purpose flour
- 1 teaspoon baking soda
- 1/2 teaspoon baking powder
- 1/2 teaspoon salt
- 1 cup unsalted butter, softened
- 1 1/2 cups granulated sugar
- 1 large egg
- 1 teaspoon vanilla extract
- 2 tablespoons fresh lemon juice
- 1 tablespoon lemon zest
- Extra granulated sugar for rolling
Instructions
- Preheat the oven to 350°F (175°C). Line two baking sheets with parchment paper to prevent sticking and to promote even browning. Position oven racks in the upper and lower thirds for consistent heat circulation. If your oven runs hot or cold, consider using an oven thermometer for accuracy. Parchment helps the cookies spread in a controlled way and keeps bottoms from over-browning. Set out a shallow bowl with extra granulated sugar for rolling, and make sure your butter is truly softened for proper creaming.
- In a medium bowl, whisk together the flour, baking soda, baking powder, and salt until the mixture looks uniform and the leaveners are well dispersed. This step prevents pockets of baking soda or powder that could cause uneven rise or bitter bites. Spoon and level the flour instead of scooping directly from the bag, which can compact the flour and lead to dry, dense cookies. If your flour is lumpy, sift it first. Set the dry mixture aside while you prepare the wet ingredients.
- In a large mixing bowl, cream the softened butter and 1 1/2 cups granulated sugar on medium speed for 2 to 3 minutes, stopping to scrape the bowl and beaters as needed. You are aiming for a mixture that is paler in color and noticeably fluffy. Proper creaming dissolves some of the sugar and incorporates air, which creates that coveted tender interior with lightly crisp edges. If the mixture looks greasy or grainy, keep beating until it lightens and increases slightly in volume.
- Beat in the egg, vanilla extract, fresh lemon juice, and lemon zest until fully incorporated and the batter looks smooth and satiny. Adding both zest and juice provides layered lemon flavor: the zest contributes aromatic oils while the juice adds bright acidity. If your mixture appears slightly curdled after adding the juice, do not worry; it will come together once the dry ingredients are added. Continue mixing just until everything is cohesive, scraping the bowl to ensure even distribution of zest.
- Gradually add the dry ingredients to the wet mixture in two to three additions, mixing on low speed just until a soft, uniform dough forms. Avoid overmixing once the flour is added, as excess gluten development can make the cookies tough. If flour remains in pockets along the bowl’s edges, finish folding with a spatula. The dough should be soft but not sticky. For slightly thicker cookies, you may chill the dough for 20 to 30 minutes, though chilling is not required for excellent results.
- Use a tablespoon or a small cookie scoop to portion the dough into even mounds, roughly 1 tablespoon each, about 25 grams per ball. Roll each portion between your palms to create smooth rounds. Drop the dough balls into the bowl of extra granulated sugar and roll to coat completely. A generous sugar coating creates that classic, sparkly finish and adds a faint crunch to the exterior that contrasts with the soft center.
- Arrange the sugar-coated dough balls on the prepared baking sheets, leaving about 2 inches of space between them to allow for spreading. If you prefer slightly flatter cookies with more pronounced crackling, gently press each dough ball down until it is about three-quarters of an inch thick. For puffier cookies, leave them rounded. Work swiftly so the dough does not warm excessively, which can cause excessive spread in the oven.
- Bake for 9 to 11 minutes, rotating the baking sheets halfway through for even baking. The cookies are done when the edges are lightly golden and set, while the centers look pale and slightly soft. Do not wait for all-over browning; overbaking will lead to dryness and a harder bite. If your oven runs cool, add a minute; if it runs hot, check as early as 8 minutes. The cookies will continue to set from residual heat after they come out of the oven.
Notes
Let the cookies cool on the baking sheet for 5 minutes to firm up, then transfer them to a wire rack to cool completely. This brief rest helps the centers finish setting while keeping the bottoms delicate. Once cool, the cookies should have crisp edges and a soft, tender interior with a clean lemon finish. Store in an airtight container at room temperature. If you like an extra pop of citrus, toss a little additional zest into your rolling sugar next time.
Advanced Techniques
- Maximize lemon aroma by rubbing the lemon zest directly into the granulated sugar before creaming. Use your fingertips to massage the zest into the sugar for 30 to 60 seconds. This releases the zest’s essential oils, infusing the sugar and amplifying citrus flavor throughout the dough without adding extra liquid.
- Monitor butter temperature carefully. Aim for butter that is cool but pliable, about 65 to 67°F. Butter that is too warm will cream into a greasy mixture and encourage excess spread; butter that is too cold will not incorporate air properly, yielding dense cookies.
- Creaming technique matters. Beat the butter and sugar until light and fluffy, but not so long that the butter warms significantly. Pause to scrape the bowl and paddle frequently; unincorporated butter along the sides can create uneven texture and flat spots.
- Balance acid and leavening. Lemon juice slightly acidifies the dough, which helps with tenderness. Because this recipe also includes baking soda and baking powder, the result is a gentle lift with a soft crumb. Avoid adding too much extra juice or the dough may become slack and spread unpredictably.
- Choose the right pan. Light-colored aluminum baking sheets conduct heat evenly and reduce bottom scorching. Dark, nonstick pans can brown bottoms faster; if using them, check for doneness a minute earlier.
- Dial your texture. For thicker cookies, chill the portioned dough balls for 20 to 30 minutes before baking. For thinner, lacier edges, bake the dough at room temperature and gently press the balls before baking.
- Control spread with sugar. A generous sugar roll promotes micro-crackles and delicate crust. If you find the cookies spread too much, double-coat them in sugar and chill for 15 minutes. The thin sugar shell slightly delays surface melting, helping maintain height.
- Convection versus conventional. In a convection oven, reduce the temperature to 325°F and start checking at 8 minutes. The fan accelerates browning and can overset edges if not monitored closely.
- Weigh portions for uniformity. Using a 1-tablespoon scoop or weighing to about 25 grams ensures consistent diameter and baking times, which leads to even color and texture across the batch.
- Understand carryover baking. Pull the cookies when the centers still look slightly underdone; they will continue to set on the hot sheet. This technique is key to achieving a soft, chewy middle without overbaked edges.
Storage Tips
- Room temperature storage. Once cool, place cookies in an airtight container with parchment between layers to protect the sugar crust. Store at room temperature for up to 5 days. To keep them soft, add a small piece of fresh bread or a slice of apple to the container, replacing it daily to avoid excess moisture.
- Freezing baked cookies. Freeze completely cooled cookies in a single layer on a tray until firm, then transfer to a freezer bag or container. They keep well for up to 2 months. Thaw at room temperature inside the sealed container to minimize condensation and preserve the sugar crust.
- Freezing unbaked dough. Portion and sugar-coat dough balls, then freeze on a lined tray until solid. Store in freezer bags for up to 3 months. Bake from frozen at 350°F, adding 1 to 2 minutes to the bake time; watch for the same visual cues of lightly golden edges.
- Make-ahead dough. The dough can be mixed and refrigerated, covered, for up to 48 hours. For best texture, portion before chilling. If the dough becomes very firm, let the scoops sit at room temperature for 10 to 15 minutes before baking.
- Reviving texture. If the cookies lose some crispness on the edges after a day or two, refresh them on a parchment-lined sheet at 300°F for 3 to 4 minutes. Cool on a rack to restore the delicate contrast of crisp edge and soft center.
Dietary Adjustments
- Gluten-free. Replace the all-purpose flour with a high-quality 1:1 gluten-free baking blend that includes xanthan gum. The dough may feel slightly drier; if needed, add 1 to 2 teaspoons of milk or lemon juice to achieve a soft, scoopable texture. Bake time remains similar; watch visual cues.
- Dairy-free. Substitute the unsalted butter with a plant-based stick butter that has at least 75 to 80 percent fat. Avoid tub-style spreads that contain excess water, which can cause spreading. The flavor will remain bright, and the texture will be close to the original.
- Vegan. Use plant-based butter as above and replace the egg with a flax egg made from 1 tablespoon ground flaxseed mixed with 3 tablespoons water, rested for 5 minutes until gelled. Alternatively, use 3 tablespoons aquafaba. Expect slightly less rise and a more tender crumb.
- Lower sugar. You can reduce the granulated sugar in the dough to 1 1/4 cups without dramatically compromising texture. Keep the rolling sugar for the classic crust. Reducing further may produce less spread and a denser crumb.
- Low-carb and keto-inspired. Traditional sugar cookies rely on sugar for structure and spread, but you can experiment with a blend of fine almond flour and a small amount of coconut flour, using a granulated erythritol or monk fruit blend. Texture will be more delicate and crumbly; bake a test cookie and adjust as needed.
- Citrus swaps. Replace lemon juice and zest with equal amounts of lime or orange for a different citrus profile. Grapefruit zest also works nicely; reduce the juice slightly to keep the dough from becoming too slack.
Common Errors and Troubleshooting
- Cookies spread too much. The dough may be too warm or the butter overly soft. Chill the portioned dough for 20 minutes, use light-colored pans, and ensure your oven is fully preheated. Double-coating in sugar can also help control spread.
- Dry or cakey texture. Too much flour is the usual culprit. Use the spoon-and-level method to measure, or weigh the flour. Mix only until the flour disappears to avoid gluten overdevelopment.
- Pale, under-flavored cookies. Skipping zest or using only bottled lemon juice reduces brightness. Always include fresh zest, and rub it into the sugar for maximum aroma.
- Overbrowned bottoms. Dark pans or placement on a lower rack can cause scorching. Switch to light aluminum sheets, use parchment, and bake on the center or upper racks. Check a minute earlier.
- Cracks but raw centers. Baking temperature may be too high or time too short. Verify oven temperature with a thermometer and watch for lightly golden edges with just-set centers.
- Uneven sizes and bake times. Portion with a small scoop or weigh dough balls to about 25 grams each. Rotate trays halfway for even heat exposure.
- Gritty sugar texture. Cream the butter and sugar long enough to dissolve some crystals and incorporate air. Proper creaming yields a finer crumb and better rise.
- Flat, greasy cookies. Butter may have been too warm, or you over-creamed, warming the mixture. Start with cool room-temperature butter and stop creaming once light and fluffy.
- Not lemony enough. Increase zest by 1 to 2 teaspoons, or add a small amount of lemon paste. Avoid adding much more juice, which can upset the dough’s moisture balance.
- Tough cookies after storing. Exposure to air dries cookies out. Store airtight with parchment between layers. To re-soften, add a small piece of bread to the container or warm briefly in a low oven.
FAQs
- Question: Can I freeze the dough for later?
Answer: Yes. Portion and roll dough balls in sugar, then freeze on a tray until solid. Move to a freezer-safe bag for up to 3 months. Bake from frozen at 350°F, adding 1 to 2 minutes to the time and watching for lightly golden edges and soft centers.
- Question: How do I make the cookies thicker and chewier?
Answer: Chill the portioned dough for 20 to 30 minutes, double-coat in sugar, and avoid pressing the balls before baking. Use light-colored pans and remove from the oven as soon as edges set to keep centers soft.
- Question: Can I glaze these Lemon Sugar Cookies?
Answer: Absolutely. Whisk 1 cup powdered sugar with 2 to 3 tablespoons fresh lemon juice until smooth, then drizzle over cooled cookies. Let the glaze set before storing. The glaze intensifies citrus flavor and adds a subtle sheen.
- Question: Can I double the recipe?
Answer: Yes. Double all ingredients and divide the dough between two large bowls for easier mixing. Bake one sheet at a time for the most consistent results, or rotate two sheets halfway and swap rack positions.
- Question: What if I only have bottled lemon juice?
Answer: The cookies will still bake, but the flavor will be less vibrant. Fresh zest contributes essential oils that bottled juice cannot replicate. If possible, at least use fresh zest; it makes the biggest difference in citrus intensity.
- Question: How do I prevent the sugar coating from melting during storage?
Answer: Cool cookies completely before boxing. Store in an airtight container away from humid environments, and place parchment between layers. If humidity is high, add a small desiccant packet or a piece of dry paper towel to absorb moisture.
- Question: Can I use brown sugar instead of white sugar?
Answer: For the dough, white granulated sugar is key to the classic crisp edge and pale color. Brown sugar adds moisture and acidity, which can lead to more chew and deeper color, but it will deviate from the traditional lemon sugar cookie profile.
- Question: Why do my cookies taste salty?
Answer: Verify your measurements to ensure only 1/2 teaspoon salt was added and that you did not use salted butter. If using salted butter, reduce or omit the added salt to maintain balance with the bright lemon notes.
Conclusion
These Lemon Sugar Cookies strike the perfect balance of simplicity and elegance: a fast, dependable recipe that yields bakery-quality results with fresh, genuine citrus flavor. With their sparkling sugar crust, delicate crumb, and sunny aroma, they feel special in every season, from spring gatherings to holiday cookie trays. Follow the clear steps, lean on the advanced tips to fine-tune texture and brightness, and use the storage and adaptation ideas to fit any schedule or dietary need. Bake a batch today and share the sunshine—one zesty, tender cookie at a time.