
Introduction
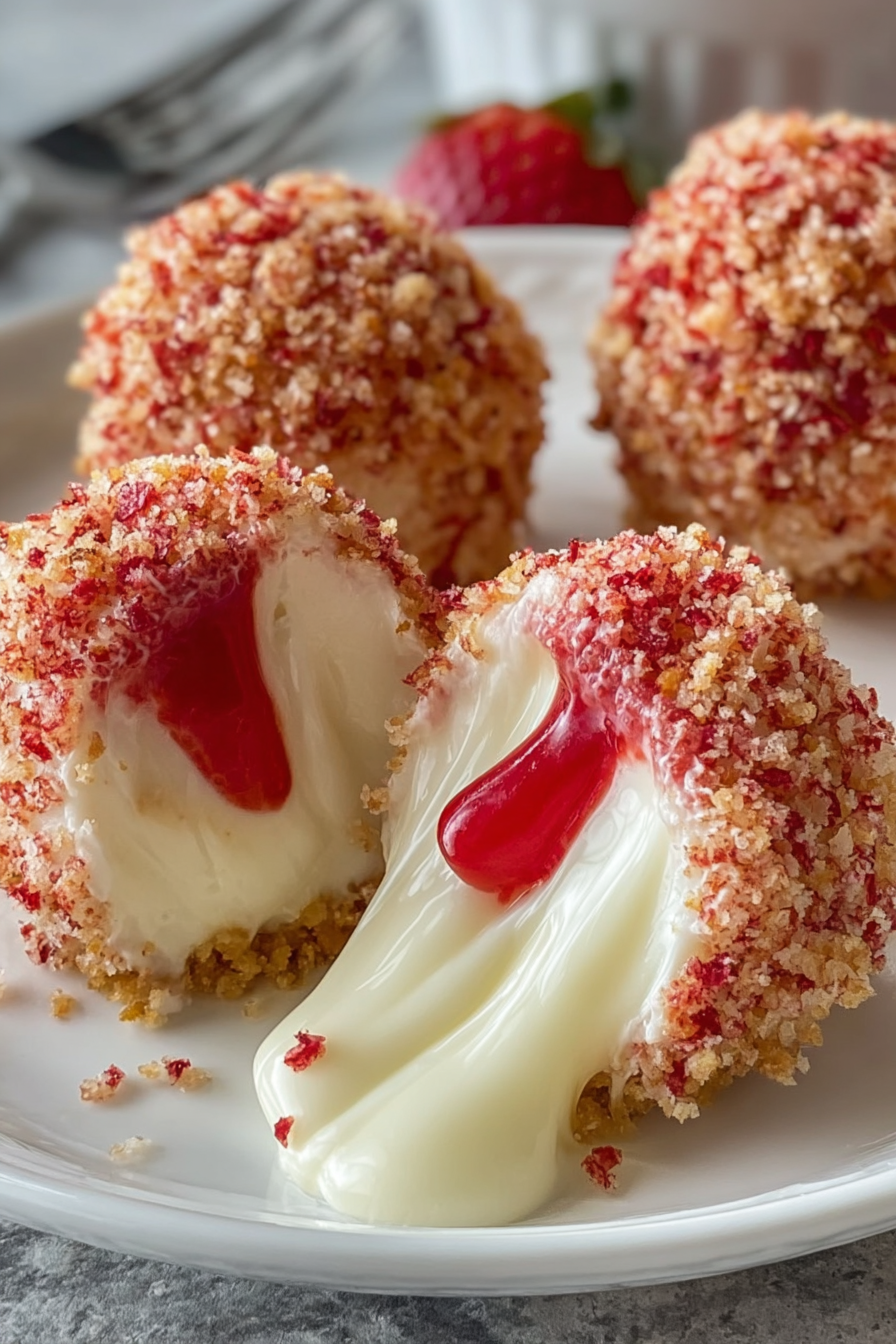
There’s something truly irresistible about Strawberry Crunch Cheesecake Bites — creamy, tangy cheesecake centers wrapped in a buttery golden crust, topped with a nostalgic strawberry crunch layer that adds both color and texture. These bite-sized desserts combine the decadence of cheesecake with the playful crunch of a strawberry crumble topping, making them perfect for any party, gathering, or sweet craving. Whether you’re hosting a summer celebration or just want to enjoy something elegant and easy, these little cheesecakes are sure to steal the spotlight.
Unlike traditional baked cheesecakes that can be time-consuming and tricky, these no-bake bites are simple, mess-free, and require minimal effort. You can make them ahead of time, freeze them for later, and serve them straight from the fridge when it’s dessert o’clock. They’re creamy, dreamy, and every bite bursts with strawberry sweetness and vanilla perfection.
My Recipe Story
My love for Strawberry Crunch Cheesecake Bites started as a childhood memory. I was always fascinated by those pink strawberry shortcake ice cream bars with their signature crunchy coating. When I began experimenting with homemade cheesecakes, I wanted to recreate that nostalgic crunch and creamy flavor in a more sophisticated yet approachable way. These cheesecake bites were the perfect fusion of both worlds.
Over the years, I’ve fine-tuned this recipe to achieve the ideal balance: the smooth, rich texture of cream cheese, the slight tang of sour cream, and the buttery, sweet crumble on top that gives every bite a satisfying finish. I often prepare these for birthdays, baby showers, and Valentine’s Day parties, and they never fail to disappear within minutes. Now, they’ve become one of my signature desserts — small in size but big in flavor and charm.
💡 Why You’ll Love This Recipe
- No-bake and fuss-free — perfect for beginners or busy bakers.
- Bite-sized portions make serving and cleanup a breeze.
- Beautiful strawberry crunch topping adds vibrant color and nostalgic flavor.
- Customizable — switch up the flavors, crusts, or toppings to suit your taste.
- Perfect for holidays, parties, or as a make-ahead treat for family and friends.
Ingredient Breakdown
The beauty of this recipe lies in its simplicity. Every ingredient plays a specific role in creating that luscious, creamy center and the addictive crunchy topping that makes these cheesecake bites so memorable.
Cream Cheese: The foundation of the filling, cream cheese provides richness and a smooth, creamy texture. Be sure to use full-fat cream cheese for the best consistency — reduced-fat versions tend to be too soft and watery.
Granulated Sugar: Adds sweetness and balances the tang of the cream cheese and sour cream. It also helps create that melt-in-your-mouth creaminess when whipped together.
Sour Cream: This ingredient gives the cheesecake filling its signature tang and extra smoothness. It lightens the density of the cream cheese, resulting in a silkier mouthfeel.
Vanilla Extract: A simple but powerful flavor booster. It enhances the sweetness and rounds out the flavor profile, making every bite more indulgent.
Golden Oreos or Graham Crackers: These serve as the base crust for the bites. The buttery crumbs provide a crunchy contrast to the creamy filling.
Butter: Melted butter binds the crumbs together, ensuring the crust holds its shape while adding rich flavor.
Freeze-Dried Strawberries and Golden Oreos: These combine to form the iconic strawberry crunch topping. The freeze-dried strawberries add real fruit flavor and vibrant color, while the cookies contribute sweetness and crispness.
Whipped Cream or Topping: Adds lightness to the cheesecake filling and a final flourish to each bite.
Equipment You’ll Need
- Hand or stand mixer
- Mixing bowls (medium and large)
- Silicone spatula
- Mini muffin pan or silicone molds
- Food processor (for crust and topping)
- Measuring cups and spoons
- Piping bag or spoon (for filling)
- Refrigerator space for chilling
Step-by-Step Directions
Step 1: Prepare the crust. In a food processor, pulse the Golden Oreos or graham crackers until they turn into fine crumbs. Mix the crumbs with melted butter until well coated. Press about one tablespoon of the mixture into the bottom of each mini muffin cup or silicone mold cavity, creating a compact crust. Chill in the fridge for 10–15 minutes to set.
Step 2: Make the cheesecake filling. In a large bowl, beat the softened cream cheese with granulated sugar until smooth and fluffy. Add the sour cream and vanilla extract, mixing until fully incorporated. The mixture should be thick but creamy, with no lumps. Fold in the whipped topping gently to add airiness without deflating the mixture.
Step 3: Assemble the bites. Spoon or pipe the cheesecake filling over the chilled crusts, filling each cavity almost to the top. Smooth out the tops with a spatula for an even look. Chill for at least 2–3 hours, or until firm enough to hold their shape.
Step 4: Prepare the strawberry crunch topping. Pulse freeze-dried strawberries and Golden Oreos together in a food processor until crumbly but not powdery. Mix in a tablespoon of melted butter to help the mixture adhere slightly. Sprinkle the crunchy mixture generously over each cheesecake bite.
Step 5: Chill and serve. Return the cheesecake bites to the refrigerator for another 30 minutes to allow the topping to set. Serve them chilled straight from the fridge, or freeze for up to 2 months for an easy grab-and-serve dessert.
Variations & Substitutions
These cheesecake bites are endlessly adaptable. Try swapping the strawberries for freeze-dried raspberries or blueberries for a colorful twist. You can also use chocolate sandwich cookies instead of Golden Oreos for a richer flavor. If you prefer a more traditional crust, graham crackers work beautifully too. For a dairy-free version, substitute vegan cream cheese and coconut whipped topping — the results are just as creamy and delicious. You can even add a swirl of strawberry jam or lemon curd inside the filling for a surprise burst of flavor in each bite.
💡 Expert Tips & Troubleshooting
- Always use softened cream cheese — cold cream cheese can create lumps in the filling.
- Chill the bites long enough so they hold their shape when removed from the molds.
- If your topping is too fine, add a bit more crushed cookies for texture balance.
- For a more vibrant color, add a tiny bit of freeze-dried strawberry powder to the filling.
- Keep the bites refrigerated until ready to serve to prevent the topping from softening.
Storage, Freezing & Make-Ahead
These Strawberry Crunch Cheesecake Bites are ideal for preparing in advance. Store them in an airtight container in the refrigerator for up to 5 days. If you’re planning for a big event, they also freeze beautifully — just place them on a baking sheet until solid, then transfer to a freezer-safe container with parchment paper between layers. When ready to serve, thaw in the refrigerator for 2–3 hours. You can even prepare the crust and filling a day ahead, assemble them, and add the strawberry crunch topping right before serving to keep the texture crisp.
Serving Ideas & Pairings
Serve these cheesecake bites on a tiered dessert tray for an elegant presentation, or line them up in mini cupcake liners for parties and buffets. Pair them with fresh berries or a drizzle of white chocolate for extra indulgence. For drinks, they complement perfectly with sparkling rosé, iced coffee, or even a refreshing strawberry lemonade. You can also serve them alongside other mini desserts like chocolate truffles or lemon bars for a colorful dessert spread.
FAQ
Can I use fresh strawberries instead of freeze-dried ones?
Fresh strawberries contain moisture and won’t give you the same crisp texture. Stick to freeze-dried strawberries for the signature crunch.
Can I make these without a food processor?
Yes! You can crush cookies and strawberries in a zip-top bag using a rolling pin and mix by hand.
What if I don’t have mini muffin pans?
You can use silicone molds, paper cupcake liners, or even make a full-size no-bake cheesecake in an 8×8-inch pan and cut into squares.
How long do they need to chill?
At least 3 hours for best texture. Overnight chilling gives the smoothest, most set filling.
Can I add toppings like chocolate drizzle?
Absolutely! Melted white or dark chocolate drizzled over the top adds a beautiful finishing touch and extra flavor.
Final Thoughts
Strawberry Crunch Cheesecake Bites are proof that desserts don’t need to be complicated to be impressive. With their smooth cheesecake filling, buttery crust, and nostalgic strawberry crunch, they’re a treat that delights both kids and adults alike. They’re easy to make, easy to serve, and impossible to resist. Whether you’re making them for a celebration or just to satisfy a sweet craving, these bites will bring smiles and compliments every single time. Once you make them, they’ll quickly become a staple in your dessert rotation — simple, elegant, and endlessly delicious.
Print
Strawberry Crunch Cheesecake Bites
- Total Time: 3 hours 25 minutes (including chilling)
- Yield: 24 bites
- Diet: Vegetarian
Description
Creamy, tangy cheesecake bites topped with a nostalgic strawberry crunch layer. A no-bake, bite-sized dessert perfect for parties and celebrations.
Ingredients
• 16 oz (450 g) cream cheese, softened
• ½ cup granulated sugar
• ½ cup sour cream
• 1 tsp vanilla extract
• 1 cup whipped topping or whipped cream
• 20 Golden Oreo cookies, crushed (divided use)
• 4 tbsp unsalted butter, melted
• ½ cup freeze-dried strawberries, crushed
• Optional: extra whipped cream or strawberry pieces for garnish
Instructions
- In a food processor, crush half of the Golden Oreos into fine crumbs. Combine with melted butter and press about 1 tablespoon of mixture into each mini muffin cup to form the crust. Chill for 10–15 minutes.
- In a large bowl, beat softened cream cheese and sugar until smooth and creamy. Add sour cream and vanilla extract, mixing until fully incorporated.
- Gently fold in the whipped topping until the filling is light and fluffy. Spoon or pipe mixture over chilled crusts. Smooth the tops evenly.
- In a food processor, blend remaining Golden Oreos and freeze-dried strawberries until crumbly. Sprinkle mixture generously over the cheesecake tops.
- Refrigerate for at least 3 hours, or until firm. Garnish with whipped cream or fresh strawberries before serving if desired.
Notes
For best texture, chill overnight. Store in an airtight container in the fridge for up to 5 days or freeze for up to 2 months. Perfect for parties, dessert buffets, or as a sweet make-ahead treat.
- Prep Time: 25 minutes
- Cook Time: 0 minutes
- Category: Dessert
- Method: No-Bake
- Cuisine: American