Introduction
If you’re looking for the ultimate party appetizer that’s colorful, fun, and full of flavor, then this Seven-Layer Taco Dip is it! Packed with creamy, cheesy, and zesty layers, this dish is always a guaranteed hit at potlucks, game nights, and family gatherings. Best of all, it’s easy to assemble with simple ingredients you likely already have on hand. Every bite is a perfect balance of textures and flavors, from creamy refried beans to tangy salsa and melty cheese.
My recipe story
Seven-Layer Taco Dip has been a family favorite for as long as I can remember. Growing up, my mom would prepare this dip for every birthday, barbecue, and holiday party. Guests always hovered around the dish until it disappeared within minutes. Over time, I started experimenting with different variations, adjusting spice levels, swapping in homemade salsa, and adding fresh garnishes. Now, it has become one of my signature dishes that I love to bring to gatherings. It’s nostalgic yet versatile, and I love how it brings people together over a shared love of Mexican-inspired flavors.
💡 Why You’ll Love This Recipe
- It’s a crowd-pleaser that disappears quickly at any gathering.
- Simple ingredients make it budget-friendly and accessible.
- No cooking required—just assemble and chill before serving.
- Customizable layers allow you to adjust flavors to your liking.
- Perfect for make-ahead prep so you can enjoy the party stress-free.
Ingredient breakdown
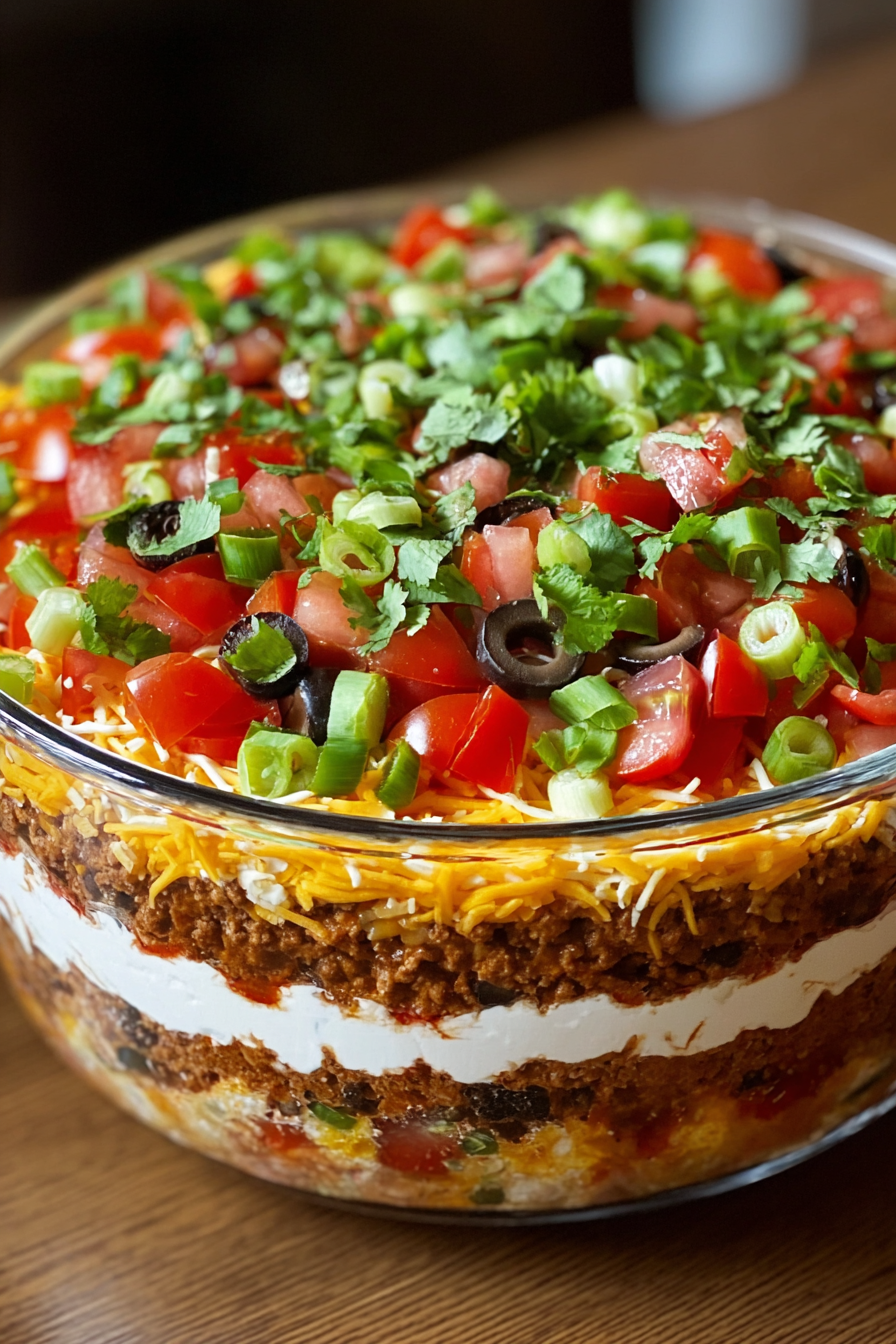
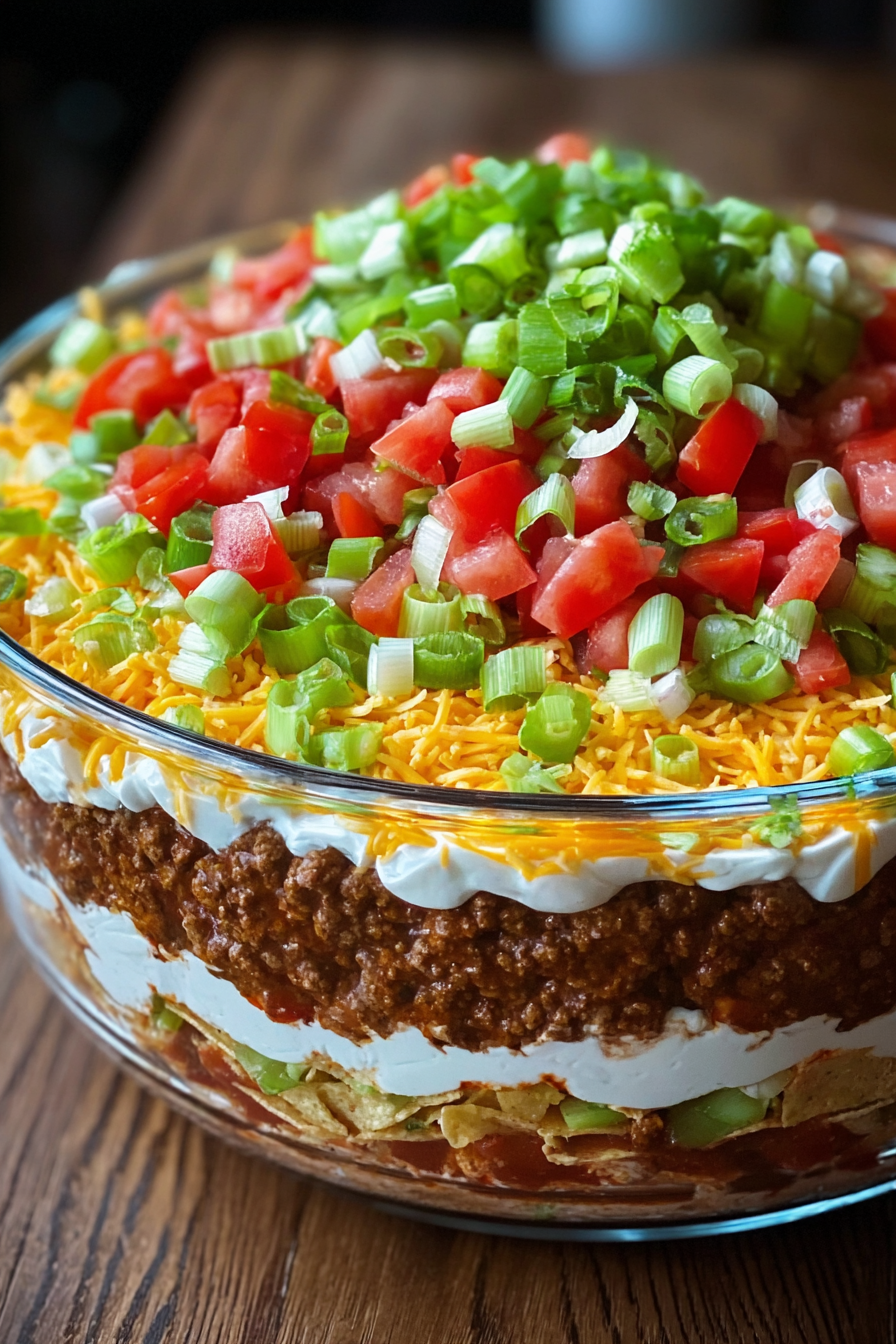
The beauty of Seven-Layer Taco Dip lies in its simple, colorful, and flavorful ingredients. Each layer plays a role in creating a balanced bite that is both refreshing and indulgent. Let’s take a closer look at what makes this dish so irresistible.
At the base, refried beans form a hearty, creamy foundation. Mixing them with taco seasoning ensures that even the first bite packs a punch of bold Mexican-inspired flavor. Sour cream adds a cooling and velvety texture that balances the spice, while salsa introduces a tangy, slightly spicy element that brightens the dip.
The shredded cheddar cheese melts slightly into the salsa and sour cream layers, giving you that gooey, cheesy goodness that everyone loves. For even more freshness, you can add classic toppings like shredded lettuce, diced tomatoes, sliced olives, or even guacamole. Together, these ingredients create a layered masterpiece that is as visually appealing as it is delicious.
Equipment you’ll need
- 1 large glass baking dish (9×13 works well for presentation)
- Mixing bowls for combining ingredients
- Measuring cups and spoons
- Rubber spatula or offset spatula for spreading layers evenly
- Plastic wrap or lid for covering before chilling
Step-by-step directions
- Prepare the beans: In a mixing bowl, combine the refried beans with the taco seasoning until fully blended. This step ensures the beans are flavorful and seasoned throughout. Spread the mixture evenly at the bottom of your serving dish to form the sturdy first layer.
- Add the sour cream: Using a spatula, gently spread the sour cream over the refried beans. Take care to cover the beans entirely for a smooth and creamy second layer that balances the boldness of the beans.
- Spoon on the salsa: Carefully pour the salsa over the sour cream and spread it evenly. Choose a chunky salsa for more texture, or a smoother salsa if you prefer less liquid. This layer adds zest and color to the dip.
- Sprinkle the cheese: Scatter shredded cheddar cheese over the salsa layer. The cheese not only adds a salty richness but also creates a visually appealing golden layer that ties the flavors together.
- Customize your toppings: While optional, this is where you can add extras like shredded lettuce, diced tomatoes, sliced black olives, or chopped green onions. These toppings add freshness, crunch, and vibrant color.
- Chill before serving: Cover the dish with plastic wrap and refrigerate for at least one hour. This resting time allows the flavors to meld together and makes the dip easier to scoop.
- Serve and enjoy: Bring out your layered dip when guests arrive. Serve with tortilla chips, pita chips, or veggie sticks for a perfect party snack.
Variations & substitutions
This recipe is endlessly versatile. If you want to add a layer of guacamole, simply spread it between the sour cream and salsa for extra creaminess and freshness. For a protein boost, add a layer of cooked and seasoned ground beef, chicken, or turkey above the refried beans. If you prefer a lighter version, swap sour cream for Greek yogurt. Vegans can enjoy this dip by using dairy-free sour cream and shredded cheese alternatives. Don’t hesitate to get creative with toppings—jalapeños, corn, or even pickled onions add exciting twists to the classic version.
💡 Expert Tips & Troubleshooting
- Use a clear glass dish so the colorful layers are visible and eye-catching.
- Spread each layer evenly to ensure every scoop has all the flavors.
- If your salsa is too watery, drain excess liquid before adding to prevent sogginess.
- Make ahead and chill for at least an hour to allow the flavors to blend.
- Keep tortilla chips sturdy to handle the thick layers without breaking.
Storage, freezing & make-ahead
Seven-Layer Taco Dip is best enjoyed fresh, but it can be stored in the refrigerator for up to 3 days. Be sure to cover the dish tightly with plastic wrap to keep it from drying out. For make-ahead convenience, you can prepare the bean layer and sour cream mixture a day in advance, then assemble the remaining layers shortly before serving. Freezing is not recommended, as dairy and salsa tend to separate when thawed, which affects both texture and flavor.
Serving ideas & pairings
This dip is perfect with crispy tortilla chips, but you can also serve it with pita chips, pretzel thins, or even crunchy veggie sticks for a lighter option. For a full party spread, pair it with Mexican-inspired dishes like chicken quesadillas, nachos, or tacos. A refreshing margarita or a cold Mexican beer makes an excellent drink pairing, while non-alcoholic options like lime soda or agua fresca complement the dip’s zesty flavors beautifully.
FAQ
Can I make this dip ahead of time?
Yes! You can prepare it a few hours in advance and store it in the refrigerator until serving. Just keep it covered.
Can I use homemade refried beans?
Absolutely. Homemade beans can add more depth of flavor and control over seasoning.
What are the traditional seven layers?
They usually include refried beans, sour cream, salsa, cheese, guacamole, lettuce, and tomatoes, but you can mix it up as you like.
How can I make it spicier?
Add diced jalapeños, spicy salsa, or a sprinkle of cayenne pepper to the layers.
Can this dip be made vegan?
Yes, use plant-based cheese and sour cream alternatives for a delicious vegan-friendly version.
Final thoughts
Seven-Layer Taco Dip is a classic for good reason—it’s delicious, visually stunning, and easy to make. Whether you stick to the traditional layers or put your own creative spin on it, this dish is guaranteed to be a hit at your next party or gathering. It’s the kind of recipe that invites people to dig in, share laughs, and enjoy good food together. Once you try it, you’ll understand why this appetizer has stood the test of time as a favorite for every occasion.
Print
Seven-Layer Taco Dip
- Total Time: 20 minutes
- Yield: 12 servings 1x
- Diet: Vegetarian
Description
This colorful, flavorful taco dip is layered with beans, sour cream, salsa, and cheese for the ultimate party appetizer. Always a crowd favorite!
Ingredients
-
1 can (16 oz) refried beans
-
1 packet taco seasoning
-
1 cup sour cream
-
1 cup salsa
-
1 cup shredded cheddar cheese
-
1 cup shredded lettuce
-
1 cup diced tomatoes
-
1/2 cup sliced black olives
-
2 green onions, chopped
Instructions
-
In a bowl, mix the refried beans with taco seasoning until fully blended, then spread evenly in a 9×13-inch dish.
-
Spread the sour cream over the bean layer, covering it completely.
-
Evenly spoon salsa over the sour cream, smoothing gently with a spatula.
-
Sprinkle shredded cheddar cheese over the salsa layer.
-
Top with shredded lettuce, then layer diced tomatoes on top.
-
Add sliced black olives and green onions for garnish.
-
Cover and refrigerate for at least 1 hour before serving with tortilla chips.
Notes
For extra creaminess, add a guacamole layer. Best enjoyed within 2–3 days. Serve with sturdy tortilla chips or veggie sticks.
- Prep Time: 20 minutes
- Cook Time: 0 minutes
- Category: Appetizer
- Method: No-Cook
- Cuisine: Mexican-American